While updating Windows 10, many users have reported getting the DRIVER PNP WATCHDOG Blue Screen of Death error. Usually once this happens, the update process gets stuck and you will be forced to restart the machine. Though Blue Screen of Death errors are always scary, most of them are easily fixable. The reason for DRIVER PNP WATCHDOG BSOD error could be anything from a damaged PC registry, outdated drivers, faulty hard drives, a malware attack etc. Read on, to learn how to solve this BSOD issue.
Most of the times, when you get BSOD errors, you might be prevented from logging into Windows through normal booting. In that case, you can login using safe mode and then try out the methods listed in this article one by one to fix the problem.
How To Safe Boot Into Windows 10
1. First of all, shut down your PC completely. Now turn it on by pressing the power button. The moment you see the manufacturer’s logo on the screen, turn off the PC by long pressing the power button again. Repeat this process 2 to 3 times until the Preparing Automatic Repair screen appears instead of the manufacturer’s logo screen.
2. Wait for a few seconds when the Diagnosing your PC screen appears.
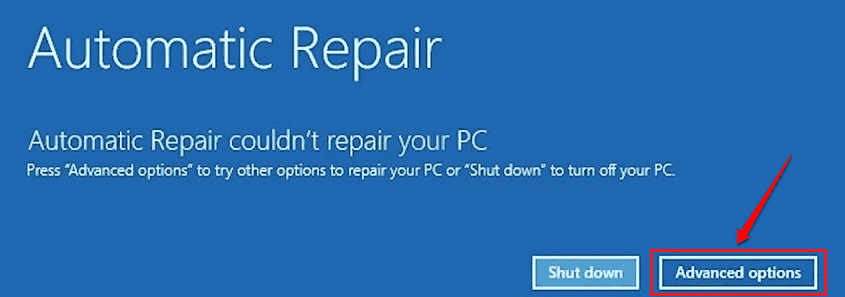
Once the Startup Repair screen shows up, click on the button Advanced options.
3. Now Choose an option screen will come up. Click on the Troubleshoot option.
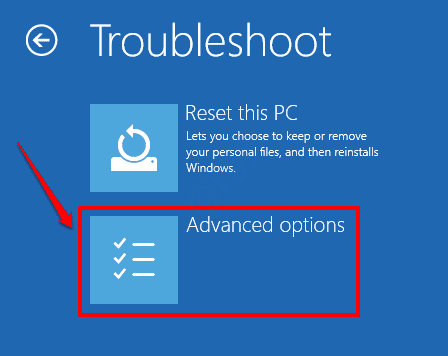
4. As next, in the Troubleshoot window, choose Advanced options.
5. Click on Startup Settings tab from the Advanced options window.
6. The following screen will now be able available for you, where you have to click on the Restart button at the bottom right corner.
7. As next, press either the number key 4 or the number key 5 to enter into the system in Safe mode.
System will now restart in Safe mode. Now you can try out the methods listed below one by one to fix the Driver PNP Watchdog BSOD error.
Method 1: Check Volume Shadow Copy Service
Volume Shadow Copies are used for backup and other related purposes, and is managed by the Volume Shadow Copy (VSS) service. If this service is not running properly, sometimes it can cause issues like DRIVER PNP WATCHDOG BSOD error. Follow the steps below to ensure that the VSS service is properly running in your machine.
1. Bring up the Run command box by pressing WIN + R keys together. Type in services.msc and hit Enter key.
2. Scroll all the way down and double click on the service named Volume Shadow Copy.
3. Now click on General tab first. Then set the Startup type as Automatic. Make sure the Service status is Running. If not, click on the Start button and get it to running state.
Once all done, hit Apply button followed by the OK button.
Restart your computer and check if the DRIVER PNP WATCHDOG BSOD problem is fixed or not.
Method 2: Run a System Wide Antivirus Scan
Driver PNP Watchdog errors are sometimes caused because of malware attacks. Hence running a system wide antivirus scan is always useful. You can either use your third party antivirus software or the built in Windows Defender for this purpose. Here we have listed out the steps to run the scan using Windows Defender.
1. Bring up the windows Settings app by pressing the WIN + I keys together. Click on the Update & Security tab.
2. Click on Windows Security tab in the left window pane and then on the right window pane, click on Virus & threat protection option.
3. As next, click on the link Scan options under Virus & threat protection.
4. Choose the radio button associated with the Full scan option and once done, click on the Scan now button at the bottom.
5. Once Windows Defender finishes the scan, if any malicious files are present, Windows Defender will give you instructions on how to proceed. Follow those instructions to finish the process.
Restart your machine and check if the DRIVER PNP WATCHDOG BSOD error is gone or not.
Method 3: Repair PC Registry Using System File Checker
If the DRIVER PNP WATCHDOG BSOD error is caused because of corrupted system files, System File Checker utility can be used to find and fix those corrupted files. Here is how to run the SFC command tool in windows 10:
1. Type in cmd to windows start menu search bar. From the results, right click on Command Prompt and then click on Run as administrator.
2. As next, copy paste the following command into command prompt and hit Enter key.
sfc /scannow
Restart your machine when the scan is complete. Once you restart your machine, all the corrupt files will be replaced. Check if the issue is gone or not.
Method 4: Fix Corrupt System Files Using DISM Tool
Another useful tool in fixing the corrupt system files is the DISM (Deployment Image Servicing and Management) tool. Please follow the steps below to run the DISM tool.
1. In windows start menu search bar, type in cmd and from the results that appear, right click on Command Prompt and then click on Run as administrator option.
2. Copy paste the following command onto command prompt and hit Enter key.
DISM /Online /Cleanup-Image /RestoreHealth
Restart your machine once the scan is complete and check if the issue is resolved.
Method 5: Run CHKDSK Command Tool
Your hard disk might have some unwanted files or folders and this can also cause the DRIVER PNP WATCHDOG BSOD problem. Perform CHKDSK to effectively resolve the issue if that is the case.
1. Click on windows start menu search, type cmd. Right click on Command Prompt and then click on the option Run as administrator.
2. As next, copy paste the following command and hit Enter key.
chkdsk C: /f /r /x
Parameters:
- C: – Drive to scan
- /f – This parameter will attempt to fix any errors that are found
- /r – This parameter will locate for bad sectors and recovers any readable information
- /x – This parameter will forcefully dismount the volume you are about to check before the scan begins
When you get the following prompt with Y/N option, press Y and press Enter.
Restart your machine for the scan to take place. If you can’t boot in normal mode, boot in through safe mode. Refer to the section, How To Safe Boot Into Windows 10, at the beginning of the article for the steps.
Method 6: Tweak System Service Settings
Faulty services can cause BSOD errors, DRIVER PNP WATCHDOG BSOD error is not an exception. Sometimes, tweaking some of the required system services can fix the issue. Follow the steps below to achieve the same.
1. Type in cmd into windows start menu search bar. Right click on Command Prompt and click on Run as administrator option.
2. In the command prompt, type in the following commands one by one and press Enter key after each one.
net stop wuauserv
net stop cryptSvc
net stop bits
net stop appIDSvc
3. Now open windows file explorer and go to the following path:
C:\Windows\
Find and rename the folder SoftwareDistribution to SoftwareDistribution.old
4. As next, navigate to the path:
c:\WIndows\System32\
Rename the folder catroot2 to catroot2.old.
5. Now go back to admin mode command prompt and enter the following commands one by one. After each command, press enter key.
net start wuauserv
net start cryptSvc
net start bits
net start msiserver
net start appIDsvc
Close command prompt once done.
6. Now type in powershell to windows start menu search bar and hit Enter key. Right click on Windows PowerShell and choose the Run as administrator option.
7. In the PowerShell window, copy paste the following command and hit Enter key.
wuauclt.exe /updatenow
Restart your PC and check if the BSOD error is gone or not. If not, please head on to the next method.
Method 7: Update Device Drivers
DRIVER PNP WATCHDOG BSOD error could very well be caused because of corrupted or outdated system drivers. Device Manager is a powerful utility that shows a yellow warning sign against corrupt / outdated system drivers. You should update all such outdated drivers.
1. Press WIN + R keys together and bring up the Run dialog box. Now type in devmgmt.msc and hit the Enter key.
2. When the Device Manager window opens up, expand every single section and look out for yellow warning signs against the drivers. If there is a yellow warning symbol against a driver, right click on it and then click on the Update driver option.
3. As next, click on the Search automatically for updated software option for windows to find suitable updates for your drivers.
Repeat the steps 2 and 3 above for all the drivers with yellow warning sign.
Restart your machine. If the issue is still not resolved even after updating the corrupt drivers, try updating other major drivers like network adapters, Bluetooth driver, Display adapters etc.
Method 8: Run Windows Update Troubleshooter
1. Launch windows Settings app by pressing the keys WIN + I together. Click on the Update & Security tab.
2. In the left window pane, click on Troubleshoot option. In the right window pane, select Windows Update and then click on the Run the troubleshooter button. Follow on screen instructions.
After issues are found and fixed, restart your machine and check if the problem is resolved.
Method 9: Run Windows Update
Now that the windows update troubleshooter is run, you can try running the Windows updater to check if the problem is gone.
1. Open Settings app by pressing the WIN + I keys together. Click on the tab Update & Security next.
2. As next, in the left window pane, click on Windows Update. In the right window pane, click on Check for updates.
3. Windows will now check for latest updates available. If found, they will be downloaded and installed.
4. If any new updates are installed, you will now be able to see a button named Restart now. Click on it to restart the machine and for the changes to take over.
Check if the problem is resolved or not. If still not resolved, try out the final method.
Method 10: Reset Your PC
If none of the above methods worked, then you can try resetting the PC. But make this the last option as this will reset all your system settings.
1. Shut down your PC completely. Now turn it on by pressing the power button. The moment you see the manufacturer’s logo on the screen, turn off the PC by long pressing the power button again. Repeat this process until the Preparing Automatic Repair screen appears instead of the manufacturer’s logo screen.
2. Click on the Advanced options button from the Startup Repair screen.
3. As next, click on the Troubleshoot option.
4. Now in the Troubleshoot window, click on the option Reset this PC.
5. If you want to retain your personal files, choose the option Keep my files. If you are ok with your files also being removed, click Remove everything option.
Once you choose one of the options above, click on the Reset option in the screen that follows to proceed with the system reset. Hopefully this fixes your DRIVER PNP WATCHDOG BSOD problem.
Please leave in comments which method worked for you.


