OneDrive is a cloud storage solution integrated with the Windows OS. With the introduction of Windows 11, Microsoft is trying to force this integration more than ever. Are you trying to disable the OneDrive once and for all in your Windows 10 or 11 device? There is a way you can disable the OneDrive in your system. Just enact all the steps we have mentioned here.
How to disable OneDrive in Windows 10, 11
There are quite a few steps to disable different parts of the OneDrive process. You can enact all the steps or you can disable OneDrive partially.
A. Disable the File Syncing
B. Stop the auto-start of OneDrive
C. Unlink OneDrive from your system
D. Uninstall the OneDrive
E. Alternative options of cloud storage
We have explained all the steps with detailed instructions.
A. Pause the File Syncing process
The best option to disable the OneDrive is to disable the File Syncing process. This will stop the background syncing process, disabling the proper function of the cloud storage.
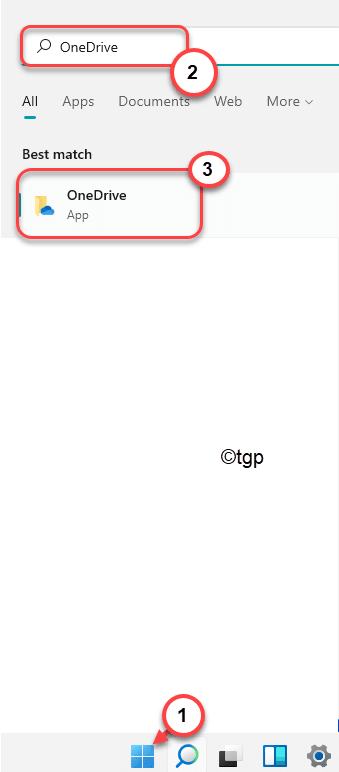
1. If you haven’t opened the OneDrive yet, click on the Windows icon and type “OneDrive“.
2. Then, tap on the “OneDrive” in the search results.

Close the OneDrive folder if that opens up.
3. Now, click on the icon on the taskbar to ‘Show hidden icons’ and then, click on the “OneDrive” icon on the Taskbar.

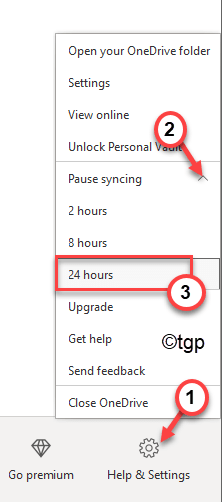
4. Then, click on “Help & Settings” in the OneDrive menu.
5. Further, tap on the “Pause syncing” menu and choose the “24 hours” from the drop-down list.

Please take note that this will stop the syncing process for a whole day. But, you have to redo all these steps to pause the syncing process another day. But there are certain measures you can take to remove all the OneDrive-synced folders from your system to stop OneDrive from syncing those.
Remove the synced folders from OneDrive
You can easily remove the synced folders from the OneDrive account.
1. At first, click on the arrow icon on the taskbar to show the hidden icons.
2. Then, tap on the grey cloud-shaped OneDrive icon in the hidden icons menu.

3. After that, click on the “Help & Settings” button.
4. Then, tap on “Settings” to open it.

5. Once the Microsoft OneDrive settings opens up, go to the “Account” tab.
6. Further, click on “Choose Folders“.

7. Inside the window, uncheck the “Make all files available” box.
8. Then, uncheck all the folder boxes to stop syncing those folders.
9. Finally, click on “OK” to complete this process.

Finally, close the OneDrive window.
This will stop OneDrive from uploading your files to the cloud.
B. Stop the autostart of the OneDrive
Now, you can easily disable the OneDrive from automatic startup during Windows 11 startup and remove the OneDrive icon from the taskbar.
1. At first, tap on the arrow icon in the taskbar and then, click on the OneDrive icon in the hidden icons.

2. Then, click on the “Help & Settings” option.
3. After that, click on the “Settings“.

4. When the ‘Microsoft OneDrive’ window opens up, go to the “Settings” menu.
5. After that, uncheck the “Start OneDrive automatically when I sign to Windows“.
6. Then, click on “OK” to save it.

This will make sure that OneDrive doesn’t start up automatically when your computer starts up.
C. Unlink OneDrive in Windows 11
If only disabling the OneDrive syncing process doesn’t solve your problem, you can unlink the OneDrive and get rid of it any time you want.
1. At first, tap on the arrow icon in the taskbar and then, click on the OneDrive icon in the hidden icons.

2. Then, click on the “Help & Settings” option.
3. After that, click on the “Settings“.

4. Next, go to the “Account” tab.
5. Here, tap on the “Unlink this PC” option to unlink your OneDrive from your system.

6. Further, confirm the process with a click on “Unlink account“.

Once you have done that, OneDrive will be unlinked from your system. So,
D. Uninstall the OneDrive
Finally, if you don’t want the OneDrive app at all, you can just uninstall it from your computer.
1. At first, press the Windows key+I keys together.
2. Then, tap on the “Apps” from the left-hand side.
3. Now, select the “Apps & Features” option from the left pane.

4. Now, click on the search box and type “OneDrive“.
5. You will see that ‘OneDrive’ has appeared in the search results. Tap on “OneDrive” to select it.
6. Then, click on the three-dot menu and click on “Uninstall“.

7. After that, tap on “Uninstall” again to completely uninstall it from your computer.

This will uninstall the OneDrive from your computer.
E. Alternative Cloud Storage options
Once you have completely disabled the OneDrive, you will need some alternative cloud storages to replace it.
There are quite a few cloud storage options you can use, such as –
a. Google Drive – Offers 15 GB of free space for a personal account. You can download the Google Drive app on your PC as a substitute for the OneDrive account.
b. Mega– Mega is another good alternative you can use.