If you want to disable the Control Panel and/or the Settings menu in Windows 11, you are just in the right place. In this article, we are going to explain the process of how to disable the Control Panel and Settings.
How to disable the Control Panel and/or Settings in Windows 11
You can disable the Control Panel and Settings using two distinct methods.
A. Using the Registry Editor
B. Using the Local Group Policy Editor
You can choose any of these two ways to effectively disable the Control Panel and Settings.
A. Use the Registry Editor
This method involves the registry editor in the process.
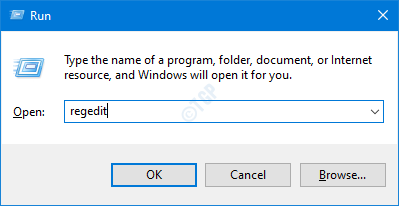
1. At first, press the Windows key+R keys together.
2. Then, write “regedit” and click on “OK“.

IMPORTANT–
You are going to create a new key in the Registry Editor. Any wrong alteration of the existing registry editor may lead to further errors.
a. Once you have opened the Registry Editor, you will need to click on the “File” and then click on “Export“.
b. Save the backup in a secure place.

If anything goes wrong, you can easily restore the registry to its original state.
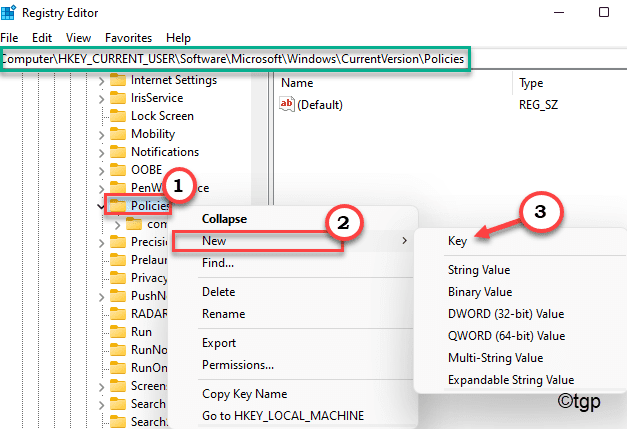
3. When the Registry Editor opens up, expand the header file or simply paste this address in the address bar and hit Enter.
HKEY_CURRENT_USER\Software\Microsoft\Windows\CurrentVersion\Policies
4. Now, on the right-hand side right-click on the “Policies” key and click on “New>” and further click on “Key“.

5. Name this key as “Explorer“.
6. Now, on the right-hand side, “New>” and tap on “DWORD (32-bit) Value” to create a new key.

7. Next. name this key as “NoControlPanel“.
8. After that, double-click on the key to change it.

9. Set the value to “1” for this new key.
10. Then, tap on “OK” to save this change.

11. After that, go to this location –
HKEY_LOCAL_MACHINE\SOFTWARE\Microsoft\Windows\CurrentVersion\Policies
12. Check if there is an ‘Explorer’ key already. Otherwise, right-click on the space on the right-hand side and click on “New>” and further click on “Key“.

5. Set the name of the new key as “Explorer“.
6. Now, on the right-hand side, right-click on “New>” and tap on “DWORD (32-bit) Value“.

7. Rename this new key as “NoControlPanel“.
8. Next, double-click on the “NoControlPanel” key to modify it.

9. Again set the value of the key to “1“.
10. Further, hit Enter to save this particular change.

After doing all these modifications, finally, you can just close the Registry Editor and restart the machine. After that, try to access the Control Panel and Settings window.
B. Using the Local Group Policy Editor
If you don’t want to use the Registry Editor, you can use the Local Group Policy Editor.
1. At first, press the Windows key+R keys together.
2. Then, type “gpedit.msc” and hit Enter.

3. When the Local Group Policy Editor appears, go this way –
User Configuration > Administrative Templates > Control Panel
4. Then, on the right-hand side, you will find the “Prohibit access to Control Panel and PC settings“.
5. Next, double-click on the particular policy to modify it.

6. Then, set the policy to “Enabled“.
7. Finally, click on “Apply” and “OK” to save this setting on your computer.

Close the Local Group Policy Editor window.
This will disable the Control Panel and Settings in Windows 11. If you want to re-enable the settings and control panel once again, you just have to disable the particular policy on your computer. Then, Settings and Control Panel will work just fine.