Did you know Windows has the option to collect and store text and ink data by the user? Yes!! To adapt the handwriting recognition to the vocabulary and handwriting style of the user windows uses this data. Data collected includes all outgoing messages in Windows Mail, and MAPI enabled email clients, as well as URLs from the Internet Explorer browser history. Data is used by Machine learning programs and Natural Language Processing programs to develop better handwriting recognition technology. The amount of ink that may be saved is limited to 50 MB, while text information is limited to about 5 MB. When these restrictions are reached and fresh data are gathered, the older data is removed to make way for the new data.
We recommend you keep the Automatic Learning feature Enabled to get a personalized user experience. But if you want to disable the Automatic Learning feature you can do it in two ways. Let’s see how we can do it.
Method 1: Using Group Policy Editor
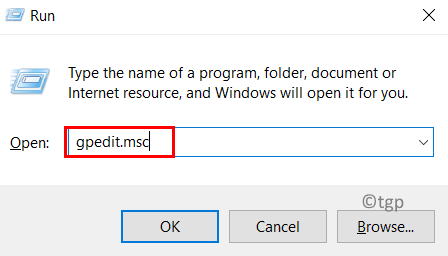
Step 1: Press Win + R then type gpedit.msc and press Enter. Press Yes if you are prompted UAC (User Account Control) popup.

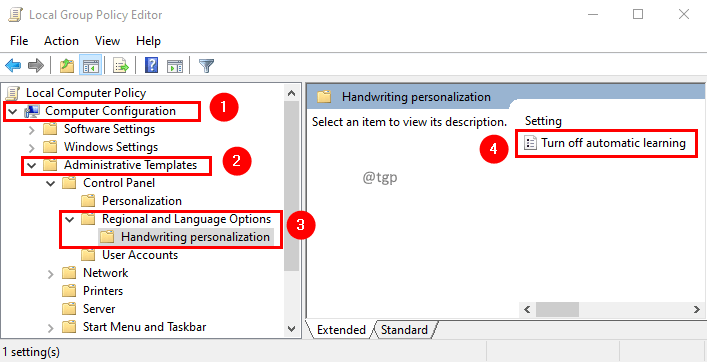
Step 2: Navigate to the below location in the Local Group Policy Editor window
Computer Configuration\Administrative Templates\Control Panel\Regional and Language Options\Handwriting personalization
Step 3: Double click on Turn off automatic learning.

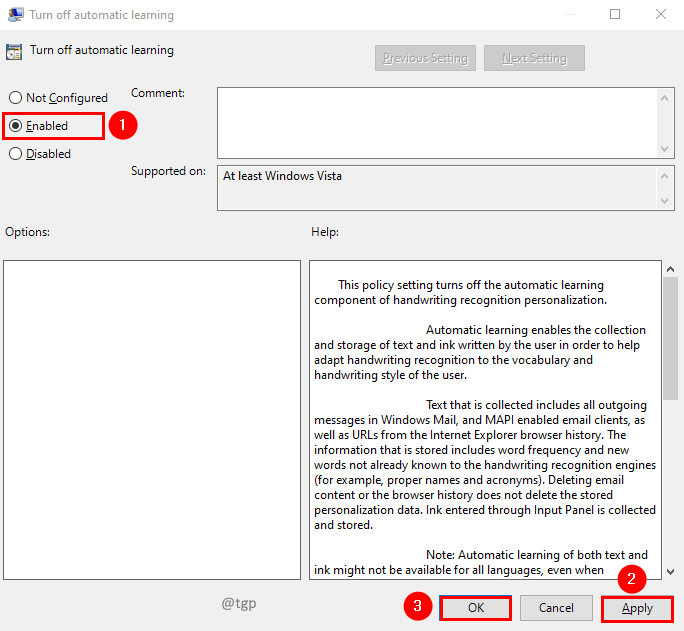
Step 4: In the Turn off automatic learning window, select Enabled and click Apply followed by OK.

Step 5: Now restart your system to make changes effective.
Note:
- When you enable this policy setting, the Automatic Learning feature stops and the data stored previously will be deleted.
- If you want to enable the Automatic Learning feature, then set this policy to Disabled or Not Configured.
- This feature cannot be controlled from the Control Panel. It can be either controlled by the policy editor or registry editor.
Method 2: Using Registry Editor
Step 1: Press Win+R, then type regedit and click OK. Press Yes if you are prompted UAC (User Account Control) popup.

Step 2: Navigate to the below registry key.
HKEY_LOCAL_MACHINE\SOFTWARE\Policies\Microsoft\InputPersonalization
Step 3: If you don’t find InputPersonalization in the path, add the key. Right-click on the Microsoft folder and select New from Context Menu. In Submenu of New, select Key.

Step 4: New folder will be created under the Microsoft folder. Give InputPersonalization as a name for the new folder.

Step 5: Now add two DWORD values to InputPersonalization. To do that, right-click and select New on the context menu. From the submenu of New, select DWORD (32-bit) Value.

Step 6: Give Dword value name as RestrictImplicitTextCollection and RestrictImplicitInkCollection.

Step 7: Double click on RestrictImplicitTextCollection and RestrictImplicitInkCollection values to edit it. In the Edit DWORD (32- bit) Value window, set the Value data to 1 to disable Automatic learning. If value data is set to 0, Automatic Learning will be enabled. Click OK.


Step 8: Restart the system to make changes effective.
That’s All! Hope this helps. Please comment and let us know. Thanks for reading.