While running a standalone installer for the DirectX web package on your Windows machines, you may have seen this error message “DirectX Setup could not download the file” in the setup screen. As an obvious result, the entire setup process gets stuck, and DirectX installation halts! Usually, upon the user’s request, DirectX setup downloads the latest DirectX package from the server and installs it. Then, this error message appears.
Fix 1 – Clear DNS cache using codes
You can clear the DNS cache only from a terminal.
Step 1 – So, use the Win key to pop up the search box. Then, type “cmd“.
Step 2 – Just right-tap the “Command Prompt” that appears in the search result and tap “Run as administrator” to open it.
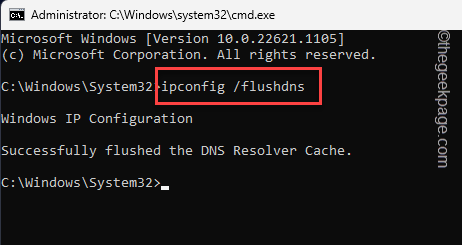
Step 3 – When you have opened up the terminal box, copy-paste this and hit Enter.
ipconfig /flushdns
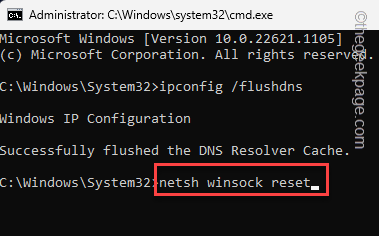
Step 4 – After running the command, type or copy-paste this in the terminal and hit Enter to run the
netsh winsock reset
Once the command successfully executes, it will show this statement –
Successfully reset the Winsock Catalog.
You must restart the computer in order to complete the reset.
So, exit the terminal. Then restart your system. Once the system restarts, test it out.
Fix 2 – Use the offline installer
You can use the offline installer that contains the package itself and is easily installable in offline conditions as well.
Step 1 – You can directly download the installer from the Microsoft website* or from here.
Step 2 – Once you have found the package, click “Download” to download it directly.
DirectX Runtime offline installer will start to dowload. After this, you may close the browser.
Step 3 – Open the File Explorer and reach the DirectX package.
Step 4 – Then, double-tap the direct package to run the installer file.
Step 5 – On the Accept page, tap “Yes” to proceed.
Step 6 – Click “Browse” to browse a location to extract the package.
Step 7 – Now, select a particular folder from the expanded list.
Step 8 – Then, click “OK“.
Step 9 – Now, go to folder where you have extracted this package.
Step 10 – After this, go to the extracted directory.
Step 11 – Once you are there, identify the “DXSETUP” application. Double-tap it to start the installation process.
Now just follow the on-screen wizard to follow the steps to install the DirectX package on your computer.
Don’t forget to restart the system.
*NOTE – You should not download any DirectX package from any third-party websites. These driver packages may contain malware, trojans, or any other third-party infection. Do not download or run untrusted, unsigned driver packages on your system.
Fix 3 – Update DirectX using Windows Update
Windows itself delivers all the DirectX packages via various Windows Update streams. Make sure to install all the updates on your computer.
Step 1 – Open Windows Settings. You can do this using the Win key+I keys together.
Step 2 – Then, head on to the “Windows Update” menu.
Step 3 – After that, on the right-hand page, check whether Windows is already downloading updates. If that isn’t the case, click “Check for updates” .
Windows will automatically configure the latest version of updates and start to download those. These should contain the latest update for DirectX package.
Step 4 – Once all the necessary updates are installed on the system, click “Reboot now” to restart the system.
Allot Windows a while to complete this update installation process.
When your system boots up, you can check the current version of the DirectX and track the installed update for more information.
Fix 4 – Uninstall & reinstall the graphics driver
Uninstalling the existing graphics card driver and reinstalling it should address the DirectX driver issues.
Steps to uninstall the graphics driver –
Step 1 – Write down “device” in the search box.
Step 2 – Then, tap “Device Manager” to open it.
Step 3 – Once the Device Manager screen appears, use the mouse to expand the “Display adapters” section.
Step 4 – There, right-tap the display adapter and click “Uninstall device“.
Step 5 – Now, on the warning message, check the “Attempt to remove the driver for this device.” tick box.
Step 6 – Finally, click “Uninstall” to uninstall it from your system.
Your computer screen will turn black and unresponsive for a brief few seconds.
Exit all the opened windows and restart your computer.
When the computer is restarting, Windows will load up the default display driver for your computer. You can use that for now. But, you have to download and install the latest driver from the manufacturer’s website.
Steps to install the latest graphics driver –
You can easily download and install the latest graphics driver package on your system.
For NVIDIA, AMD users –
Step 1 – Open the GeForce Experience app.
Step 2 – Now, go to the “DRIVERS” area.
Step 3 – Wait for the latest version of the driver to load up. Then, click “DOWNLOAD” to download the latest driver package.
As this driver package sizes are over 600 MB, it may take a while to download. So, wait patiently.
Step 4 – Once you have downloaded the driver, click on the “EXPRESS INSTALLATION” option.
For Intel or integrated graphics card users –
You can just download and install the latest graphics card from the device manufacturer’s website. If you have dedicated softwares like Dell’s Driver Support Assistant (DSA), your job will be easier.
Step 1 – Go to the OEM manufacturer’s website. We have given direct links to
Step 2 – Head on to the Drivers section. There, specify the device model you have.
Step 3 – Find out the Intel HD graphics driver for your system. Download the latest graphics driver for your device.
After downloading the update package, run it on your computer to install the latest Intel driver on your system.
Fix 5 – Download and install Visual C++
Installing the Visual C++ Redistributables should help solve the issue.
Step 1 – Head on to the Visual C++ packages.
Step 2 – Once you are there, tap the red button “Download” to start downloading the package.
Step 3 – Now, choose the package depending on the system you are using (64-bit or 32-bit).
Step 4 – Then, click “Next“.
This way, you can download the updater package easily.
Step 5 – Run the downloaded setup packages and follow the on-screen steps to install the update package on your system.
Follow the on-screen wizard and complete the installation.
This should fix the problem of DirectX for sure.
Fix 6 – Install .NET Framework features
You can install the .NET Framework features from the command line.
Step 1 – Make sure your system is online. Then write down “cmd” in the search box.
Step 2 – Then, right-click the “Command Prompt” and click “Run as administrator“.
This will take you to the terminal box.
Step 3 – When the terminal page appears, just paste this and hit Enter.
DISM /Online /Enable-Feature /FeatureName:NetFx3 /All /LimitAccess /Source:D:sourcessxs
Once you have executed the code, Windows will start enabling the feature .NET Framework features.
Once the operation is done, close the CMD terminal and restart the system.
Check if this works.


