Windows 11 comes installed with a lot of unnecessary applications that are unknown/hidden and may never be used by you. Such applications are called bloatware as you don’t require them and they make unnecessary use of system resources like CPU and RAM which in turn slows down your Windows 11. Some examples of bloatware apps on Windows 11 are Phone Link, Movies & TV, Solitaire Collection, Xbox Game Bar, People, Weather, Microsoft To Do, OneNote, and many more. In order to get the maximum performance from your system, you need to uninstall these bloatware apps from your Windows 11 PC.
If you are looking to optimize your Windows 11 and unlock the maximum performance from it then read this article. In this article, we have discussed how you can use the Debloater tool to uninstall all the bloatware applications from your Windows 11 PC to make it faster.
Step 1 – Create a System Restore Point
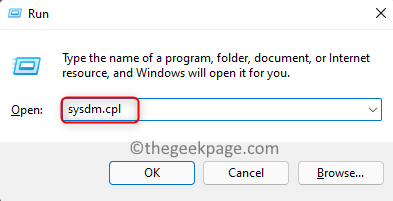
Step 1. Open Run using the Windows + R key combination.
Step 2. Type sysdm.cpl and hit Enter.
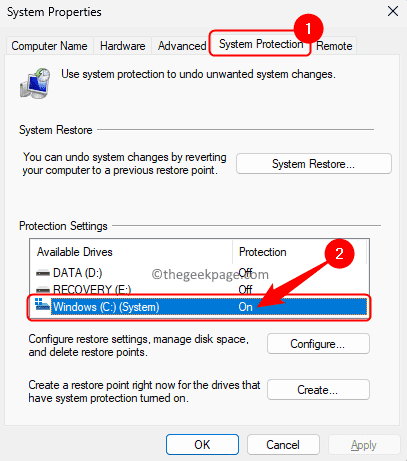
Step 3. Go to the System Protection tab in the System Properties window that opens.
Step 4. In the Protection Settings section, make sure that Protection is turned On for the C drive.
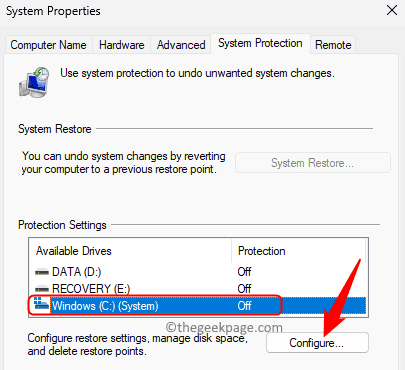
If it is not turned on, then click on Configure.
In the System Protection for Windows (C:), select the option Turn on system protection in the Restore settings section.
Then, click on Apply and OK to save the changes.
Step 5. Now, click on the Create button at the bottom.
Step 6. Give a name for the restore point in the Create a restore point window.
Then, click on Create.
Step 7. Wait for some time till the restore point is created.
You will see a message “The restore point was created successfully.” once the process is complete.
Click on Close.
Step 2 – Debloat Windows 11 using the Debloater Tool
In order to debloat Windows 11, we will make use of the Windows 10 debloater tool from GitHub which works perfectly fine for Windows 11 as well.
Install Debloater
Step 1. Hit the Windows key on your keyboard and type powershell in the search box.
Step 2. Right-click on Windows Powershell in the search result and choose Run as administrator.
Click on Yes when prompted by User Account Control.
Step 3. Execute the command below in Powershell.
Set-ExecutionPolicy Unrestricted -Force
Step 4. After you have changed the execution policy to unrestricted, copy and paste the following command and execute it by hitting the Enter key.
iwr -useb https://git.io/debloat|iex
Step 5. Wait for the above command to download and install the Windows debloater tool on your system.
Step 6. You will be able to see the interface of Windows10Debloater as soon as the installation completes.
Debloat Windows by Uninstalling Bloatware
Once the Debloater tool opens, you will notice different options to customize your Windows PC like debloat options, registry changes, Cortana, and other changes. In our case, we want to debloat our Windows 11 PC to maximize performance, so we need to look at customizing the blocklist in Debloat Options. This helps to ensure that we do not uninstall OneDrive and other such necessary apps from our computers. You should not be uninstalling OneDrive as all the documents and pictures on your PC are linked to OneDrive directly on Windows 11. So, we need to uninstall only the bloatware that we will not be using.
Step 1. In the Windows10Debloater tool, click on CUSTOMISE BLOCKLIST.
Step 2. You will see the Customize Allowlist and Blocklist window with a list of all the bloatware that is present on your Windows 11 PC.
By default, there will be some apps that would be selected. In order to uninstall/remove bloatware, the options need to be checked.
Go through the entire list and check those apps/bloatware that you want to uninstall.
Also, uncheck the box next to OneDrive or any other app that you do not want to be removed.
Step 3. After you have made the selection of bloatware to be removed, click on Save custom Allowlist and Blocklist to custom-lists.psl
Close the Customize Allowlist and blocklist window.
Step 4. Back in the Windows10Debloater main screen, click on the REMOVE BLOATWARE WITH CUSTOM BLOCKLIST button.
Step 5. Now, you will need to wait for around 20-30 minutes for all the selected bloatware to be uninstalled from your PC.
You will see a message “Bloatware removed” in your PowerShell window.
Step 6. Once all the bloatware has been uninstalled from your computer, you can use this debloater tool to further optimize Windows 11.
You can disable Cortana if you are not using it.
If you want to disable Microsoft’s data collection and tracking services on your PC, then click on Disable Telemetry / Tasks.
It is recommended that you don’t disable any other options present in the tool.
Step 7. After all the unnecessary applications and unwanted packages have been removed, restart your system for the changes to come into effect.
That’s it.
We hope that this article has helped you remove all the bloatware and in turn get the maximum performance from your Windows 11 PC. Did you find this article informative enough in debloating your Windows PC? Please let us know your thoughts and opinions in the comments section below.


