Direct3D is a graphics API that is used for PC games. There are different versions of Direct3d and it has improved significantly with newer iterations. The current version is Direct 3D D12, which is a basic requirement of almost all the latest AAA titles. So, if you are seeing the “D3D11 compatible GPU (feature level 11.0 shader model 5.0) is required to run the engine” error message while trying to play Fortnite, it is due to the fault of your GPU. You can easily fix this issue following these easy fixes.
Fix 1 – Check the Direct3D version
Check what version of Direct3D your GPU is currently using.
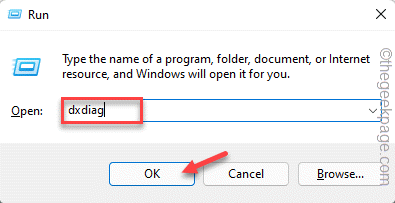
1. You can open the Run app with Windows key+R keys together.
2. Then, just type “dxdiag” in the terminal and click “OK“.
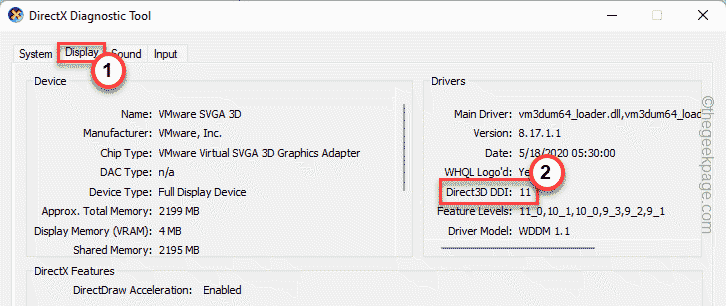
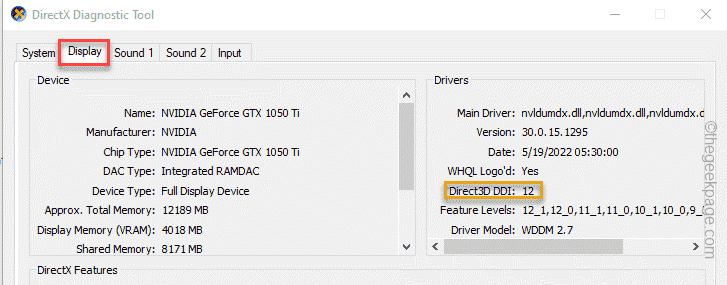
3. Once the DirectX Diagnostics Tool opens up, head on to the “Display” section.
4. On the right-hand section, you will find the ‘Drivers’ section. There, check what the “Direct3D DDI” says.
If it is set to “11“, the GPU is using the Direct 3D 11 and that’s the root cause of this problem. So, maybe the GPU you are using is too old to run the latest games. You have to replace it with the latest GPU.
But, if you see the “12“, there is some problem with other graphics card settings, such as outdated drivers, etc. You have to update the graphics card driver.
So, follow the next fix.
Fix 2 – Update the GPU driver
Outdated GPU drivers can be the main reason for this problem. There are several ways you can proceed.
Way 1
1. Updating the graphics drivers is quite easy. Just, right-tap the Windows icon on the middle of the taskbar and tap “Device Manager“.
2. When the Device Manager pops up, you will find several devices there.
3. Now, click on the “Display adapter” section to view available display adapters.
4. Just, find the graphics card driver and tap “Update driver“.

5. Now, tap on the “Search for the latest driver online” to let Windows look for the latest version of the driver online.
This process takes a while, so wait patiently.
Once the driver package is updated, close everything and restart the system.
Way 2
If the Device Manager method fails or you are unable to find the latest driver package, you can use the dedicated app to do the same.
1. Launch the NVIDIA GeForce Experience app.
2. When the app opens up, you may head on to the “DRIVERS” tab.
3. Now, allow just a little while to let Windows recognize the latest driver package.
Once it detects, tap “Download” to download the driver.
Wait for a while as your system downloads the latest version of the driver.
4. Once it is done, tap on “CUSTOM INSTALLATION“.
Now, you can decide what or what not to download.
5. In the next step, don’t do anything else, just tick the “Perform a clean installation” tab and click “Next“.
This will remove the older installation of the graphics card and the latest version of the driver will be installed.
Way 3
If the other two ways failed to update the driver, you can directly download the graphics driver and install it on the system.
1. At first, launch the NVIDIA Driver downloads website.
2. Following that, input the specifications (like the ‘Product Type’, the ‘Operating System’, etc) of your graphics card in the correct sections.
3. Once you are done, tap “Search” for the graphics card version.
4. Once you are done, tap on the “Download” button to download the latest graphics driver.
5. When the graphics driver has finished downloading, go to the file location.
6. Then, double-tap the driver file to access it.
7. The package file will be extracted. So, tap “OK” to extract it.
8. Now, choose the “NVIDIA Graphics Driver and GeForce Experience” option.
9. After that, click “AGREE AND CONTINUE” to proceed.
10. After that, select the “Custom (Advanced)” option and tap “Next” to proceed.
11. Now, check the “Perform a clean installation” box on the installer page.
12. Tap “Next” to start the final installation process.
Once the installation process is complete, reboot the system. Test if this works.
Fix 3 – Disable the internal graphics card
If you have both the internal graphics card and a dedicated one, the game be using the internal one.
1. Just type “device” in the search box.
2. After that, tap “Device Manager” to access it.
3. Now, if you expand the “Display adapters“, you will see both the integrated graphics driver and the dedicated one.
4. Just, right-tap the integrated graphics card and tap “Disable device“.
5. Just, tap “Yes” to disable the device.
Once you have disabled the integrated card, close the Device Manager. After that, try to play the game you are facing this problem with. It will use only the dedicated GPU.
This should end the conflict and fix the problem permanently.
Fix 4 – Repair the Visual C++
There is another solution that has worked for other users.
1. Go to your desktop and right-tap the Windows icon and tap “Apps and Features“.
2. In the Apps list, you will find the complete list of apps.
3. Just, look for the Microsoft Visual C++ Redistributables. There should be quite a few numbers of those.
4. Now, tap on the three-dot menu and click “Modify“.
5. You will see the Redistributable Setup window has appeared.
6. So, tap “Repair” to repair it.
This way, you can repair the redistributable file.
7. Coming back to the Settings page, you will find several other redistributable files as well.
8. So, tap the ⋮ icon and tap “Modify” again and repair all the redistributable files.
Repeat these steps for all the files.
Once you have repaired all those, you can close the Settings. Now, try to run the game again. Test if this is working or not.
Fix 5 – Download & install the DirectX
You can download and install the DirectX manually.
1. Go to the Directx package.
2. Once you reach there, tap “Download” to download the latest update package.
3. Just, double-tap the package file to open the setup file.
4. On the first page, select the “I accept the agreement” and click on “Next” to proceed.
5. DirectX setup will detect the latest version of DirectX installed on the system and download the required components.
6. Now, just tap “Next” to go forward.
7. Once it has finished installing, tap “Finish” to complete the process.
The next immediate thing you should do is to restart the system. After you do that, you can easily check if the game works.
The problem will be solved for sure.


