Customise Quick Access In Windows 10:– There are chances that you would have missed out the Quick Access section that appear on the left pane when you open up the This PC section.Well, they are really amazing as they help you access the files and folders quickly rather than scrolling down, remembering the location, navigating through entire files and finally ending up after a couple or three minutes. Here we will show you how to customize them,that is how to add or remove files form them and on what should be actually shown there.
The Quick Access Tweaks
The folders and files that appear in the Quick access section are automated initially. The files to be shown in them are selected by the operating system and they mostly choose the recently accesses files for this Quick Access. But it need not be always the case that we are intersested in those files and folders. In fact,we might not even use them in the mean time. So, there are options on what to see and what not to see in the Quick Access section.
Step 1:
Open the File Explorer on your system.
Step 2:
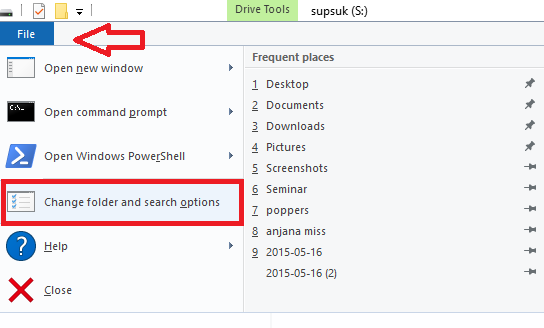
Click on the File Option available on the top left and choose from its options, Change folder and Search options.
Step 3:
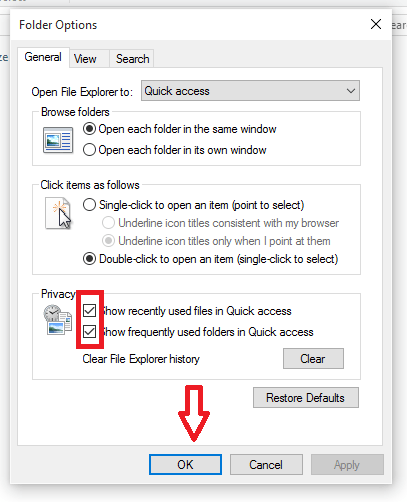
On the Folder Options Window that appear,go to the option under Privacy which appears in the General section.
Step 4:
Choose the option Show Frequently used Folders in Quick Access and Show Recently used files in Quick Access by clicking on the buttons before them
Step 5:
Tap on the OK button to proceed.
Add or Remove Files In Quick Access
This is a very simple one that requires only a few tasks to be done.It can be done in three different ways.
Step 1:
Drag and drop the file or folder just below the Quick Access that appears in the left navigation pane ,when you open up the This PC section.
Step 2:
Right click on the file you want to add, Choose the option Add current location to Favourites in its context menu.
Step 3:
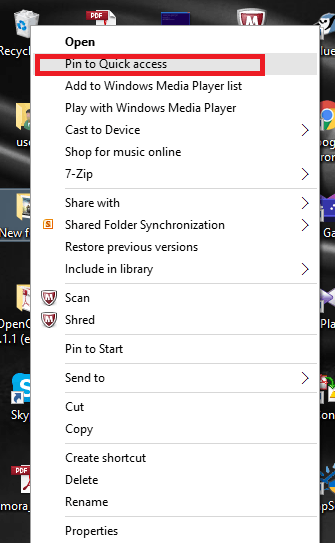
Alternately, in the most recent version of Windows,when you right click the file,an option called Pin to Quick access appears. You can give a try on that too.
To remove the file or folder, just right click on it and choose the option Unpin from Quick Access . But if you are using a lower version of Windows, right click and choose the Remove option.
Now start saving your time by using your Quick access!


