Want to create a visitor account on your Windows 10, but don’t know how to do it? Here is our comprehensive guide on how to create a visitor account in Windows 10 or how to edit the settings of Visitors’ account and finally how to delete a visitor’s account from your computer.
Visitors account-
A visitor’s account is an account with limited access to the computer files, system settings, etc. In a simpler sense, a user with a visitor account will enjoy most of the Windows 10 features except the fact that they can’t change any major settings on your computer.
How to create a visitors account in Windows 10
You can create a visitor’s account by passing a simple command in an elevated Command Prompt window. Follow the steps to do so-
1. Type ‘cmd‘ in the search box.
2. Now, right-click on the “Command Prompt” and then you need to click on “Run as administrator“.

Command Prompt window will be opened with Administrative rights.
2. To activate the new “Visitor“ account, copy-paste this command. Then, press the Enter key.
net user Visitor /add /active:yes

You have created the ‘Visitor‘ account on your computer.
How to modify settings of Visitor’s account-
If you want to modify the Visitor account simply follow these steps on your computer.
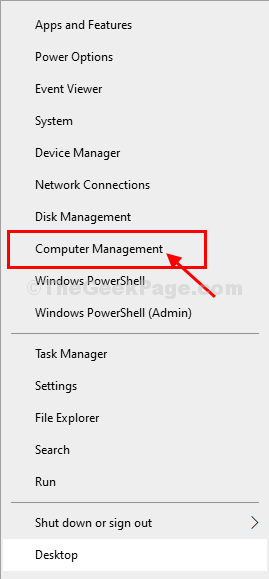
1. Press Windows key+X and then click on “Computer Management” from the elevated panel of just above of Start icon.

2. In the Computer Management window, on the left-hand side, expand “Local Users and Groups“.
3. Now, on the same window, click on “Users” to select it.
4. On the right side of the window, right-click on “Visitor” and then click on “Properties” to modify its properties.

5. Now, in the General tab, check both the options “User cannot change password” and “Password never expires“.

6. Now, go to the “Member Of” tab.
7. Select “Users” in Member Of section and then click on “Remove” to remover it.
8. Now, click on “Add…” to modify the new set of users.

9. When the Select Groups window appears, click on “Advanced“.

10. In Select Groups window, click on “Find Now” and then select “Guests” from the list of users and groups.
11. Click on “OK” to save the changes.

12. You will notice “MYPC/Guests” in the ‘Enter the object names to select:‘.
13. Click on “OK” to save the changes.

14. Coming back to Visitor Properties window, click on “Apply” and “OK” to save the changes on your computer.

That’s it! You have successfully created a new Visitor account on your computer. This visitor account will have limited access to your files and Settings.
Close Computer Management window.
How to switch to Visitor account on your computer-
To switch to the Visitor account, follow these steps-
1. Close any opened window on your current desktop window.
2. Now, click on the Windows icon.
3. Now, click on your account image on the left side of the elevated panel.
4. You will notice the list of accounts on your computer, click on “Visitor“.

You will be logged out of your current Windows. Your computer will be booted into the new account.
The same way you have logged into this new account, you can switch to the main account any time you wish, following the same way.
How to delete Visitor account from your computer-
Once the necessity of the Visitor account is over, you can easily remove it from your computer.
There are two ways to do it-
Deleting Visitor account from Command Prompt-
1.Search “cmd” in the Search box beside the Windows icon.
2. Then, right-click on “Command Prompt” in the elevated search result and choose “Run as administrator“.

Command Prompt with administrative rights will be opened.
4. Finally to delete the ‘Visitor’s‘ account, type this command in CMD. Once you have done so, press ‘Enter‘.
net user Visitor /delete

The visitor account will be deleted from your computer.
Deleting Visitor account from Computer Management-
You can easily delete the Visitor account from Computer Management.
1. Press Windows key+R to open Run window.
2. Now, copy-paste or type “compmgmt.msc” and then hit Enter.

Computer Management window will be opened.
3. When the Computer Management window appears, expand “Local Users and Groups“.
4. Now, you have to click on “Users“.
5. Then, On the right side of the window, right-click on “Visitor” and then click on “Delete” the account from your computer.

The visitor account will be deleted from your computer.
This way you can easily create, modify and delete a visitor account on your computer.