The minimalist theme of Windows 11 has a few comprises that limit some shortcuts and tricks of older Windows versions. One of these such limited features is the obscurity of the taskbar alignment shortcut. You could easily move around your taskbar on all four sides in Windows 10, but you can’t do it in the new Windows 11. But, there is a trick that you can use to align the taskbar at the top of your screen. You will have to modify your registry to do it.
How to put your Taskbar at the top in Windows 11
You can move the taskbar at the top of your screen by modifying a certain existing key on your system.
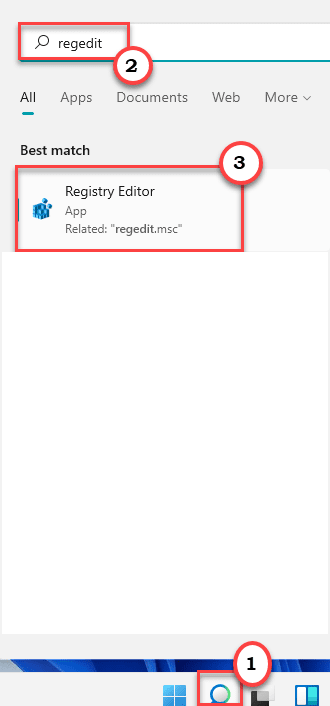
1. Click on the search icon just beside the Start icon and type “regedit“.
2. Further, click on “Registry Editor“.

IMPORTANT–
Before you do any certain changes in the Registry Editor, we recommend you make a backup of the registry keys.
a. Once you have opened the Registry Editor, you will need to click on the “File” and then click on “Export“.
b. Save the backup in a secure place.

If anything goes wrong, you can easily restore the registry to its original state.
3. Then, go this way –
Computer\HKEY_CURRENT_USER\Software\Microsoft\Windows\CurrentVersion\Explorer\StuckRects3
4. On the right-hand side, just double-click on the “Settings” key to edit it.

5. You will find multiple values here. Look for the fifth value in the second row in the ‘FE’ column.
6. Just replace the “03” in the ‘FE’ column with “01“.
7. Then, click on “OK” to save it.

After that, just close the Registry Editor window and restart the system. After you restart your computer, you will notice that the Taskbar has appeared at the top.
[
NOTE –
If you are using multiple monitors, you have to do alter the value of ‘Settings’ key for all the keys in this folder –
Computer\HKEY_CURRENT_USER\Software\Microsoft\Windows\CurrentVersion\Explorer\StuckRects3
Once you do alter the value of these keys, close the Registry Editor and restart the system.
]
How to restore the taskbar position
If you are not becoming very fond of this new taskbar position, you can put it to the bottom of your screen.
1. Open the Registry Editor window.
2. After opening it go here, again –
Computer\HKEY_CURRENT_USER\Software\Microsoft\Windows\CurrentVersion\Explorer\StuckRects3
3. On the left-hand side, just double tap on the “Settings” key.

4. Here, again find out the fifth value in the second row in the ‘FE’ column.
5. Now, replace the “01” under the ‘FE’ column with “03“.
7. Finally, click on “OK” to save it.

Once you are done, close the Registry Editor and restart your computer.
How to change the alignment of the Taskbar using the Registry Editor
You can adjust the alignment of the Taskbar using the Settings page. But, in case if you want to adjust the alignment of the Taskbar using the registry.
1. Press the Windows key+R keys together to open the Run panel.
2. Then, type “regedit” and click on “OK“.

3. Once the Registry Editor opens up, navigate this way –
HKEY_CURRENT_USER\Software\Microsoft\ Windows\CurrentVersion\Explorer\Advanced\TaskbarAl
4. On the right-hand side, look for the “TaskbarAl” key.
5. Then, double click on the “TaskbarAl” to modify it.

6. There are two options you can choose –
0 = Left
1 = Center
7. Just put the value according to the alignment you want on your system.
[Suppose, you want the older left alignement for your system, you have to put “0” in the ‘Value data:’ box.]
8. Then, click on “OK” to save this modification.

After that, close the Registry Editor. You won’t notice the change in the alignment of the taskbar unless you restart the your system.