DHCP or Dynamic Host Control Protocol Lease time is a time interval that is leased out to the devices connected to a certain WiFi router to let you access the internet from your connected device. This DHCP lease time is unique for every device and you can alter it from the internal router settings. This article will show you how to adjust this DHCP Lease time on your Windows 11 machine.
What is the DHCP Lease Time feature?
Every unique connection to a router device is a temporary connection. So, the router, following the DHCP, assigns a dynamic IP address for a time interval for the connection. If the particular device disconnects from the router within the specified lease time, the router reallocates the IP address to other devices with a lease time.
For your home router connection, you can allocate a longer lease time for the IP addresses. The DHCP lease time should offer time for public WiFi router connection.
How to adjust the DHCP lease time in Windows 11
You can adjust the DHCP lease time on your computer. But at first, you have to know the default lease time on your computer.
Step 1 – Check the current lease time
You can check the current lease time using the Command Prompt terminal.
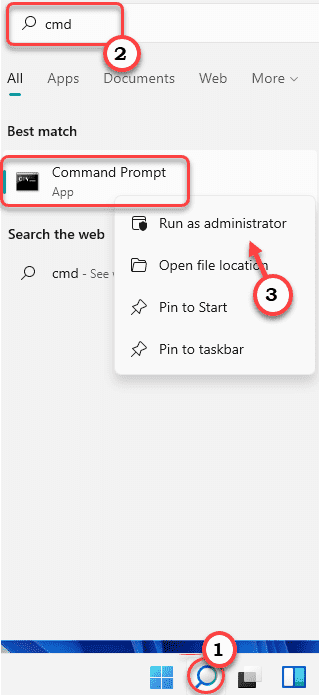
1. At first, click on the search icon and type “cmd“.
2. Then, right-click on “Command Prompt” and click on “Run as administrator” to open the terminal with administrative rights.

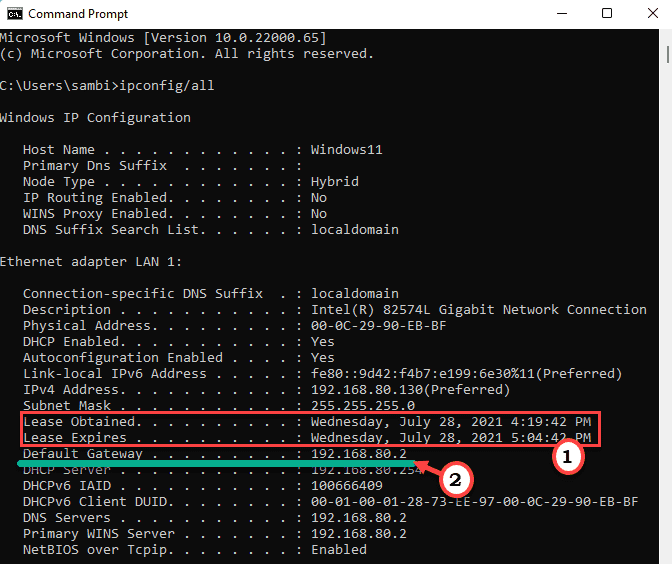
3. When the Command Prompt opens up, type this command and hit Enter.
ipconfig/all

4. Once the terminal opens up, you will find a list of network adapters.
5. Look for the network adapter you are using in the list.
6. Now you can check the ‘Lease Obtained:‘ and ‘Lease Expires:‘ timings from the list.
7. Also, don’t forget to note down the ‘Default Gateway’ for the network adapter.

So, this is the lease time your router has allocated for your machine.
Step 2 – Access your router settings
You can access the router settings from a browser.
1. Open a browser tab.
2. Then, open the router website on the browser.
(If you don’t know the router web address, you can find it either on the router manufacturer website or on the router package itself.)
[We have shown the process for a DigiSol router. The steps may differ depending upon which router you are using. ]
3. At first, enter your admin ID and password and click on “Log in” to enter the setup.

4. Now, on the left-hand side, tap on the “Local Network“.
5. In the ‘DHCP Mode:’, select “DHCP Server” from the drop-down list.

6. Now, here you will see the “Max Lease Time:” option. The default value for this is 120 minutes.
7. Set this to “1200” or any value between 1-2880.
8. Finally, click on “Apply” to save this modification.

Your router will reboot automatically.
This will significantly increase the DHCP lease time for your router.