As we all know Cortana is a Digital assistant service introduced in Windows 10 by Microsoft. Not everyone would want to use this feature. However, when we try to close it by pressing the close button, Cortana won’t close. This behavior is expected. Microsoft has the settings for the Cortana app in such a way that it is always running in the background even after pressing the close button. This is because Cortana can assist the user better only when it knows sufficient info about that user like, what kind of activity the user is involved in, URLs typed, videos watched, etc.
For various reasons, if you want to get rid of Cortana, then try out the fixes listed below. In this article, we will be looking at the different ways to Close Cortana in Windows 10
Fix 1: End the Process using Task Manager
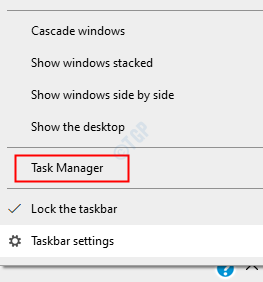
Step 1: Right-click anywhere in the blank area on the taskbar. From the context menu that pops up, click on Task Manager

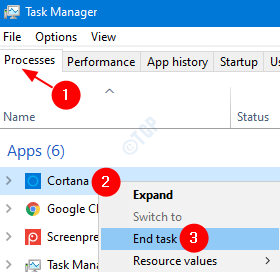
Step 2: In the window that opens, Make sure you are in the Processes tab
Step 3: Under the Apps section, locate Cortana and right-click on it
Step 4: From the context menu, choose End Task

Now, check if the Cortana window closes. If not, try the next fix.
Fix 2: Kill Cortana using Command Prompt
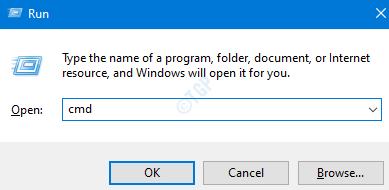
Step 1: Hold the Win Key and press R. This opens the Run Dialog
Step 2: Type cmd and hit Ctrl +Shift + Enter keys together from the keyboard.

Step 3: In the command prompt window that opens type the below command and hit Enter
taskkill /f /im cortana.exe

Step 4: Restart the system.
Check if this works. If not, try the next fix.
Fix 3: Uninstall Cortana using Powershell
If you are not planning on using Cortana for some time and want to get rid of this issue, then you can simply uninstall it from your system.
Step 1: Press Windows+r together to open the run window
Step 2: Type powershell and press Ctrl +Shift + Enter keys together from the keyboard.

Step 3: In the PowerShell window that opens type the below command and hit Enter
Get-AppxPackage *Microsoft.549981C3F5F10* | Remove-AppxPackage

Step 4: When you feel the need for Cortana in your system, you can re-install it using the below command
Get-AppXPackage -Name Microsoft.Windows.Cortana | Foreach {Add-AppxPackage -DisableDevelopmentMode -Register "$($_.InstallLocation)AppXManifest.xml}
Fix 4: Install the Speech package
Step 1: Holding the keys Windows+R, open the Run Dialog
Step 2: Type ms-settings:speech and press OK

Step 3:In the Settings window that opens, on the right side pane, scroll down to find Installed voice packages. Under that section, ensure your language is listed.
Step 4: In case your language is not listed, click on the “+” symbol next to Add voices under the Manage voices section

Step 5: In the appearing window, tick on the required language and then press Add

Step 6: Wait till the package downloads and installs in the system
Step 7: Restart the system
Check if this helps, if not try the next fix.
That’s All Guys
We hope this article has been informative. Thank you for reading
Kindly comment and let us know which fix helped.