Many users have reported that they are facing this error when they try installing VJoy. The error says
vjoy failed to install
Several reasons to see this error are:
- Corrupt Installation of Windows
- Corrupted vJoy
- Incorrect driver signature enforcement
- Updating Windows
- Updating the Application
In this article, let us see in detail how to resolve the vJoy Failed to Install issue in Windows 10 and Windows 11. Please try the fixes below in the same order as specified.
Fix 1: Restart the Cryptographic Services
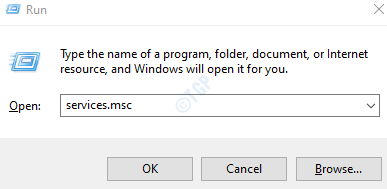
Step 1: Open Run Dialog (Windows+r)
Step 2: Type services.msc and hit OK

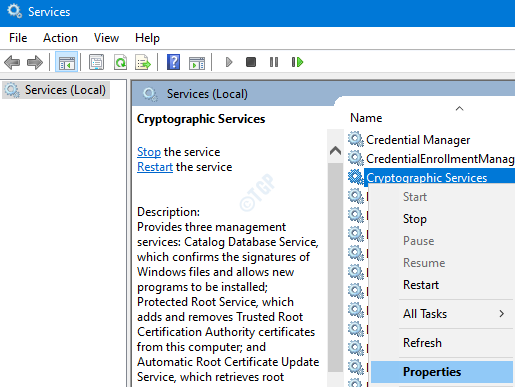
Step 3: In the Services window, locate Cryptographic Services
Step 4: Right-click on Cryptographic Services and choose Properties

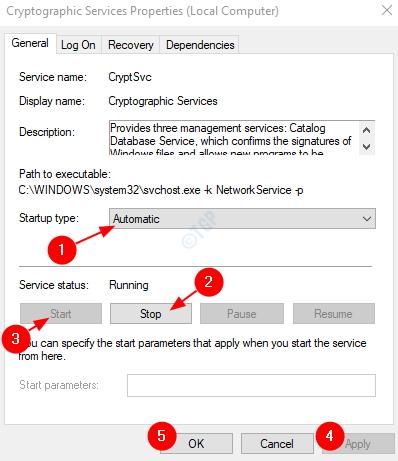
Step 5: In the Properties window that opens, make sure that the Startup Type is Automatic
Step 6: Under the service status section, click on the Stop button and then click on the Start button
Step 7: Finally, click on Apply followed by OK

Step 8: Now, try Installing the vJoy ad check if this works.
in case this doesn’t help, try the next fix listed.
Fix 2: Disabling the Driver Signature Enforcement
Important Note before proceeding
- Disabling the Driver Signature Enforcement can be risky. Usually, the VJoy drivers must be signed digitally by certain authorities. When it is not signed, you see the error. In this fix, we are bypassing that by disabling Driver Signature Enforcement. By doing so, we are exposing our system to threats. Please process further at your own risk.
- In case this fix happens to work , whenever you want to use Vjoy, you have to Disable the Driver Signature Enforcement
Step 1: Open the Run Dialog. Simply hold Windows+R
Step 2: Type ms-settings:recovery and press the OK button

Step 3: On the right-hand side of the window, scroll down to reach the Advanced startup section and click on Restart Now button

Step 4: Once the system restarts, you will be able to see the below screen. Choose Troubleshoot

Step 5: Now click on the Advanced Option as shown below

Step 6: Now click on Startup Settings as shown below

Step 7: From the Startup Settings, click on Disable driver signature enforcement

Step 8: Once the system restarts, try installing the VJoy and check if it works.
In case it does not work, check the next fix.
Fix 3: Try Installing VJoy with Admin Rights
Step 1: UnPlug the VJoy hardware from the PC.
Step 2: Ensure no vJoy related process is running in the system from the Task Manager
Step 3: Now, try installing the VJoy.
Step 4: If the error is seen, open the VJoy website and download the Zip file
Step 5: Unzip the file and copy the contents in the below location:
C:\Program Files\vJoy
Step 5: Now locate the application file (.exe) in the explorer. Right-click on the file and choose Run as administrator

Check if this works, if not, try the next fix.
Fix 4: Update the vJoy Driver
Step 1: Open the Run Window by holding the keys Windows+r
Step 2: Enter devmgmt.msc, and hit OK

Step 3: From the device manager window, right-click on the VJoy device and then click on Update driver
Step 4: In the Update Drivers window, click on Search automatically for drivers

Step 5: If any updated version of the driver is found, you will be notified and you can update the driver.
Once, the driver is up to date, check if the issue resolves, if not ty the next fix.
Fix 5: Re-installing the VJoy Application
If you had used the VJoy application in the past and then removed it for some reason and if the uninstallation had some errors then that might cause errors when installing the VJoy application again. Follow the below steps to uninstall the VJoy application properly and then try re-installing it.
Step 1: Hold the keys Windows+R and open Run Dialog
Step 2: Type appwiz.cpl and press Enter

Step 3: In the window, right-click on the VJoy application and choose Uninstall.
As a demo, uninstalling the update is shown in the below image. Uninstalling the vJoy application should be similar.

Step 4: Restart the system
Step 5: Open Run Dialog ( Refer Step 1) and type devmgmt.msc, and hit OK

Step 6: In the device manager window, from the top menu, click on View and click on Devices by connection

Step 7: Locate the VJoy application. Right-click on it and choose Uninstall
Step 8: In the Confirm Device Uninstall window, check the option of Delete the Driver Software for this Device and click on OK
Step 9: Restart your system
Step 10: Open Run Dialog ( Refer Step 1) and type cmd, and press Ctrl+Shift+Enter together. This opens a Command prompt with Admin rights.

Step 11: In the UAC that opens asking for permissions, click on Yes
Step 12: In the command prompt window that opens, type the below command and hit Enter
pnputil -e

Step 13: You will get a list of entries, search for the entry that contains Shaul in the Driver package provider name, note the published name this would be an OEM file with its name in oemxx.inf(xx would contain some numbers).
Step 14: Remove all the OEM files that contain Shaul in the Driver package provider name one after the other using the below command and press Enter
pnputil -f -d oemxx.inf
xx contains numbers
For example, to delete the oem86.inf file, the command to be used is
pnputil -f -d oem86.inf
Step 15: Delete all the files from the below location
C:\Program Files\vJoy
Step 16: Open the Run Dialog( Refer Step 1) and type regedit and hit Enter

Step 17: In the UAC pop up, click on Yes
NOTE: Registry editing can have an adverse effect on the system even with the slightest mistake. It is advised to take the backup of the registry before proceeding. To take a backup, In the Registry Editor–> Go to File –> Export –> Save your Backup file.
Step 18: Delete the following keys:
HKEY_LOCAL_MACHINE\SYSTEM\CurrentControlSet\Services\vjoy
HKEY_LOCAL_MACHINE\SYSTEM\CurrentControlSet\Control\MediaProperties\PrivateProperties\Joystick\OEM\VID_1234&PID_BEAD
HKEY_CURRENT_USER\System\CurrentControlSet\Control\MediaProperties\PrivateProperties\Joystick\OEM\VID_1234&PID_BEAD
NOTE: In order to delete the keys, navigate to the location specified and then press the Delete button from your keyboard and press Yes in the Deletion Confirmation Dialog
Step 19: Restart the system again
Step 20: Download and install the latest version of the Vjoy Application. Uncheck the options of all of the Companion Applications
Check if this helps, if not try the next fix listed.
Fix 6: Perform a Clean Boot
To narrow down the issue further, it is advised to Clean Boot the system to rule out the chances of other applications using the system resources and causing this issue. To perform a Clean of the system, follow the below steps:
Step 1: Open the Run Dialog in your system. You can use the shrtcut Windows+r
Step 2: Type msconfig and press the OK button

Step 3: The System Configuration window opens as shown below. Go to the Services tab
Step 4: Tick the box next to Hide all Microsoft services. This would disable all the Microsoft Services from the above list.
Step 5: Click on Disable all and Press on Apply

Step 6: In the same window, Open the Startup tab, click on Open Task Manager

Step 7: In the Task Manager Window that opens, under the Status column you can see the applications that are enabled on Startup. Disable all the applications that are enabled at the start-up.

Step 8: In the System Configuration Window, Click on Apply and then Press OK

Step 9: Restart the PC.
Step 10: Try installing the VJoy in the system now. There will be no interference from the other apps. Check if this works.
If not, try the next fix.
Fix 7: Revert Windows to Previous Update Version
At times, some new updates might have caused the issue. To check if that is the case, one can simply opt to remove the changes made by the latest update.
Step 1: Open Settings–> Update and Security –> Window Update window .(Refer Step 1, from Fix 20)
Step 2: Scroll down and click on View Update history

Step 3: In the appearing window, Check if there were any updates to the Camera app under the Update history section.
Step 4: Click on Uninstall updates

Step 5: In the Window that opens, a list of updates that are installed in the system will be shown.
Step 6: Right-click on the required update and choose Uninstall.

Check if the VJoy can be installed. If not try the next fix.
Fix 8: Reset the Windows
Step 1: Hold Windows+R and open the Run Dialog
Step 2: Type ms-settings:recovery and hit Enter

Step 3: In the next screen click on Reset Now.

Step 4: In the Reset this PC window that opens, click on Keep my Files.

Step 5: Follow the instructions as shown in the window and do the needful. Once, the PC is Reset, check if the issue resolves, if not, try the next fix.
That’s All
We hope this has been informative. Kindly comment and let us know which of the above fixes helped you resolve the issue. Also, let us know if you run into any issues, we will glad to assist.
Thank you for Reading.