How to Configure AutoPlay in Windows 7 and 10:- AutoPlay feature scans a device automatically when it is connected to your computer. It is responsible for determining what to do with the connected device. It performs an action or do nothing as per your settings. So the question is, can you set your AutoPlay in such a way that it always perform in the way that you want it to perform? Yes, you can. The configuration settings are somewhat similar in all versions of Windows. In this article, I have explained the steps to configure AutoPlay in Windows 7 and Windows 10. Read on, to learn how to hack this simple trick.
See also :
How To Configure Autoplay In Windows 7
STEP 1
- Start typing autoplay into your Windows 7 search box. This will result in the listing of the AutoPlay program by Windows 7. Click on AutoPlay as shown in the screenshot.
STEP 2
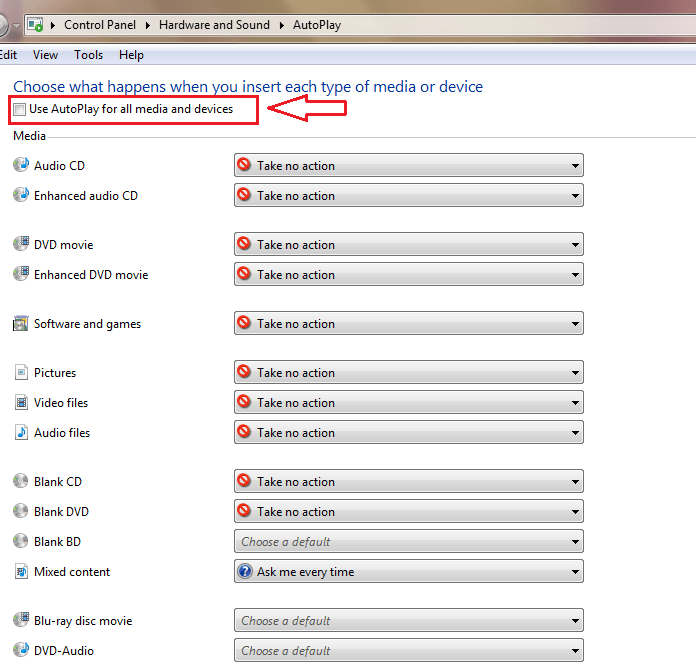
- You will be shown a long list of options by the heading Choose what happens when you insert each type of media or device. If you want to completely turn off the AutoPlay feature, simply uncheck the box that says Use AutoPlay for all media and devices.
STEP 3
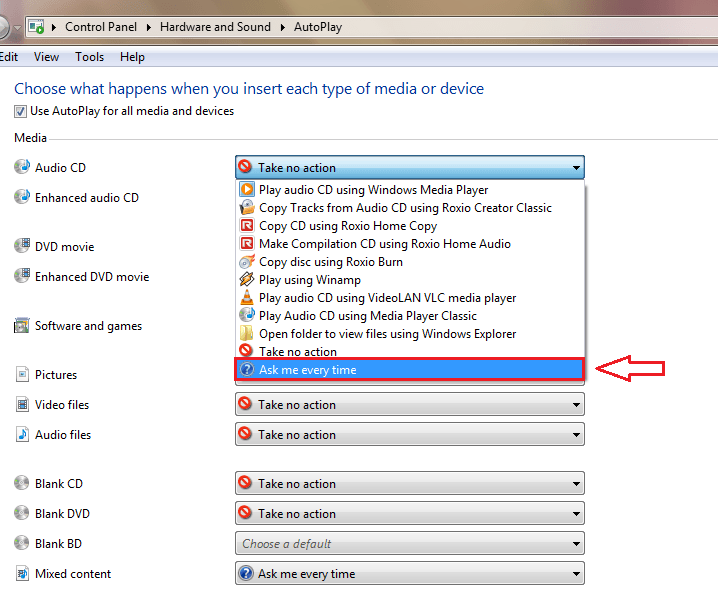
- Now under the section titled Media, find the media or device that you want to change the AutoPlay settings for. In the given example, I have chosen to change the settings for Audio CD. From the corresponding drop down menu, you get to select what you want your AutoPlay to do at the occurence of the selected event.
STEP 4
- If at any point in time you change your mind about the changes that you have made, scroll down and find the button named Reset all defaults to click on it.
How To Configure Autoplay In Windows 10
STEP 1
- Just like in Windows 7, type in autoplay into the search box. From the search results that appear, click on the AutoPlay program as shown in the screenshot.
STEP 2
- You can choose to turn off the AutoPlay feature by unchecking the checkbox corresponding to Use AutoPlay for all media and devices as shown below. If you want to change the AutoPlay configuration of Removable drive, simply select the option that you want from the drop down menu.
STEP 3
- Likewise, you can change the AutoPlay configuration settings of other media and devices as well.
STEP 4
- To set all your preferences back to the original way, find and click on the button that says Reset all defaults.
So that’s how simple you can configure your AutoPlay. Make your system really speak a lot about you by customizing it the best way. Hope you found the article useful.


