No doubt auto-refresh of web pages is very useful, especially during live and important events like election results, news, etc the contents will be updated at regular intervals of the web page auto-refresh. But this becomes annoying when you are reading the content of any web page or you are in the middle of a particular research article website. If you feel that the specific website does not require frequent automatic refreshes you can disable the feature. In this article let us see a few methods to stop the auto-refresh of chrome tabs.
Method 1: Re-start Chrome Browser
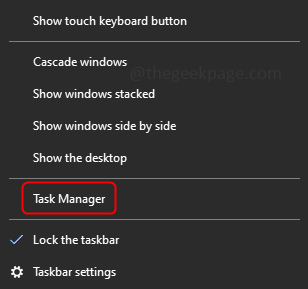
Step 1: Close and Reopen Chrome browsers do not work, you need to kill all the background processes related to chrome. So, right-click on the windows taskbar and select Task Manager
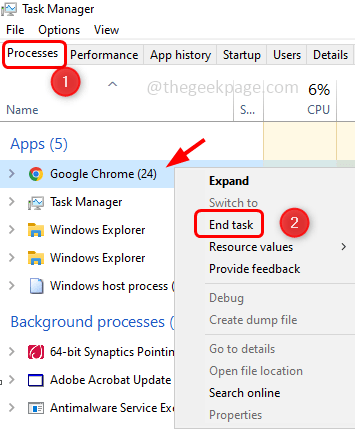
Step 2: In the processes tab, find Google Chrome, right-click on it and select End task
Step 3: Similarly find if there are any other entries of Chrome in the task manager and end them.
Step 4: Now open Chrome and check if it is working as expected
Method 2: Disable Meta Refresh
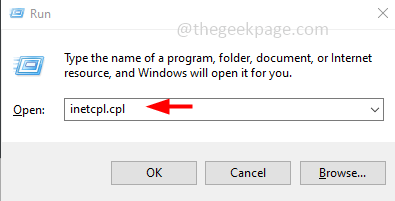
Step 1: Open the Run prompt using Windows + R keys together. Type inetcpl.cpl and hit enter
Step 2: This will open the internet properties window. Select the Security tab and click on the Custom level button
Step 3: Scroll down and find the Miscellaneous section. Under the miscellaneous section find “Allow META REFRESH”
Step 4: Now select Disable option by clicking on the radio button beside it
Step 5: This will disable the auto-refresh option. Click on OK
Step 6: Restart your computer and check if the issue is solved
Method 3: Check The Chrome Extensions
Step 1: Remove the unwanted extensions, to do that open your chrome browser and click on the three dots at the top right corner. From the list, select More tools
Step 2: Now, click on Extensions
Step 3: To remove the extensions click on the Remove button.
Step 4: To disable the extensions, click on the toggle bar.
Step 5: Else if you want to check which extension is consuming more RAM and then end that process, click on the three dots at the top right corner. From the list, select More tools
Step 6: And then click on Task manager
Step 7: Select the extension that is consuming more memory and then click on the end process
Method 4: Disable Auto Discardable Option
Step 1: Open a new tab in the Chrome browser, type chrome://discards in the search, and hit enter
Step 2: There appears a list, to stop auto refresh of the tabs, in the auto discardable column click on the toggle option a cross will appear.
But one drawback is that this setting is not permanent. If you close the chrome browser and relaunch it the auto discardable will be enabled again and again you may have to repeat the steps to disable it.
Method 5: Run SFC Command
Step 1: Open the command prompt in administrative mode, to do this type cmd in the windows search bar
Step 2: Press Ctrl and Shift keys together and hit enter
Step 3: A user account control window will open asking for confirmation, click on yes.
Step 4: In the command prompt type the below command and hit enter
sfc/ scannow
Step 5: It will take a few minutes to finish the scan process. Once done, open the Chrome browser in a new window and check if the issue is resolved.
Method 6: Reset Chrome To Default Settings
If none of the above methods work, then try resetting the chrome. Be aware that when chrome is reset, the extensions, bookmarks, cache everything will be removed. It appears just like a fresh start
Step 1: Open a new tab in the chrome browser and type chrome://settings/reset
Step 2: Click on Restore settings to their original defaults
Step 3: A pop-up will appear, click on Reset settings
That’s it! I hope any of the above methods would have worked for you. Thank you!!


