When you open the File Explorer and go to This PC, you will see that the Disk Space Usage bar will be displayed below the drive label. This disk space usage bar gives you information on the amount of free space out of the total space in that particular drive. Generally, this can be seen only when the default view setting is applied to File Explorer.
If you are noticing that this disk space usage bar is not being displayed under the drive label on your Windows 11 PC, then read this post to find some fixes that can help you resolve this issue on your computer.
Fix 1 – Reset the Folder View for This PC
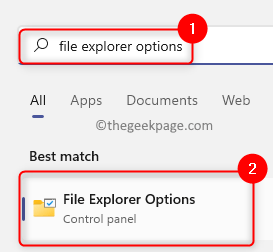
1. Tap on the Windows key on your keyboard and type file explorer options.
In the search result, click on File Explorer Options.
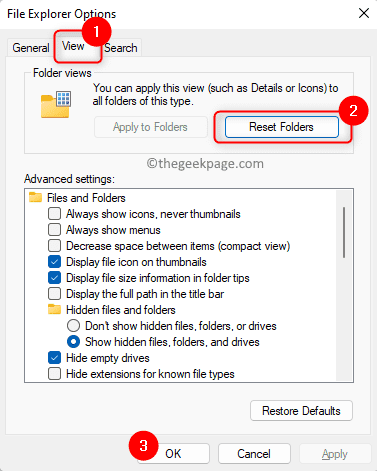
2. In the File Explorer Options window, go to the View tab.
In the Folder Views section, click on the Reset Folders button.
On clicking the button, This PC view is reset to the default view settings.
Finally, click on OK.
3. Reopen your File Explorer and check if the disk space usage bar shows up when you open This PC.
Fix 2 – Change the File Explorer View Settings
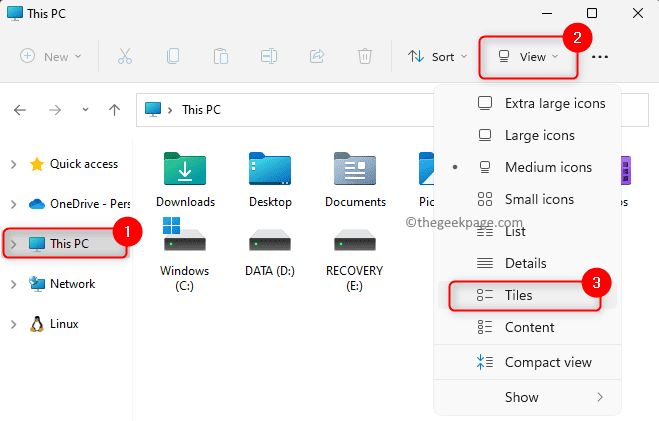
1. Open File Explorer (Windows + E) and go to This PC.
2. Click on the View tab at the top.
In the dropdown list that opens, select the option Tiles.
3. This will instantly change the view type for the devices and drives in This PC.
Now, you will be able to see the disk space usage bar below the drive label.
Fix 3 – Check the Registry Value for Drives
1. To open the Run dialog, press the Windows + R key combination.
Type regedit and hit Enter to open the Registry Editor.
Click on Yes when prompted by User Account Control for granting access permissions.
2. In the Registry, navigate to the path mentioned below.
HKEY_CLASSES_ROOT\Drive
3. Move over to the right side and look for TileInfo registry value.
Double-click on TileInfo to change its value.
4. In the Edit String window set the Value Data field to the value below:
prop:*System.PercentFull;System.Computer.DecoratedFreeSpace;System.Volume.FileSystem
Click on OK to save the changes.
Note: If the entry TileInfo is not present, then right-click on the empty space on the right side and choose New –> String Value of type REG_SZ. Give it the name TileInfo and set its value data as above.
5. Exit the Registry.
Open This PC in your File Explorer and the disk space usage bar must now be visible.
That’s it!
Thanks for reading.
We hope the troubleshooting methods mentioned in this article have helped you resolve the issue and display the disk space usage bar in This PC on your computer. Please let us know the fix that helped you in the comments section below.


