Is the C drive on your computer keeps filling up again and again on your computer? The red marker on the C drive (or on any drive) shows up when there is an shortage of free space. In some certain scnearios, the C drive may start to get filled up automatically. In that case, you can take these steps to get rid of unnecessary clutter in the C drive.
Fix 1 – Delete unnecessary files
The C drive is not the place to store your vacation vidoes. At least 30 GB of free space is required in the C drive for it to operate the machine efficiently. Clear or move any unnecessar files from the C drive to any other drive on your computer.
But, this alone may not be enough to fix the problem.
Fix 2 – Clear temp files using Diskcleanup
You can take the help of the Disk Cleanup tool to clear the Temp folder.
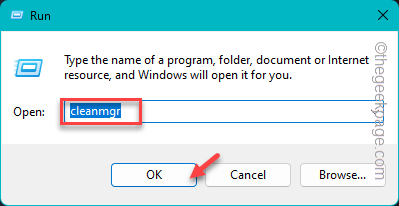
Step 1 – Using the Windows and R key, call the Run box on your screen.
Step 2 – Type this in the box and click “OK“.
cleanmgr
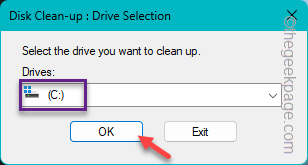
Step 3 – Select the “C:” drive from the drive selection panel and hit Enter.
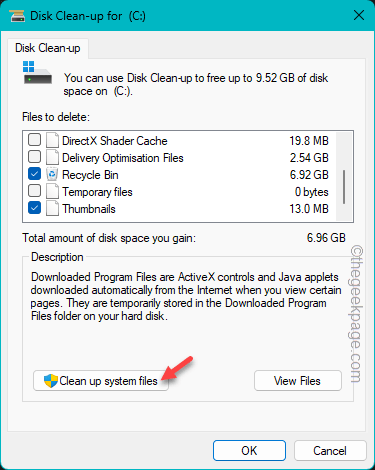
Step 4 – At first, tap the “Clean up system files” option.
Allow Windows a bit of time to analyze the supeflous files holding up space in your C drive.
Step 5 – Once it has done analyzing these, check all the boxes –
Recycle Bin
Previous Windows instalallations
Make sure to check the boxes that is occupying most of the storage in the drive.
Step 6 – Finally, tap “OK” to start the cleansing operation.
Step 7 – A prompt will show up on your screen. Tap “Delete Files” to delete all those files and clear up more free space in the C drive.
Now, go ahead and open the This PC in the File Explorer. Check the amount of free space there in the C drive.
Fix 3 – Delete the system restore points
Older restore points can become a burden on the system as they occupy a huge chunk of storage in the C drive.
Step 1 – Launch a Run panel using Win+R keys.
Step 2 – Next, type “sysdm.cpl” there and hit Enter.
Step 3 – In the System Properties panel, go to the “System Protection” tab.
Step 4 – Select the “Local Disk (C:)” drive from the list and tap “Configure” to configure that.
Step 5 – There should a slider in there denoting the maximum disk usage. So, drag the slider all the way to the left to minimize the alloted disk space for a restore point (not more than 5% of the total disk space).
Step 6 – Finally, tap “Delete” beside the Delete all restore points for this drive option.
Windows shall take a few seconds to remove the restore points from the drive.
Go back to the File Explorer and you shall see a significant improvement of the free space in the C drive.
Fix 4 – Use the storage sense
If you are using Windows 11/10, you can use the automated storage sense to free up the C drive automatically.
Step 1 – Directly search “storage sense” and open up the “Turn on storage sense“.
[
Or, you can open up the Storage sense in Settings –
System > Storage > Storage Sense
]
Step 2 – In the Storage management tab, enable the “Storage Sense“. After that, open it up.
Step 3 – Check the “Keep Windows running smoothly by autoamatically cleaning up temporary system” box.
Step 4 – Finally, toggle the “Automatic User content cleanup” to On mode.
Step 5 – Now, you have to configure the Storage Sense. Set the ‘Run Storage Sense’ to “During low free disk space (default)“.
Step 6 – After this, set the ‘Delete files in my recycle bin if they have been there for over:’ to “30 days (default)“.
Step 7 – Finally, tap “Run Storage Sense now” to run the Storage sense tool.
Now, Windows will enlist which folders or file types (like apps or appdata) is eating up so much of free space of the drive.
Take necessary steps according to the the situation and free up more space on your system.
Fix 5 – Manually clear the Temp folder
You must clear the Temp folder and free up space in the C drive.
Step 1 – Press the Win+R keys at once.
Step 2 – Next, type this and click “OK“.
%temp%
Step 3 – Select all the files and press the Delete button to remove them.
Step 4 – Open the Run dialog box, again.
Step 5 – Type “temp” in there and click “OK“.
Step 6 – Delete all the files from here as well.
Step 6 – For one last time, open a Run box and type this and hit Enter.
prefetch
Step 7 – Empty this folder as well.
Now, check the amount of free space left in the C drive.


