Focus Assist is a productivity tool in Windows that provides a distraction-free, productive work environment. It is good for office hours, but what if you can’t disable the focus assist at all? It can cause stress as you will miss all the notifications about crucial emails and reminders to do stuff. This is a strange issue that some Windows 10 users are facing. If you are also facing this dilemma, don’t worry. This issue has a few easy fixes that can sort out the issue very quickly.
Workaround –
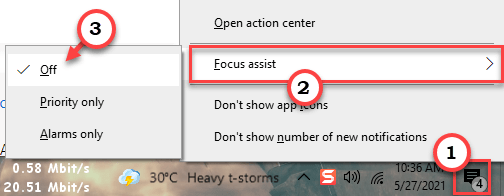
1. There is a way you can disable the Focus Assist from Taskbar.
a. Just right-click on the notification icon on the taskbar and click on “Focus assist“.
b. Set the settings to “Off“.

Check if this works out for you or not.
Fix 1 – Disable the Focus Assist for full-screen apps
You have to just disable the focus assist for full-screen apps.
1. At first, press the Windows key+I keys together.
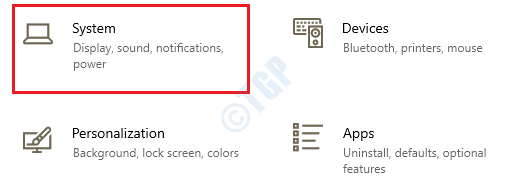
2. Then, click on the “System“.

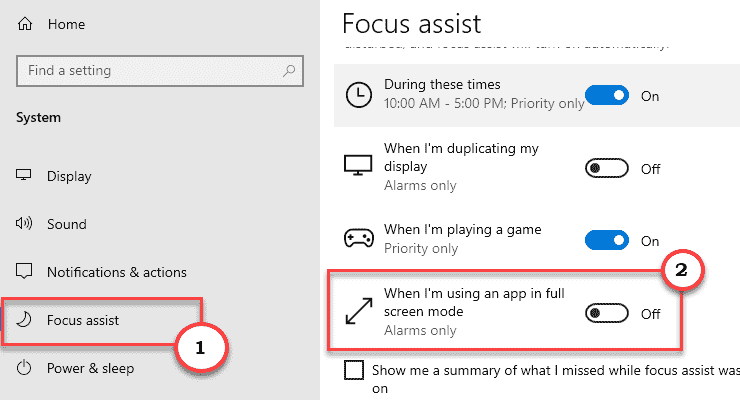
3. In the System settings, on the left-hand side, scroll down and click on the “Focus Assist“.
4. On the right-hand side, toggle the “When I’m using an app in full-screen mode” to “Off“.

Close the Settings screen.
Try disabling the Focus Assist on your computer.
Fix 2 – Disable the Focus Assist
[FOR WINDOWS 10 PRO & ENTERPRISE USERS]
You can disable the Focus Assist using the Local Group Policy.
1. First of all, right-click on the Windows icon on the Taskbar. Then, tap on the “Run“.
2. Then, write “gpedit.msc” and click on “OK“.

3. Once the Group Policy Editor opens up, go to this place –
User configuration –> Administrative Templates –> Start Menu and Taskbar –> Notifications

4. On the right-hand pane, try to locate the “Turn off Quiet Hours” policy.
5. Then, double-click on the policy to edit it.

6. Set the policy to “Enabled“.
7. Then, click on “Apply” and “OK” to save the policy settings.

After setting this policy, close the Local Group Policy Editor screen.
Fix 3 – Check the date settings
It seems that this glitch is dominant if the system date is wrong on your computer.
Step 1 – Adjust the time and date manually
1. Open the Settings window.
2. Then, click on the “Time & Language” settings.

3. After that, on the right-hand side, just under the Current date and time settings. toggle “Set time automatically” to “Off“.
4. Then, you have to adjust the time zone manually. Next, click on “Set time zone automatically” to “Off“.

5. You have to alter the date and time settings, click on “Change“.

6. Now, just set the correct “Date” settings.
7. Then, adjust the correct “Time” according to the local time of your location.
8. Finally, click on “Change“.

9. After that, scroll down through the ‘Time Zone‘ settings.
10. You have to click on the drop-down and select your timezone.

Close Settings window.
STEP 2 – Adjust the time server
1. At first press the Windows key+R to launch the Run window on your computer.
2. Type this run command in the Run window and then hit Enter.
timedate.cpl

3. Once the Date and Time window, click on the “Internet Time” tab.
4. After that, click on “Change settings…” to alter the settings.

5. Once the Internet Time Settings window appears, tick the box “Synchronize with an Internet time server“.
6. Then, click on ‘Server:‘ and just select the “time.windows. com” server from the drop-down list.
7. After that, click on “Update Now“. Finally, click on “OK” to save the changes on your computer.

8. In the Date and Time settings window, click on “Apply” and “OK” to save the changes on your computer.

Once you have set the correct date and time settings,
Fix 4 – Create a new user account
You have to create a new user account on your computer.
1. Press the Windows key+S keys together. Then, write “cmd” in the search box.
2. After that, right-click on the “Command Prompt“. Then, click on “Run as administrator“.

3. Execute this command on your computer to create a new administrator account on your computer.
net localgroup Administrators <username> /add
NOTE– Simply, replace the “<username>” with any new username
Example – As we have wanted a user account named Sambit, so the command will be –
net localgroup Administrators Sambit /add

4. Now, sign out from your current account.
Then, sign in with the new account you have just created. Now, try to disable the Focus Assist.
Fix 5 – Disable the in-game overlay
Some users have complained that the NVIDIA in-game overlay may cause this issue.
1. Just you have to search for the “GeForce Experience“.
2. Then, click on “GeForce Experience” in the search results.

3. In the GeForce Experience window, go to the “General” tab.
4. Then, uncheck the “IN-OVER OVERLAY” settings.

After that, close the Geforce Experience.
Fix 6 – Update the Windows
Windows fix these annoying errors with the occasional patches.
1. Open the Windows Settings by pressing the Windows key+I keys together.
2. Tap on the “Update & Security” settings to access it.

3. After that, click on “Windows Update“.
4. Click on “Check for updates” to download and install new updates.

Windows will check for updates and install them on your computer.
NOTE–
Sometimes, you may notice some additional updates for your device. Those are usually listed in the’ Optional update’ section. We suggest you install these updates.
a. You need to click on “View optional updates” to view the list of additional updates.

b. Here you will notice some driver updates are pending. Simply, check all the updates.
c. Finally, click on “Download and install“.

d. After downloading the updates on your device, click on “Restart Now“.

This will restart the computer and complete the installation process.