Multiple displays can make your life easier as it does increase the viewing experience and productivity level of your work. But what if your Windows 10 or 11 can’t even detect the second monitor you are trying to use? Don’t worry. This article is just for you. If you are unable to connect the second monitor, follow these easy fixes, and soon, Windows will identify and detect your second monitor.
Workarounds –
1. At first, restart your computer and try plugging in the second monitor again.
2. Check the connection of the second display.
Fix 1 – Identify the missing display
You can identify the missing display from the Settings menu.
1. Open the Settings window on your computer.
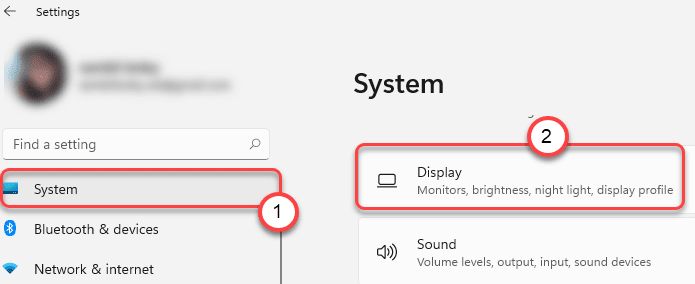
2. Then, click on “System” on the left-hand pane.
3. Next, you have to click on “Display” settings at the top of the other settings on the right-hand side.

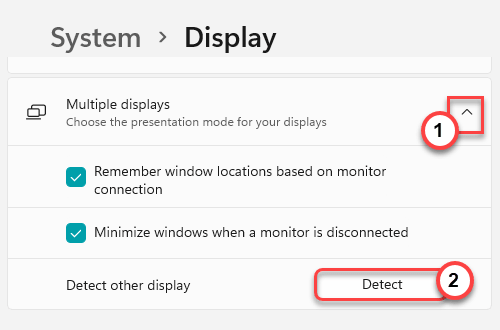
4. Now, on the right-hand side, you will find “Multiple Displays“.
5. Now, in the ‘Detect other display‘ section, you have to click on “Detect“.

It will detect the additional monitor for your setup.
Fix 2 – Update the display driver
There is a chance that you are not using the latest display driver, which is causing the multiple display issue.
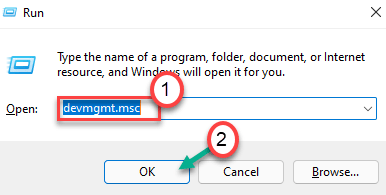
1. At first, press the Windows key+R keys together.
2. Then, type “devmgmt.msc” and hit Enter.

3. When the Device Manager opens up, click once on the “Display adapters” section.
4. Then, right-click on the display driver and click on “Update driver“.

5. Next, chose the “Search automatically for drivers” on the window.

Let Windows install the necessary driver for your system.
Fix 3 – Change the display frequency
If you are trying to attach two displays running on different frequencies, Windows won’t recognize the second display with the other frequency. Suppose you are using the 60 Hz refresh rate in one monitor. If you try to attach a 144 Hz display with the setup, Windows won’t support the new display.
You have to use one single display frequency.
1. At first, press the Windows key+R keys together.
2. Then, type “desk.cpl” and hit Enter.

This will open up the display settings.
3. Now, on the right-hand side, tap on the “Advanced display“.

4. Then, in the ‘Select a display to view or change its settings’, click on the drop-down and choose the “Display 1“.
6. Then, click on the ‘Choose a refresh rate:’ settings.
7. Select a refresh rate that both the displays supports. (Example – Suppose “60 Hz” is supported by all displays.)

Now, following the same steps set the same refresh rate for ‘Display 2’. After doing these steps, enact the steps of Fix – 1 to identify the secondary display. Close the Settings screen.
Fix 3 – Rollback the display driver
If you were working with multiple displays before you have updated the display driver, follow these steps to roll back the display driver update.
1. At first, right-click on the Windows icon and click on “Device Manager” to open it up.

2. Next, tap on the “Display adapters” section to expand it.
3. After that, double-click on the display driver to modify it.

4. Next, go to the “Drivers” tab.
5. Then, tap on the “Rollback driver“.

6. Windows will throw up a warning message. Select the “Previous version of the driver performed better“.
7. Just, click on “Yes” to roll back the display driver.

Your computer will restart automatically.
Fix 4 – Manually install the latest version of the graphics driver
[
NOTE – In this process, we have shown how to install an NVIDIA graphics driver. You can use the NVIDIA GeForce Experience to download and install the latest available driver for your system.
]
1. At first, you have to go to the NVIDIA Driver downloads website.
2. Just place your particular specifications of the existing graphics driver in the appropriate section (like ‘Product type’, the ‘Operating System’, etc).
3. Finally, you need to click on the “Search“.

4. Then, click on the “Download” button to download the graphics driver.

Once the downloading process completes, close the browser.
5. Then, open the location of the graphics driver.
6. After that, just double-click on the offline installer to launch it.

7. Once the NVIDIA Graphics Driver window appears, select the “NVIDIA Graphics Driver and GeForce Experience“.
8. You have to agree to the terms and conditions. Tap on “Agree and continue“.

9. Then, select the “Custom (Advanced)” option to try it out.
10. After that, click on “Next“.

7. Don’t forget to check the box beside the “Perform a clean installation“.
8. To start the installation process, click on “Next“.

After the installation is over, close the installer window and restart your computer to complete the installation process.