Notifications can be a lifesaver while you are working on your computer, letting you know your important emails, replies, missed out Teams calls. But, annoying notifications can make you angry while you are gaming or not working. Windows 11 does come with some new ways to tweak the notifications for your convenience.
How to enable/disable the notifications in Windows 11
There are several ways you can enable/disable the notifications in Windows 11. We have discussed all the ways with step-by-step detailed instructions.
Way 1 – Enable or disable all notifications in Windows 11
You can enable or disable all the notifications at once using the Settings menu.
1. At first, press the Windows key+I keys together to open the Settings.
2. Then, click on the “System” from the left-hand pane.
3. On the right-hand side, tap on the “Notifications” settings to access it.

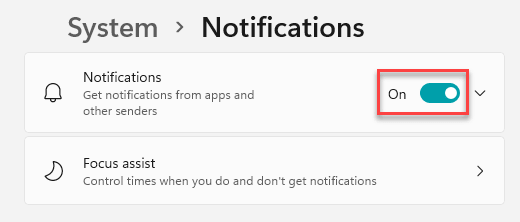
4. Simply toggle the “Notifications” settings to “On” to enable the notifications.

[
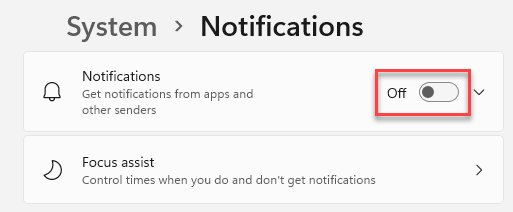
Same way, you can disable all the notifications, just by toggling the “Notifications” settings to “Off“.

]
After that, just close the Settings window. This is the way you can control all the notifications on your system.
But what if you want to restrict or allow notifications access to some specific apps of your choice.
Way 2 – Personalize the notification access for apps
You can allow or disallow notifications for certain apps as you prefer.
1. At first, open the Settings on your system.
2. Then, tap on the “System” again.
3. Now, on the right-hand side, tap on the “Notifications” settings to access it.

4. In the Notification settings, go to the ‘Notifications from apps and other senders’ section.
5. Here, you will find all the apps that have notification access to your system.
6. Just toggle to “On” settings the apps you want to give notification access to.
7. Same way, you can toggle the notification access of the apps to “Off” which app notifications you don’t want to see.

Close the Settings pane.
Way 3 – Turn off notifications using the Registry Editor
You can alter the registry
1. At first, press the Windows key+R keys together.
2. Then, type “regedit” and click on “OK“.

IMPORTANT–
The Registry Editor is a very delicate location. So, before you alter a single key, just create a new backup of the registry following these two simple steps.
a. Once you have opened the Registry Editor, you will need to click on the “File” and then click on “Export“.
b. Save the backup in a secure place.

If anything goes wrong, you can easily restore the registry to its original state.
3. When the Registry Editor opens up, navigate to this key –
Computer\HKEY_CURRENT_USER\Software\Microsoft\Windows\CurrentVersion\PushNotifications
[
Check if you can find the “ToastEnabled” key on the right-hand pane. If you already have this key, skip all these steps to step 7.
]
4. Now, on the right-hand side, right-click on the space and click on “New>“, and then click on “DWORD (32-bit) Value“.

5. Name this new key as “ToastEnabled“.
6. Then, double-click on it to edit it.

Steps to disable the notifications throughout Windows 11 –
7. At first, set the base to “Hexadecimal“.
8. Next, set the value to “0“.
9. Then, click on “OK“.

Steps to enable the notifications throughout Windows 11 –
10. Again, set the base to “Hexadecimal“.
11. After that, set the value to “1“.
12. Next, click on “OK“.

After altering the registry according to your need, close the Registry Editor. Then, restart the computer.
Way 4 – Turn off notifications from Windows 11 Notification center
There is another way to turn off the notifications in Windows 11. You can do it whenever you receive annoying notifications in your notification centers.
1. You have to press the Windows key+N keys together to open up the Notification Center.
2. Here, you will notice the list of notifications in the notification centers.
3. Just click on the three-dot menu of the notification of the app and click on “Turn off all notifications for appname” to disable all the notifications for the particular application.
[
The “appname” represents the name of the app. Like, if you try to disable notifications from the Store app, you will see this option “Turn off all notifications for Microsoft Store“.
]

This way, you can easily take control of which app will send notifications and which apps won’t.