First, let’s understand the role of IP Address and DNS servers. Let us say we want to open www.thegeekpage.com, our System has unique IP, say 192.168.0.1, and the webserver that hosts the website(www.thegeekpage.com) has a unique IP, say 770.34.56.1. The computers and network devices understand just numbers(it’s faster to process). To reach the website we have to enter the IP address of the website. But, remembering the IP address of each website is not possible. This is where DNS comes into the picture. DNS means Domain Name Servers. They tell us the IP address corresponding to the domain name. When we type the domain name(say, www.thegeekpage.com) and hit Enter, internally a request goes to the DNS server and that returns the IP address 770.34.56.1 of the domain name.
Usually, the IP address and DNS servers are automatically configured in the system. Several times you might have to change it manually as
- DNS servers are not reachable
- The IP address assigned automatically is taken by some other system
- For Security concerns
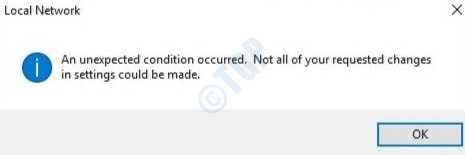
When we try doing that, it throws some error as shown below,

In such situations, we can try to fix the error in various ways mentioned below.
Method 1: Resetting the values from Command Prompt
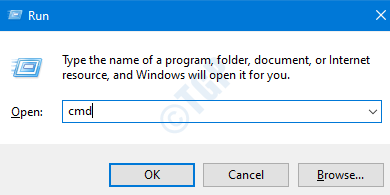
Step 1: To open the Run window, hold the keys Windows+r at the same time
Step 2: Type cmd and press Ctrl+Shift+Enter together. This opens command prompt with Administrator Privileges.

Resetting the IP Address
In most cases, renewing the IP address of the system has fixed the issue.
In the command prompt window, type the commands
ipconfig /release
ipconfig /renew
With these commands, a new IP address will be assigned to the system. If the issue is no resolved yet, try the below fix.
Flushing DNS and Resetting Winsock
To see why things aren’t working, we can refresh the TCP/IP network settings by flushing the DNS server and resetting winsock
In the command prompt type the following commands one after the other
ipconfig /flushdns
ipconfig /registerdns
NETSH winsock reset catalog
NETSH int ipv4 reset reset.log
NETSH int ipv6 reset reset.log
exit
Restart your system for the changes to take effect.
Now see if the issue resolves, if not try out the below fixes.
Method 2: Configuring from PowerShell
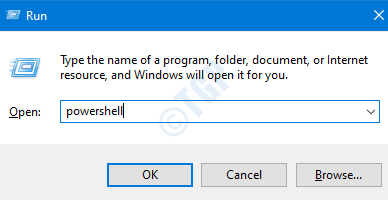
Step 1: Press Windows+r at the same time and open run window
Step 2: Enter powershell in the open section and hit Ctrl+Shift+Enter to open powershell in Admin mode.

Setting Static IP Address
In order to set a Static IP address, we can use the New-NetIP address cmdlet as follows.
New-NetIPAddress
[-IPAddress] <String>
-InterfaceAlias <String>
[-DefaultGateway <String>]
[-AddressFamily <AddressFamily>]
[-Type <Type>]
[-PrefixLength <Byte>]
[-ValidLifetime <TimeSpan>]
[-PreferredLifetime <TimeSpan>]
[-SkipAsSource <Boolean>]
[-PolicyStore <String>]
[-CimSession <CimSession[]>]
[-ThrottleLimit <Int32>]
[-AsJob]
[-WhatIf]
[-Confirm]
[<CommonParameters>]
For a detailed explanation of what each parameter does and the variation of the command refer to this link
Not all the above-mentioned parameters are needed. We can specify the ones that we want. Generally, it should have 4 parameters i.e IP address, Interface Alias, Prefix length(Subnet mask), and gateway address. As an example, let us consider a basic setting where we have to configure the IP address 192.18.0.12/24 ( /24 is equivalent to subnet mask 255.255.255.0) and the default gateway 192.168.0.254 to the “Wired Ethernet Connection”, then the command would be
New-NetIPAddress
–IPAddress 192.168.0.2
-InterfaceAlias “Wired Ethernet Connection”
–PrefixLength 24
-DefaultGateway 192.168.0.254
Refer to the snapshot below :

NOTE :
If you want to modify the changes for this IP address you can use the Set-NetIPAddress cmdlet. For more details on that command refer here.
Setting DNS Server
In order to change the DNS server settings, we can use Set-DnsClientServerAddress cmdlet. The command is
Set-DnsClientServerAddress
[-InterfaceAlias] <String[]>
[-ServerAddresses <String[]>]
[-Validate]
[-ResetServerAddresses]
[-CimSession <CimSession[]>]
[-ThrottleLimit <Int32>]
[-AsJob]
[-PassThru]
[-WhatIf]
[-Confirm]
[<CommonParameters>]
For a detailed explanation of parameters and the variation of the command refer to this link
Not all the parameters specified above are needed. We can use the ones that are required. Generally, two DNS servers( primary and secondary) are configured. Let’s say we want to configure the Primary one as 192.168.0.2 and the secondary one as 192.168.0.2 over the interface Wired Ethernet Connection. The command would be,
Set-DnsClientServerAddress
-InterfaceAlias “Wired Ethernet Connection”
-ServerAddresses 192.168.0.1, 192.168.0.2
Refer to the snapshot below,

Restart the system and see if the issue resolves.
Method 3: Assign IP Address using DHCP
Step 1: Hold Windows+r keys together to open the Run window
Step 2: In the window that opens type ms-settings:network-wifi and press OK

Step 3: In the Settings –> Network & Internet –> Wifi window that opens, click on Manage known networks

Step 4: Click on the Network and choose Properties

Step 5: Under the IP settings section at the bottom click on Edit.

Step 6 – When Edit IP Settings window opens, Choose Automatic(DHCP), and press Save

Restart the system and check if an IP is assigned by the DHCP.
NOTE :
In order to change the IP assignment of an Ethernet Connection, In Step-2, Choose Ethernet Tab instead of Wifi and follow the same steps.
That’s All. We really hope that these methods will help you fix the issue. Kindly comment and let us know which of the above fixes worked for you.
Thank you for Reading.