Several windows users have recently reported that all of a sudden their brightness adjustment slider got stuck/greyed or is missing on their windows 11,10 system and they are not able to change the brightness level on the system. A few of the other windows users have expressed that after they updated their bios or made some changes to the bios settings.
There can be various causes why this problem is occurring in the system and they may be because of not updating the Windows system and graphics driver. It can also be due to disabling the monitor driver and because some users might have unknowingly removed the brightness settings option from the action center on the taskbar.
If you are experiencing a similar problem, such as the brightness slider option being frozen or missing on your system, then all the solutions given in this post can prove to be a great help in fixing the problem. We reached these solutions after doing an extensive investigation into the causes of this problem, so please continue reading…
Fix 1 – Make sure Monitor Driver is Enabled and Updated
A disabled monitor driver can be the reason for such an issue on any windows device so we suggest users try enabling the monitor driver via device manager using the steps below.
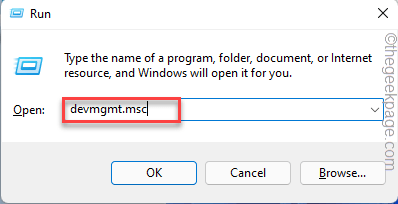
Step 1: Press the Windows and R keys simultaneously which opens the Run command box at the bottom left side of the screen as shown below.
Step 2: Then, type devmgmt.msc in the textbox of Run and hit the Enter key to open the Device Manager.

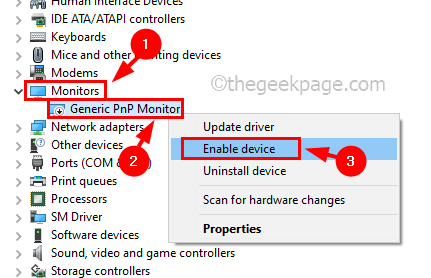
Step 3: Once the device manager window opens, go to Monitors from the list of devices and double-click on it to expand it.
Step 4: Next, right-click on the monitor driver and click Enable from the context menu if it has been disabled before. Otherwise, it will display Disable option in the context menu.

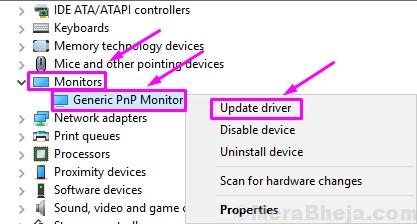
Step 5: Once done, again right-click on the monitor driver and select Update driver from the context menu as shown below.

Step 6: Next, select the Browse my computer for drivers option from the window that appeared on the screen as shown below.

Step 7: Then, click Let me pick from a list of available drivers on my computer to continue.

Step 8: Select Monitor driver (Generic Pnp Monitor) from the list of compatible hardware shown just like in the below image and click Next.

Step 9: It will start updating the monitor driver that you chose from the list and once done, it will throw a successful message window.

Step 10: Once done, close the device manager window and see if the problem got resolved.
Fix 2 – Update the Windows system
Without the updated windows system, it can create issues as mentioned above in this post because Microsoft releases the updates which are quite necessary to remain updated for the system to function better and have a good user experience. So let us see how to update the windows system.
Step 1: Press the Windows key on the keyboard and type settings.
Step 2: Then, select Settings from the search results as shown below.

Step 3: After the Settings page is opened, go to the Windows Update option at the bottom of the menu on the left side of the Settings page.

Step 4: Later, click the Check for updates button at the rightmost corner at the top as shown below.

Step 5: Now it will start checking for any updates and if there are any updates found, then please download and install them.
Step 6: After it is done, restart the system to take effect.
Fix 3 – Update the Display Adapter
The display adapter also is also important and needs to be updated on a regular basis for the brightness or any other issues on the system related to display. Here are a few steps that you need to follow to update the display adapter using the device manager.
Step 1: Press and hold the Windows and X keys together on the keyboard.
Step 2: This shows the context menu of the Start button on the taskbar.
Step 3: Select Device Manager from the list by clicking on it as shown below.

Step 4: In the Device Manager window that just opened, double-click on the Display adapters from the list of devices to expand it.
Step 5: Now right-click on the display adapter like Intel(R) UHD Graphics and click Update driver.

Step 6: Click the Search automatically for drivers option in the update window that appeared on the screen as shown below.

Step 7: It will start updating the display adapter and once done, it will display a successful message as shown below.
Then, click Close to close the window.

Step 8: After that, close the device manager window.
Fix 4 – Install Twinkle Tray: Brightness slider app
If none of the above-explained fixes helped you, then probably this is the best possible solution where you need to install this great app called Twinkle Tray which is used to adjust the brightness level of the display using the keyboard shortcut.
Let us start with how to install and use the Twinkle Tray app on the windows system with the steps.
Step 1: Press the Windows key and type microsoft store.
Step 2: Hit the Enter key to open the Microsoft Store app on the system.

Step 3: In the Microsoft Store app, type twinkle tray in the search bar at the top of the app.
Step 4: Select the Twinkle Tray:Brightness Slider app from the search results dropdown as shown below.

Step 5: Click Get to start downloading and installing the app on your system.

Step 6: Now it will start downloading and installing the app.
Step 7: Once done, open the twinkle tray app on your system by pressing the Windows key and typing twinkle tray.
Step 8: Then, select the Twinkle Tray app from search results as shown below.

Step 9: Open the system tray on the taskbar right side end and right click on the twinkle tray icon and then select Settings from the context menu as shown below.

Step 10: This opens the twinkle tray settings window where you need to go to Hotkeys & Shortcuts option on the left menu.
Step 11: Then, click on Increase Brightness field and press any key to set shortcut for increasing the brightness on your system.
Similarly, configure the hotkeys for Decrease Brightness and Turn off displays option.

Step 11: Once done, you can close the settings window.
Now on you can adjust the brightness level on your display using these shortcuts set using twinkle tray app.