The need to insert blank rows and columns to your Excel sheet after the entire sheet is prepared is definitely not common. If it’s just one row or column, the insertion part is indeed an easy task. You just need to right click on the row header or column header before which you want the empty rows or columns to be inserted and then hit the Insert option. For inserting multiple rows or columns, you can repeat this process n number of times. Or really do you have to do it? Not when we are here!
In this article, we explain in some simple steps how you can easily and instantly insert multiple blank rows or columns to your Excel sheet without wasting your time at all. Hope you enjoy reading the article.
How to Quickly Insert Multiple Blank Rows
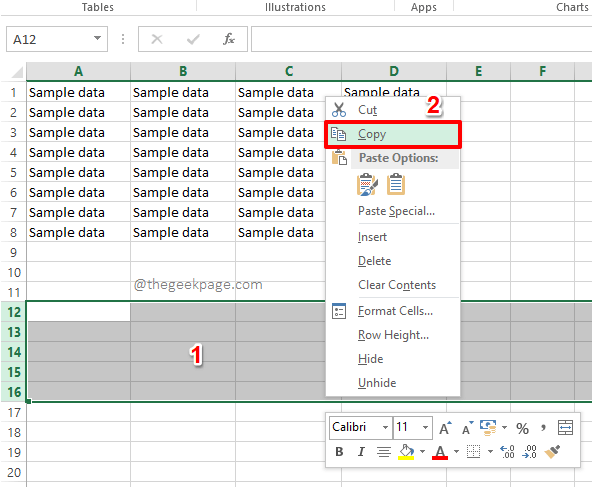
Step 1: Firstly, launch the Excel sheeet and select some blank rows from the bottom part of your sheet.
As next, right click anywhere on the selected rows and then click on the Copy option from the right click context menu.
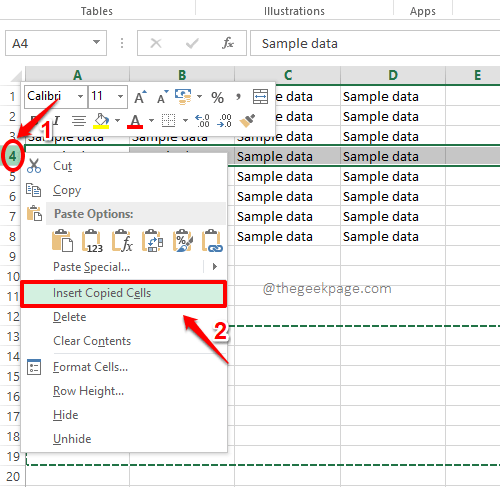
Step 2: As next, on your Excel sheet, select the row above which you want the blank rows to be inserted.
In the example below, I want the blank rows I selected from Step 1 to be inserted above row number 4. Hence I have selected the row 4.
Step 3: As next, right click on the row header, and from the right click context menu, click on the option Insert Copied Cells.
Step 4: That’s it. If you now look at your Excel sheet, you can see that all the blank rows that you selected from Step 1 are now successfully inserted.
How to Quickly Insert Multiple Blank Columns
Step 1: The steps to insert multiple blank columns to your Excel sheet is very similar to the one where we insert multiple blank rows.
Firsly, select some blank columns from your Excel sheet. In the example below, I have selected columns from E to H.
Step 2: As next, right click anywhere on the blank columns selected and then hit the option Copy.
Step 3: Now, you need to right click on the column header before which you want your blank columns to be inserted. After that, click on the option Insert Copies Cells.
In the example below, I want the blank rows to be inserted before column B. So I have right clicked on the Column B header and then clicked on the Insert Copied Cells option.
Step 4: Yes, it’s as simple as that. Your blank columns are now successfully inserted, just like that. Enjoy!
Please tell us in the comments section whether you found the article helpful. Stay tuned for more tricks, tips and how-to articles.


