Some Windows 11 Beta users have escalated an issue in the Microsoft forum where they have complained about an issue with Windows Autopilot. It seems the Autopilot.dll is indexing WIL error and this issue is quite persistent. If you have also found this error message in Event Viewer, go through these easy fixes to troubleshoot the issue.
Fix 1 – Wait for another build
This problem seems to be associated with the Windows 11 22598 build. So, you just install the latest Windows build and fix the problem.
1. Open Windows Settings.
2. Then, head on to the “Windows Update“.
3. Now, see whether Windows is already downloading an update or not. If it isn’t, click “Check for updates“.
Windows will find the latest preview available for your Windows device and install it.
4. When the process is finished, you will be asked to restart your system.
Then, click “Reboot now” to restart the system and install the update.
When the computer is finally updated to the latest build, you have to run the computer for a few hours. Now, open the Event Viewer and you won’t find any Autopilot.dll error.
Fix 2 – Disable the Microsoft Account Sign-in Assistant
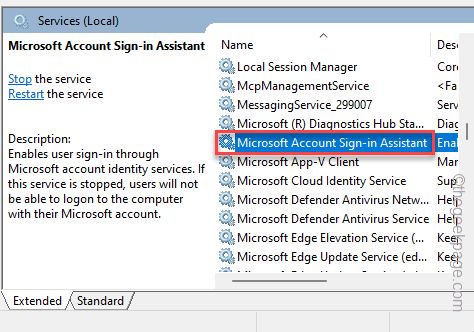
There is a PID number associated with these reported errors. This PID error seems to be associated with the Microsoft Account Sign-in Assistant service. Disable it to solve the problem.
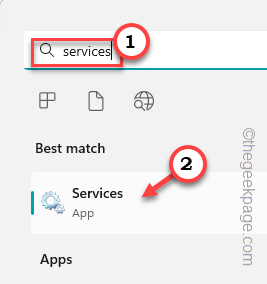
1. Search “services” in the search box.
2. Then, click “Services” to open it.
3. There, go down and look for the Microsoft Account Sign-in Assistant service.
4. Next, just double-tap that service to open it up.
5. Now, click “Stop” to stop the service immediately.
6. Now as you have stopped it, you have to set the “Startup type” to “Disabled” using the drop-down menu.
7. After that, save it with a click on “Apply” and another on “OK“.
When you have saved the changes, restart the system once. This way, the service gets disabled at the time of system startup.
Fix 3 – Delete dllmain.cpp in Safe Mode
You have to the dllmain.cpp in Safe Mode on your computer.
Step 1 – Boot the system in Safe Mode
You can only delete this file in Safe Mode. Go through these steps –
1. Open Windows Settings.
2. Then, head on to the “System” pane.
3. If you go down through the right-hand pane, you will find the “Recovery“. Open that.
4. You will see the Advanced Startup section. Click “Restart now” to restart the system in Advanced Recovery mode.
5. Open the Advanced options settings following the force-restart method we have shown before.
6. Now, click on the “Troubleshoot” menu.

8. Here you will see the “Startup Settings” option here. Now, click that to open it.

9. Now, just click “Restart” to reboot the system.
As the system restarts, you will be offered several choices.
10. Now, just click F4 key to choose “Enable Safe Mode“.
Within a few seconds, your system will start up in Safe Mode.
You can distinguish Safe Mode from a normal startup by the black background.
Step 2 – Delete the file
Now you can easily remove the accused file from your system.
1. Open File Explorer.
2. Now, go to this point –
onecoreuap\admin\moderndeployment\autopilot\dll\
3. There, select the “dllmain.cpp” and click “Delete” icon to delete it.
If there are any warning messages, you can just confirm and proceed.
After doing this, restart your computer. It will restart normally.
Fix 3 – Disable the XMP Overclocking
XMP features are offered in some computers. So, if your system has the XMP profile and you are using any, you should disable that from BIOS.
1. Restart your system.
2. You will see the manufacturer’s logo on the screen as it does restarts. There, you will see a key along with the “BIOS” setting. Press and hold that key until the system boots into BIOS mode.
[In some computers you may have to press the Fn key along with the designated key to achieve this.]

3. When the computer does go into BIOS page, there look for the Overclocking settings. You may find that in the Advanced Settings page.
4. There, search for XMP. Turn it off.
5. After turning off the XMP feature, save the changes and exit BIOS.
As you exit the BIOS, you will be back in normal Windows. Now, you won’t face the AutoPilot.dll error again.
Fix 4 – Run the DISM scanning codes
Here are some DISM codes that you should run on your system to scan the device.
1. You can easily run these scans from a terminal.
2. So, search for “cmd“.
3. Then, right-click the “Command Prompt“. Then, on the context, click “Run as administrator“.

4. Right after this, when the terminal opens up, copy-paste these scanning codes one at a time and paste in the terminal, hit Enter to run the scans.
DISM /Online /Cleanup-Image /CheckHealth
DISM /Online /Cleanup-Image /ScanHealth
DISM /Online /Cleanup-Image /RestoreHealth
Deployment Image Servicing and Management tool checks all the components of your system and fixes any bad or corrupt sector in the process.
All these scans can be lengthy and may take up some time to complete.
Fix 5 – Get out of Developer Preview
Autopilot.dll is associated with Microsoft Hololens, a recently launched AR venture of Microsoft. These are experimental features and generally show up in Windows Preview builds (which is obvious). There are three channels of updates for a Windows Insider Program user. If you have opted for the Developer Preview version, these types of bugs are normal. If you get back into the Windows Insider Release Preview channel, this problem should go away.


