Windows has an intention to download and install the updates for all the hardware devices automatically without requiring any user intervention. The situation has slightly changed as the driver updates are now being delivered as ‘Optional Updates’. But, if you are using a Windows Pro or Enterprise edition, you can block additional hardware devices. This solution is not for the Windows Home Edition.
How to prevent Windows from automatically updating specific drivers
You can block the devices on your system based on the specific Hardware IDs. You will have to use the
Step 1 – Retrieve the Hardware IDs
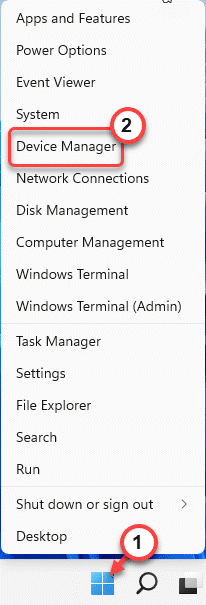
1. At first, press the Windows key+X keys together.
2. Further, tap on “Device Manager” to access it.

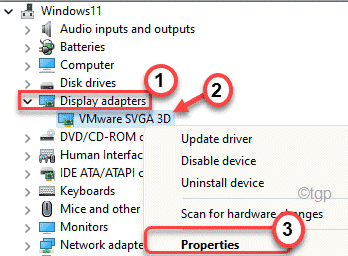
3. When the Device Manager opens up, expand the specific hardware device you want to stop the automatic update of (suppose a ‘display driver’ of your system.)
4. After selecting the particular device driver, right-click on it and tap on “Properties“.

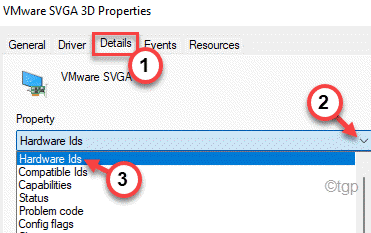
5. Now, go to the “Details” section.
6. Then, click on the ‘Property’ drop-down and choose the “Hardware Ids” from the list of items.

A list of Hardware Ids will appear on your section.
7. Now, select all the hardware Ids from the list.
8. Then, right-click on the copied list and tap on “Copy” to copy the list of hardware Ids.

You can close the Device Manager.
9. Now, go to the Desktop.
10. Then, right-click on the desktop and tap on “New>“.
11. Choose the “Text Document” to create a new text file.

12. Open the text file and paste the hardware Ids on the text file.
13. Then, press the Ctrl+S keys together to save the changes.

Minimize the Notepad window.
Now, you can proceed to the next step of the process.
Step 2 – Block automatic updates based on hardware Ids
Now, you can block the automatic updates based on those copied hardware ids.
1. At first, press the Windows key+R keys together.
2. Here, type this command and hit Enter.
gpedit.msc

3. When the Local Group Policy Editor opens up, expand the left-hand side this way –
Computer Configuration > Administrative Templates > System > Device Installation > Device Installation Restrictions
4. On the right-hand side, look for the “Prevent installation of devices that match any of these device IDs“.
5. Then, double-click on the policy to modify it.

6. Here, switch the policy to “Enabled“.
7. In the ‘Options:’ panel, tap on “Show…“.

This will open up the Show Contents window.
8. Now, maximize the Notepad window and copy the first hardware ID.
9. Paste the copied hardware ID in the first row on the Show Contents window.

10. This way, one-by-one paste all the hardware Ids in the Show Contents window.
11. Finally, tap on “OK” to save the changes.

12. Coming back to the Group Policy window, click on the “Apply” and click on “OK” to save the changes.

After saving the policy changes, the automatic updates of that designated hardware will be blocked. From now on Windows Updates won’t be able to download and install the driver update that you have blocked.
What if you want to re-enable the automatic updates for these devices?
Don’t worry. In the future, if you want to re-enable the automatic updates for the device you have blocked, you can do it simply by disabling the same policy. Follow these steps minutely to do so –
1. Open the Local Group Policy Editor.
2. Then, go to this policy header again ~
Computer Configuration > Administrative Templates > System > Device Installation > Device Installation Restrictions
3. Now, on the right-hand side, again double click on the “Prevent installation of devices that match any of these device IDs” policy.

4. Set the policy to “Disabled“.
5. Then, tap on “Apply” and “OK” to save this change.

Finally, when you are done close the Group Policy Editor and restart your computer. It will start to receive those driver updates automatically again.