When you open the Outlook app sometimes you may face a 0x800CCC90 error that is related to sending or receiving emails. This error is mostly due to incorrect credentials used to log in to the Outlook app, having multiple POP3 accounts, problematic add-ins or there might be a possibility that your port has been blocked by your Internet Service Provider, etc. But do not worry this issue can be solved. In this article, we have a few methods which you apply to get the 0x800CCC90 error solved on windows. Let us start!
Method 1 – Open The Outlook App In Safe Mode
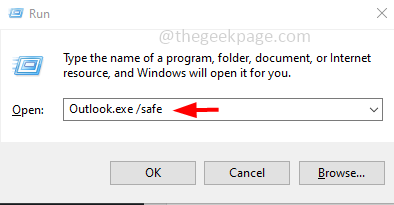
Step 1 – Open the run prompt using Windows + R keys together
Step 2 – Type Outlook.exe /safe in the run prompt and hit enter
Step 3 – There appears a prompt asking you to choose the profile. Choose your profile from its dropdown, here I will select Outlook
Step 4 – Then click on ok
Step 5 – Now Outlook will open the safe mode, and check if the error is resolved.
Method 2 – Create And Configure A New Send And Receive Group
Step 1 – Open the Outlook app
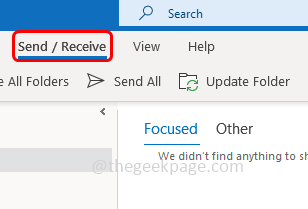
Step 2 – Go to the send/receive tab that is at the top
Step 3 – Click on the send/receive groups drop down and from the appeared list select define send/receive groups
Step 4 – In the send/receive groups window, click on new
Step 5 – Give a name to the group and click on ok. Here I have given the name as group 1, you can give anything of your choice
Step 6 – Double click on the created account
Step 7 – In the opened window enable the option include the selected account in this group by clicking on the checkbox beside it (a tick mark should be present)
Step 8 – Under account options section, select the send mail items and receive mail items by clicking on the checkbox beside them
Step 9 – Under folder options section, select the inbox option by clicking on the checkbox beside it
Step 10 – Also enable the download complete item including attachments option by clicking on the radio button beside it
Step 11 – To save the changes click on ok and close the window
Step 12 – If you want to configure more number of accounts, repeat the same steps [Step 4 – Step 11]. Now check if the issue is been resolved.
Method 3 – Disable Problematic Outlook Add-ins
Step 1 – Open the Outlook app
Step 2 – At the top left corner, click on file
Step 3 – From the bottom left side, click on options
Step 4 – In the Outlook options window, click on add-ins that is at the left side
Step 5 – In the Manage drop down select COM Add-ins and click on Go button beside it
Step 6 – From the COM Add-ins window, uncheck all the add-ins by clicking on the checkboxes beside them (a tick mark should not be present)
Step 7 – Then click on ok
Step 8 – Restart the Outlook and enable one add-in (a tick mark should be present) and check if the error persists. Likewise enable one by one and check if the error is solved. If the error is solved then it is confirmed that the error was due to a particular add-in.
Method 4 – Change The Server Port Numbers
Step 1 – Open the Outlook app
Step 2 – Click on the file that is at the top left corner
Step 3 – On the left side, click on info and at the right side click on account settings dropdown
Step 4 – From the drop down select account settings
Step 5 – Select your email account and click on change
Step 6 – In the exchange account settings window, click on more settings button that is at the bottom
Step 7 – Then go to the advanced tab and enter the value 995 in the box beside Incoming Server (POP3)
Step 8 – Click on ok and save the changes. Then check if there is no error.
Method 5 – Remove And Re-add Your Email Account
Step 1 – Open the Outlook app
Step 2 – Click on the file that is at the top left corner
Step 3 – On the left side, click on info and at the right side click on account settings dropdown
Step 4 – From the drop down select account settings
Step 5 – In the opened window, select the email that you want to remove and click on remove
Step 6 – There appears a confirmation pop up, select yes and the email account will be removed
Step 7 – Now re-add the email account by clicking on new
Step 8 – Give the email address that you want to add and click on connect
Step 9 – Once the email is added, restart the Outlook app and then check if the error is vanished.
Method 6 – Repair The Microsoft Outlook App
Since the Outlook is bundled with Microsoft Office, if you are performing the repair then it should be for the entire Microsoft Office suite. So save and close all the opened Microsoft documents and then follow the below steps
Step 1 – Open the windows settings using Windows + I keys together
Step 2 – Click on apps
Step 3 – In the apps & features window, scroll down and find Microsoft Office (Microsoft 365)
Step 4 – Click on Microsoft 365 and select modify
Step 5 – A user account control window will open, click on yes
Step 6 – In the next window, it will ask you for how would you like to repair your office programs. Select online repair by clicking on the radio button beside it. This option requires a good internet connection. If you do not have one then you can select quick repair option
Step 7 – Then click on repair button. Again to proceed with the repair process, click on repair
Step 8 – It might take sometime to finish the process. Once done restart the system and then check if the issue is resolved.
That’s it! I hope the above provided information is helpful and easy to follow. Let us know which method did you apply and got the issue resolved. Thank you!!


