The functionality of MS Outlook increases manifold with the usage of correct add-ins. In certain cases, absence of even a single third-party add-in can make otherwise an easy task harder. Not only the add-ins saves our time, it improves the quality of life of the app as well. So, if an Outlook add-in has gone missing or another is broken, these steps should be helpful.
Fix 1 – Change the Outlook registry
Sometimes Outlook may automatically block an add-in if that crashes continuously. So, you can bypass that process from Outlook.
NOTE – You should keep a record of the current system registry. This backup can be helpful if anything goes out of the line.
Step 1 – Call in the Run box. Hit the Win+R buttons.
Step 2 – Use this to open Registry Editor.
regedit
Step 3 – Get to this point –
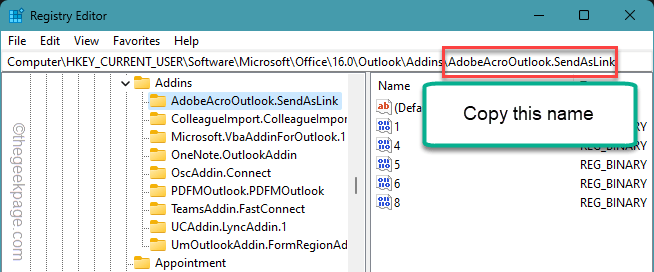
Computer\HKEY_CURRENT_USER\Software\Microsoft\Office.0\Outlook\Addins
Step 4 – The “Addins” lists the name of the add-ins installed in the Outlook app.
Step 5 – Click the name of the add-in and copy the name.
Step 6 – Later, go to this address –
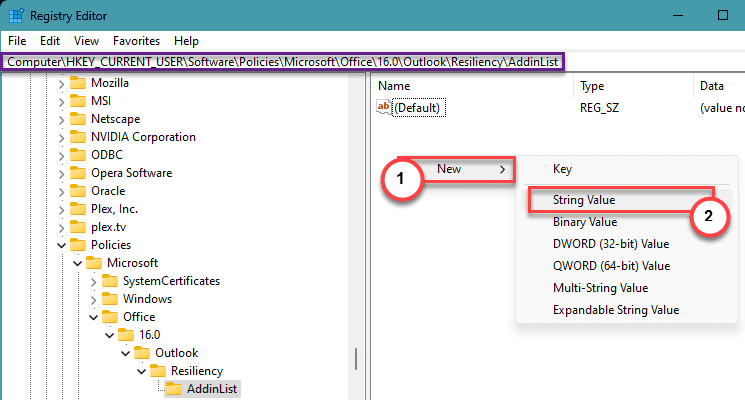
HKEY_CURRENT_USER\Software\Policies\Microsoft\Office.0\Outlook\Resiliency\AddinList
Step 7 – On the right-hand tab, right-click there and tap “New>“.
Step 8 – Choose the “String Value” to create the string value.
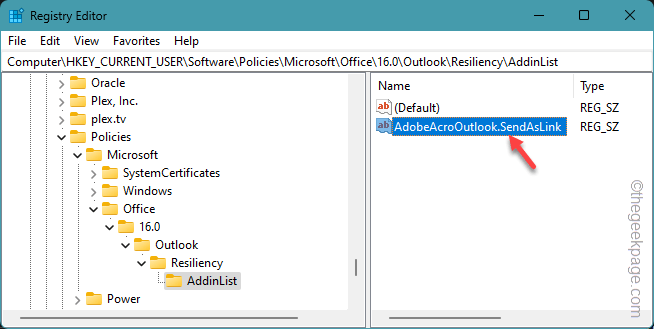
Step 9 – You have to name this string value as the same as the name of the add-in you have copied.
Step 10 – Double-click the string value to edit it.
Step 11 – Switch it to “1” value.
Step 12 – Tap “OK“.
Exit the Registry Editor page. You must restart the computer thereafter.
MS Outlook won’t disable the add-ins automatically in the app. Check if this helps.
Fix 2 – Turn on the plugins manually
You can enable the disabled add-ins from the Microsoft Outlook settings panel.
Step 1 – On the Outlook panel, go to the “File” from the menu tab.
Step 2 – Next, click to open the “Options” menu.
Step 3 – There you must open the “Add-ins” from the left-pane.
You will see all the Add-ins related information on the opposite panel.
Step 4 – To see the disabled add-ins, set the ‘Manage:’ to “Disabled items” from the drop-down tab.
Step 5 – Click the “Go” button.
This will show up all the disabled items in the Outlook page.
Step 6 – Here, you can select the disabled items and click “Enable” to enable those on your system.
This is the way you can take control of the add-ins of the Outlook program on your device.
Fix 3 – Enable the Connected Experiences feature
The Connected Experience feature allows you to get the add-ins from the third-party applications. So, it must be turned on.
Step 1 – While the MS Outlook tab is open, get to the “File” tab.
Step 2 – Next, choose to open the “Options” section.
Step 3 – Outlook Options has a dedicated “General” tab.
Step 4 – Afterward, go to the “Privacy Settings“.
Step 5 – Find the “Enable optional connected experiences” button there. Check that.
Step 6 – The “Get Add-ins” function should be checked automatically. If not, tick that box as well.
Step 7 – Tap “OK“.
Save the changes in the Outlook. Close the current panel of Outlook on your device and relaunch the Outlook.
After enabling the Connected Experiences, you can take control of the add-ins in the Outlook client.
Fix 4 – Revoke the enacted group policy
If your IT administrator has imposed a group policy to restrict the users from getting any third-party add-ins, you can ask them to revoke it.
Step 1 – Open a Run panel and type this there –
gpedit.msc
Step 2 – Click “OK“.
Step 3 – Expand through the left-hand pane, to reach there –
User Configuration > Policies > Administrative Templates > Microsoft Office
Step 4 – On the right-hand pane, find this policy and double-tap that “List of managed add-ins” to edit that.
Step 5 – You must fix this to “Enabled” state.
Step 6 – In the Options panel, tap “Show” beside the ‘List of managed add-ins’ option.
This is where you can specify which add-ins to enable using their ProgID.
Where to find these ProgID for the add-ins? These are the locations where you can find the ProgID of all the add-ins.
HKEY_LOCAL_MACHINE\SOFTWARE\Microsoft\Office\Outlook\Addins
HKEY_CURRENT_USER\SOFTWARE\Microsoft\Office\Outlook\Addins.
The value name of the add-in is the actual ProgID of the add-in.
This way, add the ProgID of the add-ins in the list of ‘List of managed add-ins‘ policy.
Once you have done, apply the policy changes on your system and later restart the system for the change to take effect.
NOTE – If you can’t use the gpedit.msc command, use the ” gpmc.msc” code. Use it to create a GPO object and edit that to include the group policy change that is discussed earlier. After this, update the group policy and refresh the GP engine.
Fix 5 – Allow the third-party add-ins in Outlook
Your IT administrator can block/allow you from using third-party add-ins in the Outlook client.
Step 1 – After logging into the MS Office 365 using your Office credentials, go to the “Admin Center“.
Step 2 – Next, open the “Settings” tab and go to the “Services & add-ins” page.
Step 3 – On the main tab, open the “User owned Apps and Services” setting.
Step 4 – In the User owned Apps and Services tab, check these two options –
Let people in your organization go to the Office Store
Let users install trial apps and services
Step 5 – Tap “Save changes“.
Now, the clients can enact the add-ins on their on.


