Sometimes after upgrading your Windows from a lower version to a higher version, you might get the BSOD (Blue Screen of Death) error A problem has been detected and Windows has been shut down to prevent damage to your computer. The problem seems to be caused by the following file: Atikmdag.sys. This BSOD error is caused because of a system file named atikmdag.sys, which is developed by Advanced Micro Devices, Inc for windows operating system.
Since this is a BSOD error, you might not be able to boot into your Windows normally. You might have to safe boot into your system to try out the methods listed.
How To Boot Into Windows In Safe Mode
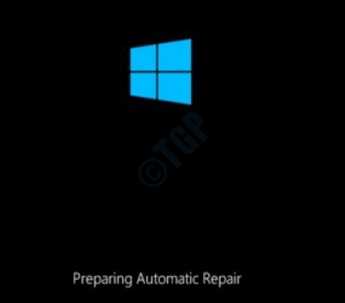
1. Make sure your PC is shutdown completely. Now press the power button to turn it on. The moment you see the logo of the manufacturer on the screen, long press your PC power button to shut it down again. Repeat this process till you get the following ‘Preparing Automatic Repair’ screen instead of the manufacturer’s logo screen.
2. As next, you will get the Diagnosing your PC screen, which will be momentary.
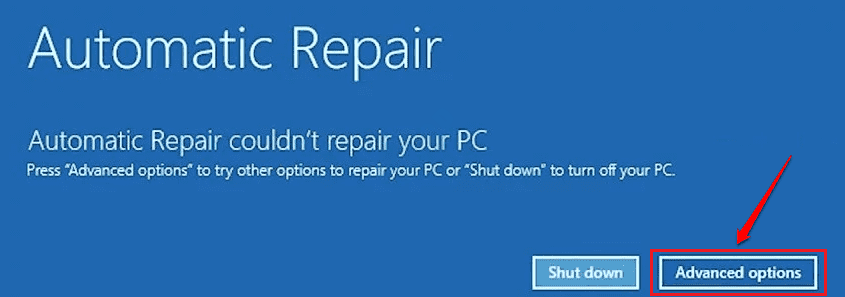
Then you will get the Startup Repair screen with 2 buttons; Shut down and Advanced options. Click on Advanced options.
3. In the screen that comes next, click on the Troubleshoot option.
4. When the Troubleshoot window opens up, click on Advanced options as shown in the screenshot below:
5. In the Advanced options menu, click on Startup Settings option.
6. Now you will reach the following screen, where you have to click on the Restart button at the bottom.
7. Clicking on the Restart button in the previous step will take you to the following screen, where you can press either 4 or 5 number key and boot into your machine in safe mode.
Now that you have logged into Windows through safe mode, please try out the methods listed below one by one to fix the atikmdag.sys BSOD error.
Method 1: Run Full Scan Using Windows Defender / Third Party Anti-virus Software
You can run a system wide full antivirus scan to eliminate the possibility of a malicious attack being the reason for the atikmdag.sys BSOD error that you are facing. In this method, we have ran a full scan using Windows Defender, however, you can use any good anti virus software that is installed in your machine for this purpose.
1. Press WIN + I keys together and bring up the windows Settings app. Click on Update & Security option.
2. In the left window pane, click on the option Windows Security and in the right window pane, click on Virus & threat protection.
3. Now under the Virus & threat protection section, click on the Scan options link.
4. As next, click on the radio button associated with the option Full Scan and then click on the button Scan now.
5. Windows Defender will now scan for any malicious files present in your machine and suggest you possible solutions if such files are found. Follow onscreen instructions in that case.
Restart your PC once the scan is complete and issues are fixed.
Method 2: Repair Damaged Windows Files Using System File Checker Utility
Corrupt system files can always cause Blue Screen of Death Errors. Follow the steps below to make use of System File Checker (SFC) command utility to find and repair the corrupt system files in your machine.
1. Type in cmd in Windows Start Menu Search bar. From the results that show, right click on Command Prompt and then click on Run as administrator.
2. Copy paste the command sfc /scannow and hit Enter key.
sfc /scannow
Wait for the process to finish. Once the scan is complete, if you get the message Windows Resource Protection found corrupt files and successfully repaired them. Details are included in the CBS.Log %WinDir%\Logs\CBS\CBS.log, then that means the scan did find some corrupt files and those are repaired. Restart your PC and check if the issue is resolved or not.
Method 3: Update Windows Operating System
Lots of issues, including BSOD errors, are fixed with OS updates. Please follow the steps below to check for any new OS updates for your machine.
1. Press WIN + I keys together and bring up the windows Settings app. Click on Update & Security option.
2. In the left window pane, click on Windows Update tab and in the right window pane, click on the Check for updates button.
Windows will now look for any new updates available for your machine. If found, those updates will be downloaded and installed. Wait for the process to finish.
3. If any new updates are installed, you will get to see the button Restart now. Click on it to Restart your machine. Once the machine boots up, check if the issue is gone.
Method 4: Update ATI Radeon Graphics Card Drivers
The reason because you are getting the BSOD errors related to atikmdag.sys could be related to old or outdated ATI Radeon graphics card drivers installed in your machine. Updating your ATI Radeon graphics drivers could be the solution to your problem.
1. Open Run dialog box by pressing WIN + R keys together. Type in devmgmt.msc and hit Enter key.
2. Now expand the section Display adapters and double click on your ATI Radeon graphics driver.
3. When the ATI Radeon graphics driver Properties window opens up, click on Update Driver button under Driver tab.
4. As next, click on the option Search automatically for updated driver software and follow the on screen instructions to complete the process.
Once the drivers are updated, restart your machine and check if the issue is resolved or not.
Method 5: Run CHKDSK Command Utility
If there are any bad sectors in your hard disk, through CHKDSK utility, they can be found and fixed.
1. Type in cmd to windows start menu search bar. Right click on Command Prompt and then click on Run as administrator.
2. As next, type in chkdsk C: /f /r /x and then hit Enter key.
chkdsk C: /f /r /x
Parameters:
- C: – Drive to scan
- /f – This parameter will attempt to fix any errors that are found
- /r – This parameter will locate for bad sectors and recovers any readable information
- /x – This parameter will forcefully dismount the volume you are about to check before the scan begins
When you get the prompt Would you like to schedule this volume to be checked the next time the system restarts? (Y/N), press Y and then hit Enter key.
On your next system restart, your drive will be scanned and the errors that are found will be fixed.
Method 6: Perform System Restore In Safe Mode
Please refer the section at the beginning of the article to boot into your machine in safe mode.
System restore is always helpful when nothing else works. Using this Windows feature, you can make your windows settings go back in time, even though personal files, documents and data will not be restored. In order to perform a system restore successfully, you should have system restore option enabled in your machine already. If it is not done, you cannot try this method out.
If you have system restore enabled in your machine already, then you can choose a restore point before the date that the atikmdag.sys BSOD error initially occurred and restore all the settings that you had with your perfectly working version of Windows.
1. Type in control panel in windows start menu search bar and then click on Control Panel from the results that show.
Once Control Panel opens up, search and click on the option Recovery as shown in the screenshot below.
2. As next, click on Open System Restore link.
3. System Restore would now launch. Simply click on Next button.
4. Check the checkbox Show more restore points to see all the available restore points in your machine.
Since you need to restore your windows to a date before the atikmdag.sys BSOD error, select a restore point before the error occurred for the first time. Click on it and then click on the Next button.
5. Now you just have to confirm by clicking on the Finish button to initiate the system restore process.
Once system restoration is complete, restart your machine and if the issue is resolved or not.
Method 7: Clean Install Windows 10 Operating System
If none of the above methods fixed your issue, then you can try formatting your machine and setting up Windows 10 once again. This will delete all your settings, apps, files and everything. So, take necessary backups before your proceed. However, this will solve your atikmdag.sys BSOD issue as well.
Method 8: Replace Your RAM/HDD
If even installing Windows 10 again doesn’t solve your problem, then it is highly likely that your hard disk drive is faulty. Please try removing your HDD and connecting it to different PC. If the new PC also can’t detect it, then problem is with your HDD. You might have to get a new HDD. However, if the new PC detects the HDD, then the problem could be with your RAM and it might need a replacement.
Hope you found the article useful. Please comment which method worked for you.


