If you have a 4 GB ram on your Windows 10 or windows 11 system, you may see that the complete 4 GB RAM is not usable. You may use 2.98 GB of RAM, but the other part is unusable. This is not an anomaly. Windows 10 & 11 consumes some of that RAM for smooth operation. Now, the problem is if you notice that the unused part of the RAM is huge, then follow our easy fixes to solve the problem.
Workarounds–
1. Antivirus programs tend to consume a huge chunk of RAM resources. Try uninstalling the antivirus and check further.
Fix 1 – Change the usable RAM
You have to change the usable amount of RAM while your system boots up.
1 – Press Windows key + R key together to open RUN.
2. Type “msconfig” in the Run window and hit Enter.

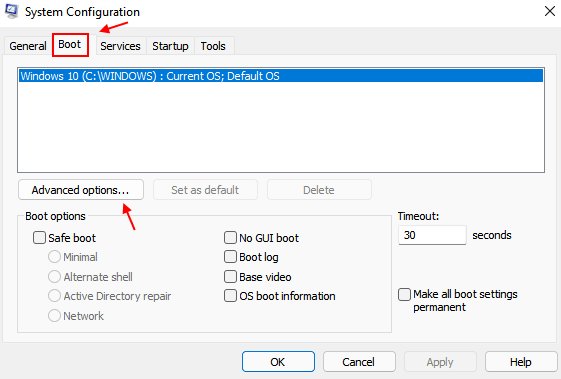
7. When the System Configuration opens up, go to the “Boot” tab.
8. Then, click on the “Advanced settings“.

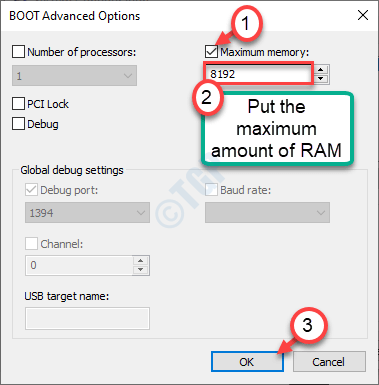
9. Here, simply check the box of the option “Maximum memory:”.
10. Now, put the maximum amount of RAM that you noticed in the Settings earlier in the box.
[ You have to put the RAM in MB. Simply, multiply the number you noticed earlier with 1024.
If it is 8 GB, it will be 8*1024=8192 MB]
11. To save the settings, click on “OK“.

9. Coming back to the System Configuration screen, click on “Apply” and “OK“.

You will see an option to restart your computer now or later. Click on “Restart Now” to restart your computer.
Windows will use the maximum amount of RAM of your system.
If this doesn’t work out, follow these steps-
1. Press the Windows key+R keys.
2. Write “msconfig“. Click on “OK“.

3. When the System Configuration opens up, again go to the “Boot” tab.
4. Then, click on the “Advanced settings“.

5. After that, uncheck the “Maximum memory” box.
6. Click on “OK“.

7. Then, click on “Apply” on “OK“.

This should save the changes on your computer. When you see the ‘Restart Now’ option, click on it to restart your computer.
Check if this one solves your RAM issue.
Fix 2 – Free Paging files of the C drive
Sometimes, the paging files in the Windows drive may cause this problem.
1. Press Windows key+R together.
2. Simply, type this command and then hit Enter to open System Properties.
sysdm.cpl

3. At first, go to the “Advanced” tab.
4. Here you need to click on the “Settings“.

5. When you see that the Performance Options panel has appeared, go to the “Advanced” tab.
6. In the ‘Virtual memory‘ panel, click on “Change“.

7.Then, uncheck the box beside the “Automatically manage paging file size for all drives” option.
8. Now, click on the drive where Windows is installed.
Generally, it is the “C:” drive. You have to select the “C:” drive.

9. Then, click on the “No paging file” option.
10. After that, click on “Set” to set it.

11.If there is a prompt, simply click on “Yes” to confirm the change.

12. Finally, click on “OK” to modify the settings.

13. After doing these, you have to click on “Apply” and click on “OK” to save it.

Close all the windows. After that, restart your computer.
Fix 3 – Set PCI Express as the graphics
You have to adjust the primary graphics settings to PCI Express mode.
1. At first, switch off your computer.
2. Start up your computer. You will see the manufacturer’s logo on your screen.
You need to press the “Delete“* key from your keyboard to open the bios setup on your computer.
* NOTE– The actual key to access the BIOS setup is not fixed for all the systems. These are the variety of keys-
Esc, F1, F2, F10, F11, F12 or Delete

3. When the BIOS setup opens up, go to the “Advanced” tab menu.
4. Here, navigate to the “Chipset Configuration” box and hit Enter.
5. Then, go to the “Primary Graphics Adapter“. Hit Enter.
6. After that, select the “PCI Express” and again hit Enter to set it.
7. Finally, press the particular key to save the settings.
[It is the “F10” key for this computer.]

8. Click on “Yes” to save the settings.

Now just wait for your computer to boot up. Check the usable amount of RAM available on your computer.
Fix 4 – Run Memory Diagnostics
Memory Diagnostics is an efficient tool to detect memory corruption which may decrease the usable memory.
1. You have to press the Windows key+R keys together.
2. Just type “mdsched.exe” and hit Enter.

3. There are two options available.
To restart the system now and begin the checking click on “Restart now and check for problems (recommended)“.
Otherwise,
If you want to perform this check as the next booting time, click on the “Check for problems the next time I start my computer” option.

Your system will reboot and the memory-checking process will begin.
Fix 4 – Change the RAM slots
Try altering the RAM slots on your motherboard.
1. At first, switch off your computer and detach all the power cables from your system.
2. Remove the cover from your machine. You can see the rectangular green RAM sticks attached to the motherboard pins.
There should be either 2 slots or 4 slots.
3. Toggle the clips at the side of the slots. Detach all the RAM sticks from all the slots.
4. Clean the dust of the RAM sticks and RAM slots on your motherboard.
Now, if you got 2 or more RAM sticks on your machine, detach any of them and restart your machine.
In the same manner, attach one working RAM stick to one of the motherboard slots and restart the machine to check the motherboard slot is working or not. Check all the slots.
If any of the RAM sticks or motherboard slot is faulty, replace it.
5. If all the RAM sticks and slots are working, attach the RAM sticks to different slots and then toggle the clips to attach them properly.
Restart your computer.
Your problem should be solved.