Windows 10 & 11 operating comes loaded with the Sync Setting feature. This feature enables you to synchronize the Windows 10 settings on your PC with other Windows 10 devices. The only requirement is that you must be signed in with the same Microsoft account on all the devices. Although the Windows 10 Sync feature is a very useful one as it saves you a lot of time by applying the exact same settings on multiple Windows 10 devices, it could face unexpected troubles. One of the issues it faces is when the Sync Setting gets greyed out in the Windows 10 Settings menu.
If you too are facing the Windows 10 Sync Settings greyed out issue on your PC, you are not alone. Many users have reported this issue troubling them. Here are a few solutions that you must try to get rid of it.
How to Fix Sync Settings Greyed Out Issue
Workarounds–
1. Before going ahead with the fixes, make sure that you have logged in to the devices with the same Microsoft account.
2. Make sure all the devices are connected with proper network connection.
3. If you are on a domain joined PC, it seems to be the reason behind this during recent update.
Fix 1 : Make Changes in the Feedback & Diagnostics Settings
If none of the above solutions helped you, here is a fix that could help you as it has a number of other users facing similar trouble. In this fix, you will be applying some changes to the Feedback and Diagnostics settings in your Windows 10 PC. After applying this setting, you can check whether the sync settings in your computer is gryed out still.
Here are the steps that you can follow:

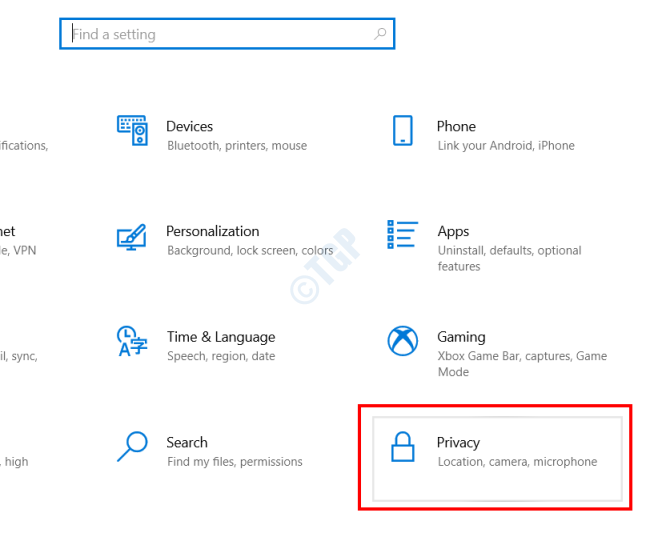
Step 1: Press the Win + I keys on your PC to launch the Settings app. Here, go ahead and make a selection on the Privacy option.

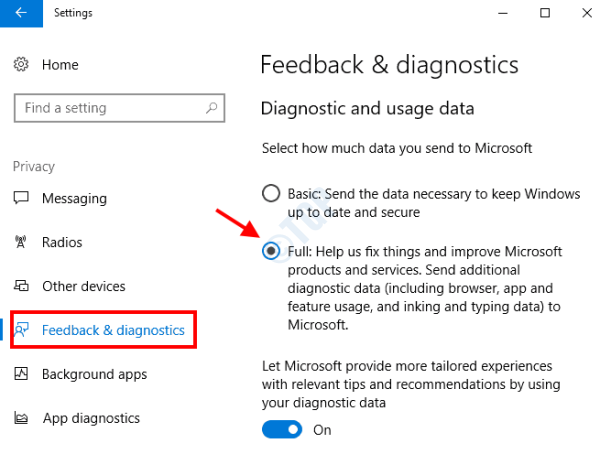
Step 2: Next up, select the Feedback & diagnostics option from the left panel of the settings app. Then, go to the right section and select the option with the Full option by clicking on the respective radio button.
Now, close the Settings app on your PC and give it a restart. After the restart, check the sync settings on your PC if they are greyed out.
For Windows 11
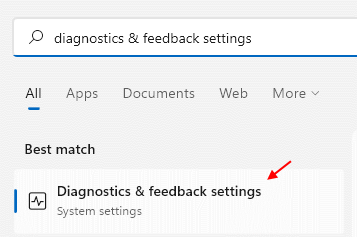
1 – Search diagnostic & feedback settings in Windows 11 taskbar search box.

2 – Now, Make sure Send Optional Diagnostic data is turned ON.

Fix 2: Sign in with Another Microsoft Account
It might be the case that the Microsoft Account in use on your PC has some issues. If the above solutions do not work, go ahead and try to sign in with a different Microsoft Account. When you do that, you will need to sign in with the new account you signed in with on other Windows 10 PC where you need the settings to be synced. In the next section, you will find the steps to sign in to Windows 10 with a different Microsoft Account:

Step 1: Open the Settings app on your PC. For this, press the Win + I buttons. In the Settings app interface, click on the Accounts option.

Step 2: On the Accounts settings interface, go to the left pane. Here, select the Email and app accounts option. Now, on the left pane, click on the following option: Add a Microsoft account
On the following screens, follow the on-screen instructions and fill up the fields to sign in with a new Microsoft Account on your Windows 10 PC.
Once you have successfully signed in with the new account, go to the Sync settings and see if the options are still greyed out. If yes, try to give your PC a restart and check again.
If you are able to view the sync settings in your Windows 10 PC, go ahead and sign in with the same Microsoft Account on the other Windows 10 PC where you need to sync the Windows 10 settings.
For Windows 11
1 – Search Email & Accounts in Search box.

2 – Now, click on Add a Microsoft Account and using a New Microsoft account sign up and sign in to your PC.

Fix 3 – Alter the registry
If the previous registry fix doesn’t work out, follow these steps.
1. Press the Windows key+R keys together.
2. Write “regedit” there and hit Enter to access the Registry Editor.

3. In the Registry Editor, go this way –
Computer\HKEY_LOCAL_MACHINE\SOFTWARE\Microsoft\Windows\CurrentVersion\Policies\System
4. Here, on the right-hand side, right-click on the space and click on “New>“.
2. Next, choose the “DWORD (32-bit) Value” from the list to create a new key.

3. Then, name the value as “NoConnectedUser“.
4. After that, double click on the value to access it.

5. Next, set the value as “0“.
6. Finally, click on “OK“.

Now, you have to reboot your computer.
The synchronization process will commence soon. Check if this works out.
Fix 4 – Verify the account
If you have logged in to the system recently, you have to verify in order to sync all the settings.
1. First of all, press the Windows key+I keys together.
2. Then, click on the “Accounts” settings to access it.

3. On the Accounts settings, click on “Your info“.
4. On the right-hand side, click on the “Verify“.
Now, you will see prompts in which way you want to verify the authenticity of the account. Choose any of the mentioned methods and complete the verification process.
Check the sync is working or not.
Fix 5 – Modify the Registry
Altering the registry may work out.
1. Click on the search box and write “regedit“.
2. After that, press the ‘Enter‘ key from your keyboard.

Warning – Registry Editor is a sensitive part of your system. Before heading on to modify the registry, we request to make a backup of the registry on your computer.
After opening the Registry Editor, click on “File“. Then click on “Export” to make a new backup on your computer.

3. After taking the backup, go to this location-
HKEY_LOCAL_MACHINE\Software\Policies\Microsoft\Windows\SettingSync
4. After that, right-click on the right-hand side space and click on “New>” and click on “DWORD (32-bit) Value“.

5. Then, name the value as “DisableSettingsSync“.
6. After that, double click on the value.

7. Then, set the value as “2“.
8. After that, click on “OK“.

Check if the synchronization process is working or not. If it is still not working, try these steps.
1. Again, right-click on the space and click on “New>“.
2. Choose the “DWORD (32-bit) Value” from the list.

3. Then, name the value as “DisableSettingSyncUserOverride“.
4. After that, double click on the value to modify it.

5. Then, set the value as “2“.
6. Finally, click on “OK“.

Close the Registry Editor window. Restart the computer.
The sync process will start soon.
Fix 4 – Use a school or work account
Many school and work organizations permit their users to sync these settings on the devices. Ask your IT administrator to authorize the sync settings.
Fix 5 – Use Local Group Policy
Sync settings may be blocked with the Local Group Policy.
1. You have to press the Windows key+R keys together.
2. Then, write “gpedit.msc” and click on “OK“.

3. Once the Group Policy Editor opens up, go to this place –
Computer Configuration > Administrative Templates > Windows Components > Sync your settings
4. On the right-hand side, check for the “Do not sync” policy.
5. To access this policy, double click on it.

6. Next, set this policy setting to “Enabled” to enable the synchronization process automatically.
7. Then, check the box beside “Allow users to turn syncing on“.
(This option is for the network administrators)

8. Finally, click on “Apply” and “OK” to save it.

Just close the Local Group Policy Editor screen. Restart the system. Check the sync settings here –
Settings > Accounts > Sync your settings
The Sync settings will work just fine.
Fix 6 – Enable the syncing feature in Azure Active Directory settings
If you are managing the computers in a domain using the Microsoft Azure Active Directory settings.
1. Go to the Microsoft Azure Portal to access it.
2. Log in to the Azure AD admin center using proper credentials.
3. Then, on the left-hand side, click on the three-bar menu and click on “Azure Active Directory“.

4. Once you are in the ADD, click on the three-bar menu and click on “Devices“.

5. Here you can manage the users you want to keep sync between.
Your problem should be solved.
Fix 7: Run Microsoft Accounts Troubleshooter
The Sync Settings in Windows 10 is closely related to Microsoft Accounts. Any issue with Microsoft Accounts on your Windows 10 PC could be causing the Sync your settings options to be greyed out. Before you go about looking for issues on your PC, it is highly recommended to run the Microsoft Accounts Troubleshooter. Now, this troubleshooter does not come built-in with Windows 10 operating system. You will have to download it manually from Microsoft’s website.
Click here to download the Microsoft Accounts Troubleshooter on your PC. Once the file has been downloaded, run the troubleshooter by double-clicking on the downloaded file; you do not need to install the troubleshooter.

Once you do that, the above interface will open on your PC. Here, click on the Next button.

The troubleshooter will begin looking for issues on your PC that could be causing the Sync settings to be greyed out in the Settings menu. If this tool detects any problem with Microsoft Accounts and settings related to it, an automatic repair will be carried out accordingly.
After the repair, close down the Microsoft Accounts Troubleshooter and restart your PC. After your PC boots up, see whether the Sync settings are still greyed out.
Fix 8 : Enable Sync in Local Group Policy Editor
It might be possible that the Sync could be disabled on your PC. You can launch the Local Group Policy Editor utility on your PC and enable Sync settings from there. In the following section, you will get to know about the steps required:

Step 1: Launch Local Group Policy Editor on your computer. To do so, press the Win + R keys. The Run dialog box will open. Here, type gpedit.msc and press the Enter key.
Step 2: The Local Group Policy Editor window will open. Here, go to the following location on the left panel:
Computer Configuration\Administrative Templates\Windows Components\Sync your settings

Now, Go to the right panel now and double click on the Do not sync option.

Step 3: The Do not sync properties window will open. Here, make sure that the Not configured or Disabled options are selected. If the Enabled option is selected, select the Disabled option and save the settings. After making the changes, close down the Local Group Policy Editor, and do not forget to restart your PC.
After the reboot, go to the Settings app and check whether you are able to view the Sync settings option now.
Conclusion
Sync Settings in Windows 10 can really be helpful with applying the same settings across multiple Windows 10 devices. If the sync settings in your PC was greyed out, i hope on eof the above solutions helped you out with it. If you are still not able to access the sync settings in your Windows 10 PC, do let us know in the comments section below.