The spellchecker is an integral part of the Microsoft Teams and works pretty well. But, some Teams users beg to differ. After Microsoft released the new version of Microsoft Teams, many users have complained of having issues with the spellchecker in the video conferencing tool. If you are one of those users, you can troubleshoot this issue by following these easy resolutions.
Fix 1 – Reset the Teams app
Resetting the Microsoft Teams app should resolve the issue with the spellchecking operation.
Step 1 – You must close the current instance of Microsoft Teams.
Step 2 – Next, you should open the Taskbar corner overflow button.
Step 3 – Later, right-click the “Teams” app and click “Quit” to exit the Teams app completely.
Step 4 – Later, you may press the Windows+I keys briefly.
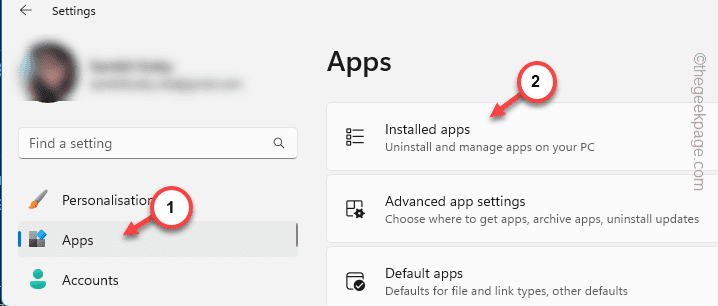
Step 5 – Next, click the “Apps” section.
Step 6 – Later, open the “Installed apps” on the right-hand pane.
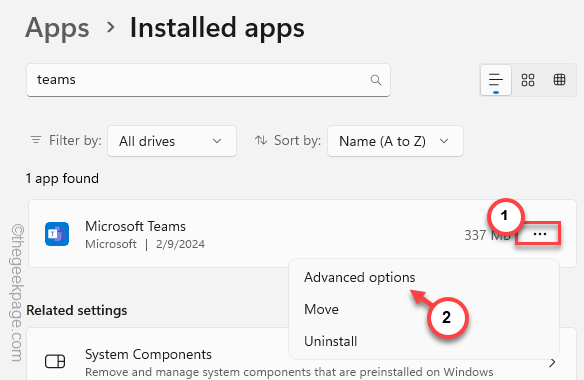
Step 7 – Search for “Teams” directly from the search box.
Step 8 – This will sort out the “Microsoft Teams“. Next, just click the dot button next to it and tap “Advanced options” to access that.
Step 9 – Once you have opened the Microsoft Teams settings, find the Reset section.
Step 10 – Try repairing the Teams using the “Repair” option.
Wait till this repair process is complete. You will receive a tick once that is complete
Step 10 – Next, tap the “Reset” option.
Step 11 – Another confirmation prompt will appear shortly. So, tap “Reset” once more to reset the Teams app.
Close the Settings page.
After this, launch Microsoft Teams. Now, as you have reset the app on your computer, you may have to use the Microsoft account credentials to log in.
Teams may take time to create the user profile (as you have reset it), but as soon as it launches, you can use the MS Teams again. Text someone and test the spell checker.
Fix 2 – Enable the spell check
The spell checker tool must be enabled in Teams for the feature to work properly.
Step 1 – Launch the Microsoft Teams on your system.
Step 2 – If it launches in the Mini mode, click the “Maximize” button in there to maximize the Teams panel.
You will get the full view of the Teams panel.
Step 3 – After this, click the dot button beside your account image and tap “Settings” to open the Teams settings.
Step 4 – In the Teams settings, you must be in the “General” tab.
Step 5 – Now, if you look on the right-hand pane, go to the Spell check and check the “Enable spell check (requires restarting Teams)” box.
After this, close the Teams settings page. You must close and relaunch the Teams app to work properly.
When the Teams app comes back up, type a simple message and check whether the Teams is checking the spelling of the words or not.
Fix 3 – Check the language settings
Maybe the spellchecking facility is not available for the language you are using in Teams.
Step 1 – After opening the Settings, go to the “Time & language” bar.
Step 2 – Next, go to open the “Language & region” setting.
Step 3 – Go to the Preferred Language and click “Add a language” to open that up.
Step 4 – This time, search for a new language and select the language that you want to get.
Step 5 – After this, click “Next” to download the language.
Step 6 – Finally, click “Install” to start installing the language pack.
Allow a while for Windows to download the language package on your computer.
After this, there won’t be any issues using the spellchecker service in Teams again.
Fix 4 – Delete the Teams cache
Some of the affected users have helped clear out the Teams cache on their system.
Step 1 – Quit the Microsoft Teams application.
Step 2 – Make sure to quit the Teams app from the Taskbar corner button.
Step 3 – After this, open up a Run box and click “OK” to open the Teams folder.
%appdata%\Microsoft\Teams
Step 4 – Just clear everything inside from that folder.
Close that and restart your computer. Restarting the system is very important. So, when you get back, take a look at the spellchecking system in Teams once more.
Fix 5 – Autocorrect or highlight words
Every Windows machine has spell-checker settings that can work throughout the OS, even on MS Teams.
Step 1 – Open the Settings.
Step 2 – Then, go to the “Time & language” tab.
Step 3 – On the right-hand tab, scroll down and click to open the “Typing” settings.
Step 4 – All the typing settings are available here. Just make sure to toggle these two options to “On” mode.
Autocorrect misspelt words
Highlight misspelt words
Close the Settings tab after this.
As the autocorrect and highlighting wrong words, it should work in MS Teams just fine. Even if the default spellchecker doesn’t work in Teams, it should be helpful.
Fix 5 – Uninstall and reinstall Teams
If resetting the Teams appdata doesn’t fix the spellchecker, uninstall MS Teams and reinstall the same.
Step 1 – Press the Windows key once. It will bring up the search box.
Step 2 – You will see the “Microsoft Teams” in the search results. Right-click the “Microsoft Teams” and tap “Uninstall.
Step 3 – As you go through the entire app list find the “Microsoft Teams” app.
Step 4 – Then, click the dot button beside that and click “Uninstall“.
Step 5 – Confirm your choice with another click on the “Uninstall” button once more.
Step 6 – Go to the MS Teams webpage.
Step 7 – Next, tap “Download now” to download the newest version of Teams.
Step 8 – Run the Teams desktop installer and complete installing the latest version of Teams.
It will take just a minute to complete the installation process.
After this, use the Teams and try out the spellchecker in it.
Additional Tip –
If you are using Teams on the web application, you can use Grammarly to auto-correct your texts in Teams.


