Even if you are logged into your Windows 10 or Windows 11 through an Admin account, sometimes when you try to install certain applications or access certain files / programs, you might get the Error 5: Access is denied error. The reason for this error could be a wrong Windows configuration or a corrupted user account that is blocking you from having the rights to install the application that you’re trying to install. There are some easy fixes that you can try out, to fix this issue.
Method 1: Run the Installer as Administrator
As the error clearly says, issue is related to the current user account not having enough privileges to run the installer for some reason. Hence the most easy solution would be try and run the installer as Administrator.
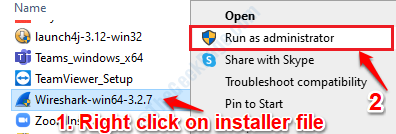
Select and right click on the installation file that is giving you the error Error 5: Access is denied and then click on the option Run as administrator.
Even though this solution might sound too easy, it has worked for many users. However, if it doesn’t work for you, head onto the next method.
Method 2: Switch User Account to Admin Profile
Another reason could be that your account is a standard account and that it does not have the admin privileges like you think it does. In that case, you can try switching your standard account to admin account. Follow the steps below to switch your standard account to an admin account:
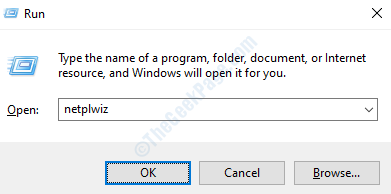
1. Bring up the Run dialog box by pressing the WIN + R keys together. Once it opens up, type in netplwiz in the Run command box and then hit Enter key.
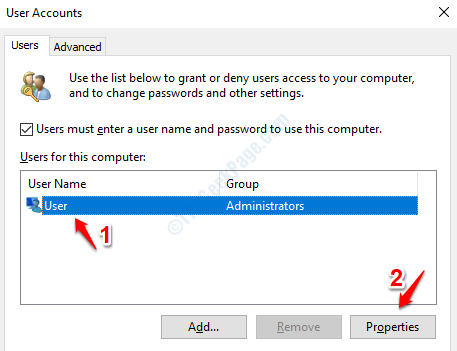
2. In the User Accounts window, click on the user account that you want to give admin permissions to, and then click on the Properties button at the bottom.
Make sure User must enter a username and password to use this computer is selected before doing the step above.
3. As next, click on the tab that says Group Membership. Choose the radio button that says Administrator. Once all done, click on Apply button and then on the OK button.
Now that your standard account is converted to an admin account, please check if your issue has been resolved or not.
Method 3: Enable Built In Admin Account
The built in admin account will have all the permissions enabled and thus it lets the user perform a lot of operations that would have been otherwise not executable. Please follow the steps below to enable the built in admin account in your system to solve your issue.
1. Open command prompt in admin mode. For that type in cmd in the Windows Start Menu search bar. From the results that show up, right click on Command Prompt and then click on the option Run as administrator.
2. To enable the built in admin account, copy paste the following and then hit the Enter key.
net user administrator /active:yes
Close the Command Prompt and check if your issue has been resolved or not. If you want to disable the built in admin account, then you can open the command prompt in admin mode again and execute the command:
net user administrator /active:no
Method 4: Change Security Permissions
If the first method did not work for you, let’s try changing some security permissions to fix the issue.
1. Open Windows file explorer and copy paste %appdata%\..\Local in the address bar at the top and then hit the Enter key.
%appdata%\..\Local
2. The AppData > Local folder would now be open in front of you. Scroll down and locate the folder named Temp. Select it and then right click on it. From the right click context menu, click on the Properties option.
3. The Temp Properties window would be launched. Click on the Security tab and then click on the button that says Advanced at the bottom of the window.
4. In the Advanced Security Settings for Temp window, first click on the Permissions Tab. There will be a table named named Permission entries. In that table, under the Inherited from column, look for any entry that is not inherited from C:\Users\user_account_name.
Once you select all the entries that are not inherited from C:\Users\user_account_name, click on the Remove button. After that, make sure you tick the checkbox that says Replace all child object permission entries with inheritable permission entries from this object. Once you’re all set, hit the Apply button and then the OK button.
This method should definitely fix your issue and give you the administrator privileges that you require to install the application that you want. In case if your issue is still not resolved, please try out the next method.
Method 5: Change UAC Settings
If none of the above listed methods worked for you, we can try changing your User Account Control settings a little bit to see if that resolves your issue. Please follow the steps below to change your UAC settings:
1. Press WIN + R keys together to bring up the Run window. Once it opens up, copy paste the following in the run command box and then hit the Enter key.
UserAccountControlSettings
2. When the User Account Control Settings window launches, drag the notification slider to Never notify and then hit OK button.
You will get a UAC window that says Do you want to to allow this app to make changes to your device. Click Yes button.
3. You can now try installing the application that you had issues installing earlier or try accessing the file / folder that couldn’t be accessed. If everything is fine this time after changing the UAC settings, your problem is resolved. Now you can go back to User Account Control Settings window and slide the slider back to its default position.
Unfortunately if the above method also did not solve your issue, please try the next method.
Method 6: Disable Antivirus Software
If none of the above methods worked for you, please try disabling your antivirus software and check if the problem is still present or not. Sometimes, antivirus could invoke the UAC that doesn’t allow you to proceed with the installations of certain applications or accessing certain files or programs.
One of the above methods should definitely fix your issue. Please drop in comments which method worked for you.


