Windows + Shift + S shortcut is a default Snipping Tool hotkey by OneNote. In simple words, it allows you to take screen clippings of the full computer screen or a part of it in Windows 10. But, some users have been facing an issue, where the Windows Shift S hotkey is not working for them in their Windows 10 PC. The error arises due to a conflict between the Snipping Tool and OneNote keyboard shortcuts. However, we have solutions for both Snip & Sketch and OneNote. Let’s see how.
Note: – If you have a game controller plugged in your pc, Unplug and then replug your game controller. This fixed the issue for many users.
Method 1: By Resetting Snip & Sketch
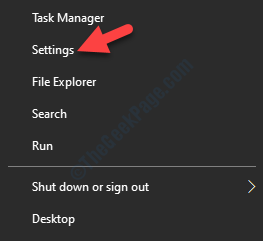
Step 1: Right-click on Start menu and select Settings.

Step 2: In the Settings window, click on Apps.

Step 3: In the next window, you are directly taken to the Apps & features section.
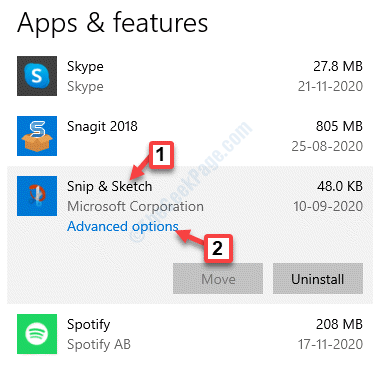
Now, navigate to the right side of the pane, scroll down and click on Snip & Sketch.
Click on Advanced options link below it.

Step 4: In the next window, scroll down and go to the Reset section.
Click on the Reset button.

Step 5: In the pop up that appears, press the Reset button again to confirm the process.

Once the Reset is complete, restart your PC and you should be able to use the Win + Shift +S hotkey back again to capture screenshots.
Method 2: By Enabling Clipboard History
Step 1: Go to the Start menu, click on it and click on the gear icon to open the Settings window.

Step 2: In the Settings window, click on System.

Step 3: Next, on the left side of the pane, select Clipboard.

Step 4: Now, go to the right side of the pane and under Clipboard history section, slide the toggle to the right to turn it on.

You should now be able to use the Windows + Shift + S hotkey to capture screenshots.
Method 3: By Enabling Snip & Sketch
Step 1: Press the Win + I shortcut keys on your keyboard to open the Settings window.
Step 2: In the Settings window, select System.

Step 3: On the left side of the pane, click on Notifications & actions.

Step 4: Now, go to the right side of the pane and under Notifications & actions, go to the Get notifications from these apps section.
Here, go to Snip & Sketch and check if it’s turned on. If not, then slide the toggle to the right to turn it on.

You can now try using the Win + Shift + S key to take screen clipping.
Method 4: By Using OneNote’s System Tray Icon for Screen Clipping
Step 1: Right-click on the Taskbar and select Taskbar settings.

Step 2: In the Taskbar settings window, go to the right side of the pane, scroll down and under Notification area, click Select which icons appear on the taskbar.

Step 3: In the Select which icons appear on the taskbar, go to Send to OneNote Tool and turn the switch on.

Now, you should be able to use the Win + Shift + S hotkey as normal to capture screenshots.
Method 5: Alternatively you can use PrntScrn in place of Win + Shift + S
1. Press Windows key + I to open settings.
2. Click on Ease of Access.
3. Click on Keyboard from the left menu.
4. In the right side , scroll down and locate the option Use the PrtScrn button to open screen snipping.

Method 6: By Uninstalling Snip & Sketch and then Installing Again
Step 1: Press Win + I shortcut keys on your keyboard to open the Settings window.
Step 2: In the Settings window, click on Apps.

Step 3: Next, you reach directly to the Apps & features section.
On the right side of the pane, scroll down and select the Snip & Sketch app.
Press the Uninstall button below it.

This will remove the Snip & Sketch app from your Windows 10 system. Now, go to the Microsoft Store to download and install the app again on your system. Once re-installed, the Win + Shift + S hotkey should work fine.
Method 7: By Changing the OneNote Hotkey Via Regedit
Sometimes the issue can also be due to a glitch in the OneNote. In such cases, you can change the hotkey since OneNote does not come with any customization options for the hotkeys. Since the change will have to be done using the Registry Editor, make sure that you create a backup of the registry data first. This to ensure that if you lose any data during the process, you can recover it from the backup created.
Step 1: Press the Win + R keys together on your keyboard to open the Run command.
Step 2: Type regedit in the Run command search box and press OK to open the Registry Editor window.

Step 3: In the Registry Editor window, navigate to the below path:
HKEY_CURRENT_USER\Software\Microsoft\Office.0\OneNote\Options\Other
Now, go to the right side of the pane and right-click on an empty space. Select New and then DWORD (32-bit) Value to create a new DWORD.

Step 4: Rename the new DWORD as ScreenClippingShortcutKey.

Step 5: Double-click on ScreenClippingShortcutKey.
In the Edit DWORD (32-bit) Value dialogue box, set the Value data field to 5A to change the clipping tool hotkey to Win + Shift + Z.
Press OK to save the changes and exit.

Exit Registry Editor and reboot your PC. You can now use the new hotkey to capture screenshots.
Method 8: By Disabling the Global Hotkey Using Regedit
Before you proceed to disable the Win + Shift + S hotkey on your keyboard using the Registry Editor, make sure that you create a backup of the registry data, so that, in case of any loss you can recover the lost data.
Step 1: Press the Win + X shortcut keys on your keyboard and select Run from the Run command.

Step 2: In the Run command window, write Regedit in the search field and hit Enter to open the Registry Editor window:

Step 3: Copy and paste the below path in the Registry Editor address bar and hit Enter:
HKEY_CURRENT_USER\Software\Microsoft\Windows\CurrentVersion\Explorer\Advanced
Now, select the Advanced key, right-click on it and select New > String Value.

Step 4: Now, rename the new String Value as DisabledHotkeys.

Step 5: Double-click on DisabledHotkeys.
In the Edit String dialogue box, go to the Value data field and set it to S.
Press OK to save the changes and exit.

Exit Registry Editor and reboot your PC. The hotkey should be completely disabled now.
Method 9: By Performing System Restore
When none of the above method works, you can try restoring your system to go back to the previous state when the Win + Shift + S (Snipping tool) was working. To proceed with the system restore, here’s how to create a restore point first. Now, proceed to perform the system restore.
Step 1: Right-click on the Start menu and select Run to open the Run command.

Step 2: In the Run command search box, type rstrui and press OK to open the System Restore window.

Step 3: As the System Restore window opens, click on Next.

Step 4: In the next screen, select a preferred Date and Time from the list and click Next.

Step 5: Next, to confirm your restore point, press the Finish button.

Once done, reboot your PC. The system restore process takes a while, so wait patiently till it gets over. Once you are back to the previous state, you should be able to use the OneNote snipping tool normally.
However, if the even the system restore process does not work, you may perform a Repair Install using a Media Creation tool. Here’s how to create a Windows Installation Media for your Windows 10 PC. Insert the tool, open it and select Upgrade Now. This will reinstall the Windows 10 freshly, while keeping all files, applications, and majority of the settings.