If you are trying to rename your User folder on your Windows 10 system, this guide is for you. It is very tricky to change the User name on your computer. In simple words, there is an easy one-step solution to this issue. As your username is entitled to all the folder attributes, you can not change it within your account. But there is one way you can rename the user folder. Follow these easy steps to do so-
Method 1 – Using Registry changes
1 – Log in using an administrative account on your windows PC.
2 – Now, Open file explorer
3 -Now, go to C:\Users from the address bar.
4 -Rename the user folder normally.
5 -Now, Open registry editor.
6 – Go to the path given below.
HKEY_LOCAL_MACHINE\SOFTWARE\Microsoft\Windows NT\CurrentVersion\ProfileList
7 – Now, Click on each User SID (The one with the Long names) one by one.
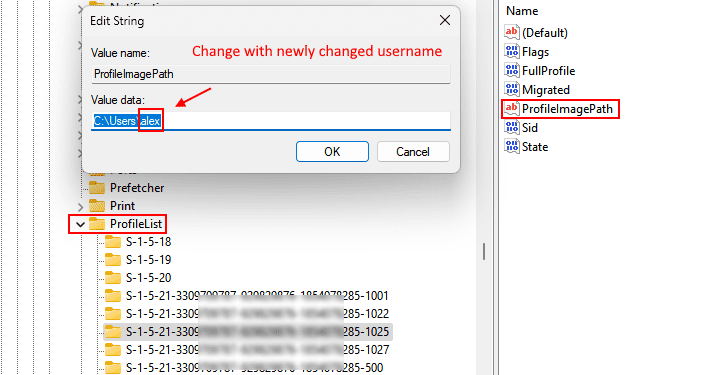
Each time , in the right side double click on ProfileImagePath every time and check whether the username in value data path is the same username which you desire to change.
When you locate the correct SID , then , change the value data of ProfileImagePath with the new name .
So, for example, you have changed the name and new name is alex, then the value data will be C:\Users\alex

Method 2 – Create a new account
In this procedure, we will follow certain steps
- First , we will Create a local account with the user name of our choice.
- Now, we will Change this local account type to administrator
- Remove original Microsoft linked account
- Link Newly created local account to Microsoft account.
Case 1 – For Windows 1o Users
Step-1 Add a new Local User account-
In order to create a new standard local user account, follow these steps-
1. Press Windows key+I to access the Settings.
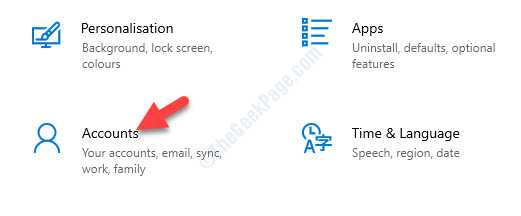
2. After that, click on “Accounts“.

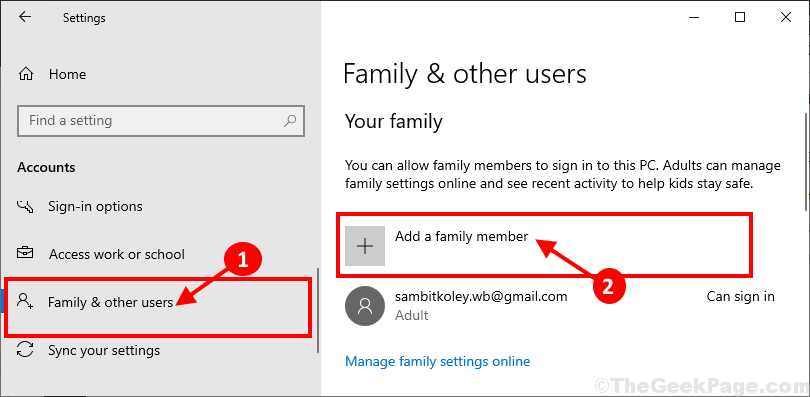
3. In the Settings window, click on “Family & other users” on the left-hand side and then,
4. Here you have to click on “Add a family member” under ‘Your Family‘ to initialize the creation of an account on your computer.*

* NOTE- If you want to add an account for anyone outside of your family, simply scroll down in the same window, click on “Add someone else to this pc” under ‘Other users‘.
Case 2 – For Windows 11 Users
1 – Press Windows key + I key together to open run.
2 – Now, copy and paste the following path given below.
ms-settings:otherusers

3 -Now, click OK.
4 -Now, Click on Add Account

5. Now select “Add an Adult” as the account type and
6. After that, you need to put an email address and then click on “Next” to start the account creation process.

Now, follow on-screen instructions to complete the account creation process.
Step-2 Set this account as an administrator
After creating the new account you have to set this account as an administrator of your computer.
1. Press the Windows key and type “Control Panel”
2. After that, click on “Control Panel”.

3. Click on ‘View by:’ and choose “Category“.
4. Then, click on “Change account type” under ‘User Accounts‘ in order to alter the new status.

5. In the Manage Accounts window, you will notice both the old account and the new account.
6. Then, click on the new account.
[NOTE– For our computer, “sambit koley” is the new account and the “Sambit_Main” account is the old account”].

7. Then, click on “Change the account type” on the left-hand side of the Change an Account window.

8. Click on the radio-button beside, “Administrator” to set this account as an administrator of this computer.
9. After doing these, click on the “Change Account Type” to save this change.

Close Control Panel window.
The new account is a new administrator of your computer.
STEP 3 – RENAME THE NeW ACCOUNT
Now, you can easily rename your older account according to your choice.
1. Right-click on the Windows icon and click on “Run“.
2. Type “control” and then click on “OK” to open the Control Panel.

3. Just like before, click on the “Category“.
4. After that, click on “Change account type” under ‘User Accounts‘.

5. Double click on the new account.

6. After that, click on “Change account Name“.

7. Set the new account name in the box.
8. Click on “Change Name” to change the name of the user account.

Close the Control Panel.
Step -4 Remove the administrative rights of the older account
At the last stage, we will remove the administrative rights of the older account on your computer.
1. Just right-click on the Windows icon and click on “Run“.
2. Write “control” and then click on “OK” to open the Control Panel.

3. Just like before, click on the “Category“.
4. After that, click on “Change account type” under ‘User Accounts‘.

5. In the next window, click on the older account to change its status.

6. Now, you have to click on the “Change the account type“.

7. This time, for an older account, select the “Standard” to set the account as a standard user of the computer.
8. Then, click on “Change Account Type” to save the changes on your computer.

After that, reboot your computer. After rebooting your device, log in to your account and check if this works.
Method 3 – Modify Registry
You can rename the user folder by logging in to your computer using another administrative account.
Step 1 – Create a new account
Log in to the system using your main administrative account. Then follow these steps-
1. Press the Windows key along with the “R” key.
2. After that type this code. To access the CMD terminal, press the ‘Ctrl+Shift+Enter‘ keys together.
cmd

3. To create a new user named ‘administrator’, simply copy-paste this line in the terminal and then hit Enter.
net user administrator /active:yes

Once you see that ‘The command completed successfully.’ has appeared on your screen, close the terminal.
4. To sign out, right-click on the “Windows icon“.
5. Then, click on the “Shut down or sign out“. Then click on “Sign out“.

6. You will see the list of available users on your computer.
7. Click on “Administrator” on the bottom-left corner.

8. After that, click on “Sign in” to sign in to the account.
This process will take a while as this is a new user on your computer.
STEP – 2 Set this account AS an administrator
1. Write “Control Panel” in the search box.
2. Then, click on “Control Panel”.

3. On the right-hand side, click on ‘View by:’ and choose “Category“.
4. After that, click on “Change account type” under ‘User Accounts‘.

5. When the Manage Accounts window, here you will see your old and new account.
6. Here, click on the “Administrator” account.

7. Here, click on the “Change account type” to change this account type.

8. Here click on the “Administrator” to set this account as an administrator of this computer.
9. Finally, click on “Change Account Type” and the change will be saved.

Close Control Panel window. Now you can easily rename your older account.
STEP 3 – Rename your account
Now, you can rename the older account.
1. After that, press the Windows key+R.
2. Then, type this address in the Run terminal and hit Enter.
C:/users

3. When the Users folder opens up, right-click on your older account and click on “Rename“.
4. Name the folder as you want.
(As an example, we have renamed the ‘Sambit’ folder to “SambitK”.)

5. Now, right-click on the Windows icon and click “Run“.
6. Then, type “regedit” and hit Enter.

Important – Before you make any change in the Registry Editor, click on “File“. Then click on “Export” to make a new backup on your computer.

This will create a new backup on your system that you can use if anything goes wrong.
7. Then, navigate to this location –
HKEY_LOCAL_MACHINE\SOFTWARE\Microsoft\Windows NT\CurrentVersion\ProfileList
8. On the left-hand side, you will see a list of keys in the “ProfileList” section.
9. Click on the first one and check out the value of the “ProfileImagePath” key on the right-hand side.
The value contains the path of the user folder the key is associated with.
[Example– As we want to change the name of the user “Sambit“, we had to find out the profile key associated with this particular user. ]
10. Double click on the “ProfileImagePath” key on the right-hand side.

11. Here, the ‘Value data:’ is the address of the profile it represents. Simply name of the folder as same as what you have done in Step -3.
(Example – In Step -3 we renamed ‘Sambit’ user folder as “SambitK”. So this time, the value will be –
C:\Users\SambitK)
12. Don’t forget to click on “OK“.

Close the Registry Editor window. After that, restart your computer. Log in to your computer using the older account.
That’s it! This way you can easily change the username on your system.