After the recent update of Windows 11 22H2, some users have noticed that File Explorer is automatically popping up in the foreground as they try to use other apps. Though this issue seems to be prevalent in Windows 11 22H2, it can happen to any version of the OS. Restarting the File Explorer should work and your problem should be fixed.
Workarounds –
1. If the File Explorer is popping up here and there, the first thing you should try is to restart the system. After restarting, open the app you were working on and check if the issue still persists.
2. Close all the opened tabs of File Explorer before opening other apps.
Fix 1 – Reboot the File Explorer
Restarting the File Explorer process should help you resolve the issue.
Step 1 – Open a File Explorer instance. If one has automatically opened up, do not close that.
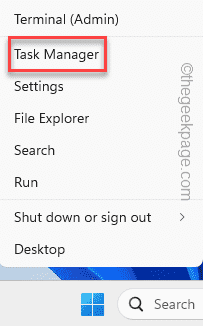
Step 2 – Instead, go ahead and press the Windows key+X keys. This will bring up the Power User menu.
Step 3 – Then, just choose “Task Manager“.
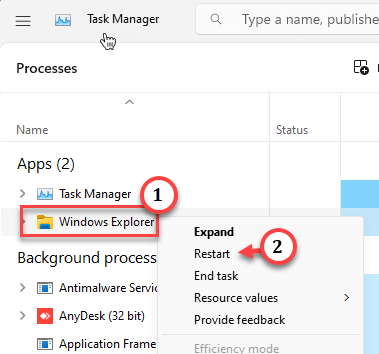
Step 4 – When the Task Manager loads up, look for the “File Explorer” process.
Step 5 – Now, just right-click that process and tap “Restart“.
Within a second, the entire desktop background, taskbar, and everything else will vanish and the computer becomes unresponsive. But, this doesn’t carry one more than a few seconds. Just a couple of seconds later, everything will go back to normal as the File Explorer process kicks in.
Now, try to use the app once more and test it.
Fix 2 – Update the system
In the recent update patches, build 23403.1001 (Developer Build), Microsoft has addressed this issue and patched it. As we move forward, they will include this with the monthly updates.
Step 1 – So, we have to make sure that your machine lacks no updates. Hit the ⊞ Win+I keys together.
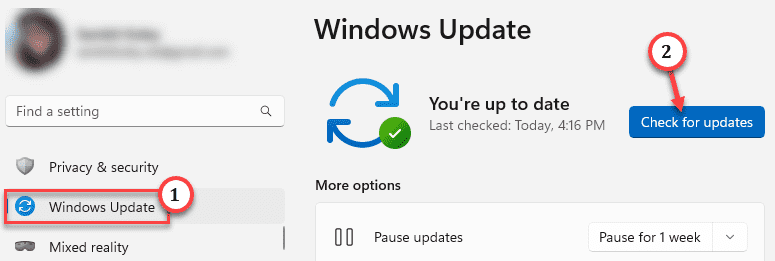
Step 2 – Go straight to the “Windows Update“.
Step 3 – Take a look at the right-hand pane. Look whether you can see whether any updates are pending or not.
If Windows is already on the move to download certain updates, don’t pause or interfere.
Step 4 – But, in case of Windows not downloading any updates, directly tap “Check for updates“.
Allow some time for Windows to update the system.
Step 5 – Sometimes, there are some optional updates for your system. You can also install them using the “Download & Install” button.
Step 6 – Whatever updates your system installs, a system update needs a system restart. So, tap “Restart now” on the WU page to restart the system upon completion of the updates.
Test if this works.
Fix 3 – Enable the AutoPlay feature
File Explorer has the facility to open up an instance whenever you plug a USB device into it. Now, if some USB devices keep connecting and disconnecting, File Explorer will keep popping up.
Step 1 – Type “control” after pressing ⊞ Win once.
Step 2 – Upon seeing the “Control Panel” item, click that.
Step 3 – Set the ‘View by:’ option to “Small icons“.
Step 4 – On the Control Panel page, click “AutoPlay“.
Step 5 – In the Choose what happens when you insert each type of media or device section, uncheck the “Use AutoPlay for all media and devices” option.
[Additionally, you may set the Removable drive to “Take no action“. This way, no matter what new drives you plug into your system, none of the prompts will appear.]
Step 6 – Tap “Save” to changes.
Restart the system after doing this in Control Panel.
Check if this offers any resolution.
Fix 4 – Remove all external peripherals
As we have mentioned earlier, any device drivers which keep connecting and disconnecting, again and again, can cause File Explorer tabs pops up again and again.
Step 1 – At first, use the power button to switch off the system.
Step 2 – Then, very carefully remove and disconnect the machine from the main power source.
Step 3 – Next remove all the unnecessary USB drives or adapters that you have plugged in (like external HDDs, old Bluetooth adapters, etc. ) from the machine.
Step 4 – After disconnecting all the unnecessary devices from the system
Step 5 – If your system has an old CD/DVD drive slot, just take a look into it and make sure there aren’t any old CD/DVD loaded up.
After going through all these steps, start up the system and use it for sometime. Test whether this actually works.
These steps should have fixed the issue.


