File Explorer is an interface provided to the users to navigate and access the files and folders stored on the computer. In Windows 10, the File Explorer has a ribbon that consists of buttons and commands for most of the common tasks like copying and moving files and folders, renaming files, creating folders, compressing folders, emailing files, and also changing the way your files and folders are displayed by Windows. There are tabs that can be used to see the extra tasks that can be performed for the selected file/folder.
But, with Windows 11, the File Explorer has changed from the ribbon interface to a simpler command bar with a modern and neat look. This change to the File Explorer’s interface in Windows 11 has not been liked and appreciated by a few of the users. These users can now restore the File Explorer in Windows 11 to the classic File Explorer with the ribbon that they were enjoying using on Windows 10.
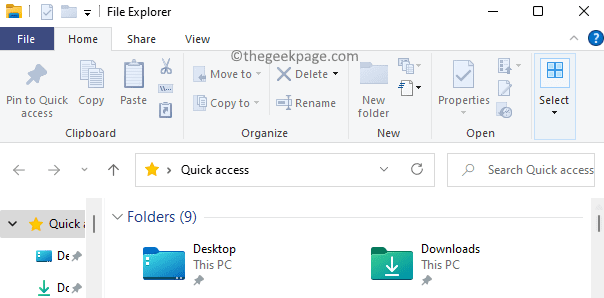
The classic File Explorer with ribbon in Windows 10 is as shown below.
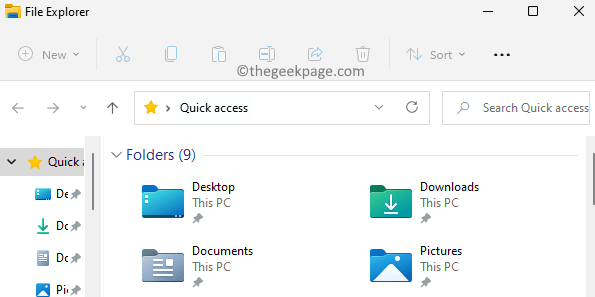
The default File Explorer with command bar available in Windows 11 is as shown below.
If you are one such user who is missing the classic File Explorer on your Windows 11 PC, then read this post.
Restore Classic File Explorer With Ribbon in Windows 11 by Manually Changing the Registry
To be able to restore the File Explorer to the classic one with the ribbon you need to be signed in as an administrator on your PC.
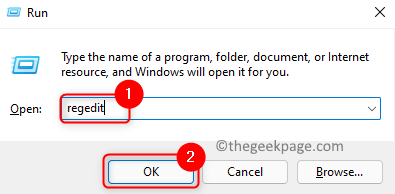
1. Press the Windows + R key combination to open the Run box.
Type regedit and click on OK to open the Registry Editor.
Click on Yes when prompted by UAC.
2. Once you are in the registry, navigate or copy-paste the path below in the address bar.
Computer\HKEY_LOCAL_MACHINE\SOFTWARE\Microsoft\Windows\CurrentVersion\Shell Extensions
3. You need to create a new key under the Shell Extensions registry key.
To do so, right-click on the Shell Extensions folder in the left pane and select New –> Key.
Name the new key as Blocked.
4. Select the newly created key Blocked.
Now, you need to create a new String value.
Move over to the right side of the registry window. Right-click on any empty space here and choose New –> String Value to create it.
5. Name this new String as {e2bf9676-5f8f-435c-97eb-11607a5bedf7}.
You can copy and paste the above string value rather than typing it again.
Double-click on this newly created key to open the Edit String window for it.
To restore the classic file explorer with ribbon go to Step 6 else go to Step 7 to use the default modern file explorer in Windows 11.
6. In the Edit String window, type <added> in the Value data field to restore to the classic Windows 10 File Explorer with a ribbon in Windows 11.
Click on OK.
Reboot your PC or log out and log in for the changes to come into effect.
7. In the Edit String window, type <delete> in the text box below Value data to make use of the modern file explorer with the command bar in Windows 11.
Click on OK to save the changes.
Sign out and sign in or restart your computer for the changes to take effect.
Restore Classic File Explorer With Ribbon in Windows 11 Using a Registry File
If you don’t want to manually make changes in the Registry, then use the .reg registry files to quickly restore the classic file explorer.
1. Click on this link to download the registry files to restore the File Explorer.
Download and save the compressed file at a location on your PC.
2. Go to the location of the downloaded file. Right-click on this compressed file and choose Extract All… to extract the contents of the file.
Select a location to save the extracted file using Browse.
Then, click on the Extract button.
3. Once the file is extracted, open the folder and double-click on the file named Restore_classic_File_Explorer_with_ribbon.reg to restore the classic File Explorer on Windows 11.
When prompted with a security warning to open the file, click on Run.
Click on Yes when asked for permissions by the User Account Control.
Now, you will see a Registry Editor pop up asking whether you want to confirm making the changes. Here, click on Yes.
At last, click on OK in the pop-up that indicates the registry merge has happened successfully.
4. Log in and log out or reboot your PC to apply these changes.
To go back to the default modern File Explorer of Windows 11, just click on the file named Default_modern_File_Explorer_with_command_bar.reg in Step 3 above and repeat the other steps as mentioned.
That’s it.
Thanks for reading. You will now be able to use the classic Windows 10 File Explorer on your Windows 11 computer.


