If you have ever used the Windows key+Shifzt+S to call upon the Snip & Sketch tool, you have seen the option of full-screen capture. But, what if the Snip & Sketch tool can’t actually take a screenshot not covering the complete portion of the available screen? Like, the screenshot coverage is only 75% of the available screen on the system. This is likely to be a scale issue on your system, rather than a problem of the hotkey.
NOTE – Snip & Sketch is now Snipping Tool.
Fix 1 – Adjust the scale of the display
The scaling of the show is actually the primary reason behind this issue.
Step 1 – Launch Windows Settings. You can do it using the Win key+I keys together.
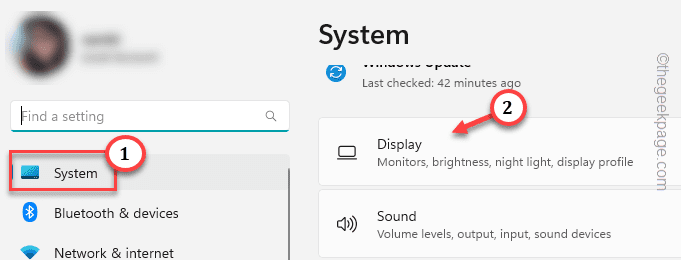
Step 2 – When you have opened that, go to the “System” settings. Then, click “Display“.
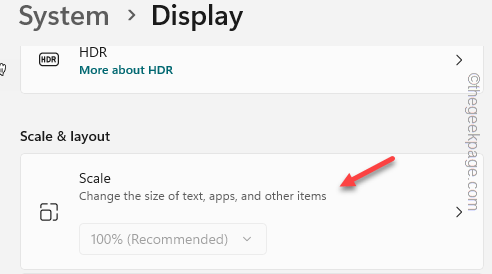
Step 3 – Here, you shall find the “Scale” option. Open that up.
Step 4 – Now, you can see all the screens you have connected to the system along with their display scale.
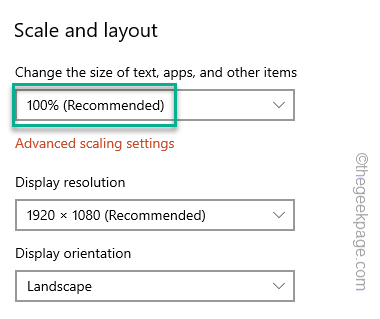
Step 5 – Find out which display you are using as a secondary. Now, set the scaling to “100%” mode.
[According to many users, if you are using dual monitors of different resolutions, setting lower scaling (100%) for the higher-resolution monitor and higher scale (125%) for the low-res monitor should fix the issue.
]
If you can’t find the scaling option, you can use the Custom Scaling option. Just write “100” in the box and click the tick sign to save the change.
Your screen will turn black and come alive within a few seconds to adjust itself according to the new scale you have set.
Now, go back to the Desktop and use the Win+Shift+S keys together to call upon the Snipping Tool overlay and take a fullscreen capture. Check if this time it is covering the full screen or not.
Note – A handful of users have If you are using multiple monitors on your system, even if their maximum resolution is not exactly the same, you should set the scale feature to a fixed value. If the system suggests you set the scale to 100% for the bigger screen and 125% for the smaller one.
Instead set both the display to a similar scale. Though there will be some issues with the zoomed-in and zoomed-out display, you can set them back to recommended mode again.
Fix 2 – Place the monitor on the left side of the laptop
If you don’t want to interfere with the scaling of the monitors, you can try this workaround.
If you are using a laptop connected to an external display, you can place the monitor on the left-hand side of the laptop. Otherwise, you can also set your laptop screen as the main display for the system. This way, the external display will function as the secondary display and automatically support the full-screen capture from the Snipping tool.
Fix 3 – Update Snip & Sketch
Check whether the Snipping tool has a pending update. If it is available, install it on your system.
Step 1 – Launch Microsoft Store.
Step 2 – There, head on to the “Library” which you may find in the left column. There, click “Get updates“.
Check whether you can find any updates for Snip & Sketch or not.
You can also directly open the Snip & Sketch app and look for any pending updates there.
After updating the app, give the fullscreen capture another shot and test.
Fix 4 – Repair or Reset Screen Snip
You have reset the scale of the monitor, but still having problems capturing fullscreen shots? Repair, and reset the Snipping tool.
Step 1 – Open Settings.
Step 2 – Then, head on to the “Apps” on the left pane.
Step 3 – On the right-hand part of the screen, you shall find the “Installed apps“.
Step 4 – Now, either you can use the search box or you can just go down and search for the “Snipping Tool” app.
Step 5 – The moment you find it, tap the three-dot button and click “Advanced options“.
Step 6 – Inside there, scroll down slowly and click “Repair” once you have found it.
Windows will now make an attempt to repair the app.
Don’t exit Setting yet. Go back down to the Desktop and check if you can capture the screen at all or not.
Step 7- If you capture the full screen, go back to the same Settings page.
Step 8 – Then, tap “Reset” to reset the app.
Step 9 – Another warning message will appear. Tap “Reset” another more to reset the app.
Exit Settings.
Try to take a full screenshot and check.
Fix 5 – Set the Projection mode to duplicate
If you are using projection mode from one device to another screen, Snipping Tool may not cover the full screen.
Step 1 – Just tap the action center button on the right corner of the taskbar.
Step 2 – There, tap “Project” in the notification center.
Step 3 – In the elevated Project panel, choose “Duplicate” to duplicate the same screen.
Call upon the Snipping tool once more and check if that fixes the issue.
Fix 6 – Update the system
This issue has been fixed in the latest version of Windows 10 and Windows 11. So, if you haven’t updated the machine in a while, start updating it.
Step 1 – Press the Win key+I keys to open Settings directly.
Step 2 – On the Settings page, you can find the “Windows Update“. Open that up.
Windows sometimes start to download updates automatically. If that’s the case, you don’t have to nothing else.
Step 3 – If you want to authorize a search for new updates, tap “Check for updates“.
Windows will now contact the Microsoft server, download all the pending updates and install them.
Step 4 – Come back when all the updates are installed. Now click “Restart now” to restart the system and complete the whole process.
Try capturing new full-screen screenshots and check how much area it is covering. Check if this solves the problem.
Fix 7 – Launch Snip & Sketch directly
Instead of launching Snipping Tool through the Windows key+Shift+S hotkey, do this –
Step 1 – Search “snip” from the search box.
Step 2 – Then, tap “Snipping Tools” to open the app.
Step 3 – In Snipping Tools app, click “Create” to start capturing the screenshot.
Step 4 – Then, tap the full-screen sign on the Snipping Tool overlay.
Now, you can use the fullscreen capture sign to take a full screenshot. Check if this works.


