Error 0xC00D3E8E is associated with media files like images, videos, etc. You are likely to see this error when-
- You are deleting old media from your system
- Editing the pictures that are recently transferred from the memory card for your camera.
The Complete error reads as follows-
An unexpected error is keeping you from applying properties to the file. If you continue to receive this error, you can use the error code to search for
help with this problem
Error 0xC00D3E8E : The property is read only.
Potential causes for this error are :
- Corrupted Media Files
- Improper ownership of the files
- Malware in the system
- When the communication is disrupted while the file explorer is fetching the media files
If you have encountered this error, then don’t worry. We have compiled a list of fixes in this article.
Make sure to try out the General Fixes that might help before proceeding to the specific ones:
- Restart the System
- Scan the System for Malware and take necessary steps to mitigate them
- Relaunch File Explorer in Task Manager [End the File Explorer Task(explorer.exe) and re-open File Explorer]
In case these fixes did not help, try the fixes listed below.
Fix 1: Take ownership of the File
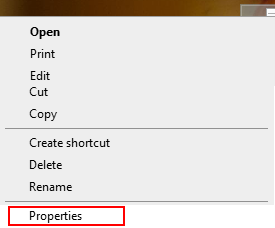
Step 1: Right-click on the media file and choose Properties from the Context Menu

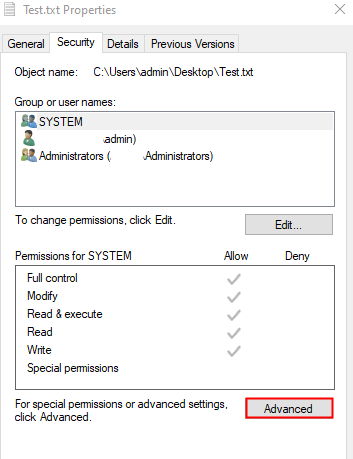
Step 2: Go to the Security Tab
Step 3: Click on the Advanced button

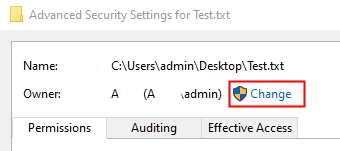
Step 4: In the Owner section, if you notice that you are not the owner, click on the Change button

Step 5: In the Select User or Group window that opens, Under the Enter the object name to select section, Type your Username and hit Enter. If you are unsure of what to type, click on Check Names
Step 6: Click on the Ok button

Step 7: In the Permissions entries section, double-click on your username
Step 8: In the Permission entry window, Tick on all options to gain complete control. Click on OK

Step 9: Finally, Click on Apply followed by the OK button in the Advanced Security Settings window.
Step 10: Either Restart the System OR Relaunch the File Explorer for the changes to take effect.
Check if this helps, if not try the next fix.
Fix 2: Run CHKDSK and SFC Scan
Step 1: Open the Run Terminal. One can use the shortcut Windows and R to do the same.
Step 2: Type cmd and hold the keys Ctrl+Shift+Enter to open the Command Prompt in Admin mode.

Step 3: Type the below commands one after the other. Make it a point to hit Enter after every command
chkdsk /f
sfc /scannow
Step 4: Once, the scan finishes, check if the error resolves.
Fix 3: Run DISM Scan
Step 1: Open Run Dialog. Use the shortcut Window and R
Step 2: In the Dialog, type cmd and press Ctrl+Shift+Enter

Step 3: In the command prompt window that opens, Enter the following commands. Please don’t forget to hit Enter after each command.
Dism /Online /Cleanup-Image /ScanHealth

Dism /Online /Cleanup-Image /RestoreHealth
Step 4: Restart your system and check if the Media files can be edited or deleted.
If not, try the next fix.
Fix 4: Try Automatic Repair
Many users have reported that this issue has helped them fix the issue.
NOTE: You should have the Windows bootable installation DVD ready
Step 1: Insert the Windows bootable installation DVD
Step 2: You will be asked if you want to continue booting from CD or DVD. Press Enter
Step 3: Choose your Language Preference and hit the Next button
Step 4: In the bottom left corner of the window, click on Repair your computer

Step 5: In the blue window that you see, click on Troubleshoot

Step 6: Now, click on Advanced options

Step 7: Finally, click on Automatic Repair or Startup Repair

Step 8: Sit back and wait patiently till the Automatic Repair finishes.
Step 9: Restart the System.
Fix 5: Run Windows Update Troubleshooter
Step 1: Open the Run Dialog in your System, holding the Shortcut keys Windows+r
Step 2: In the appearing window, type the command ms-settings:troubleshoot and just click on OK

Step 3: In the Settings–> Update & Security –> Troubleshoot window that appears, Click on Additional troubleshooters

Step 4: Scroll down and locate Windows Update and click on it.
Step 5: Now, click on the Run the troubleshooter button

Step 6: Windows will run the troubleshooter program and indicate if any changes or updates are required to the system. Do the needful.
Step 7: Restart the computer.
Check if this helps, if not, try the next fix.
Fix 6: Rollback your Windows OS
Step 1: Open the Run Dialog in your System, holding the Shortcut keys Windows+r
Step 2: Type ms-settings:recovery and hit Enter

Step 3: In the Settings > Update & Security > Recovery window that opens, Under Go back to the previous version of Windows 10 section, click on the Get Started button

Step 4: Now, go through the wizard following the on-screen instructions.
Check if this helps.
If none of the above steps help, you can roll back to the previous System Restore point( if you have created one earlier). Try running System restore in the Safe mode to limit the number of errors occurring. For more details refer to the below links,
How to perform System Restore on Windows 10
3 ways to Boot into Safe Mode in Windows 10
That’s All
We hope this article has been informative. Thank you for Reading.
Kindly comment and let us know which of the above fixes helped you solve the issue.