If you are using Windows Sandbox, you are likely to encounter an error stating No Hypervisor was found accompanied by error code 0xc0351000. The Full error is as shown below,
No hypervisor was found. Please enable hypervisor support.
Error 0xc0351000. No hypervisor is present on this system.
In case you are seeing this error, then read along. We have sorted out some fixes that might help you solve the error.
Fix 1: Ensure Virtualisation is enabled
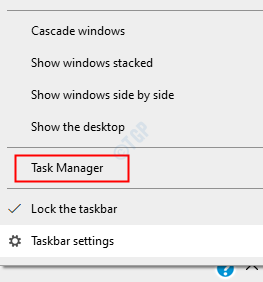
Step 1: Right on the Taskbar and choose Task Manager from the context menu

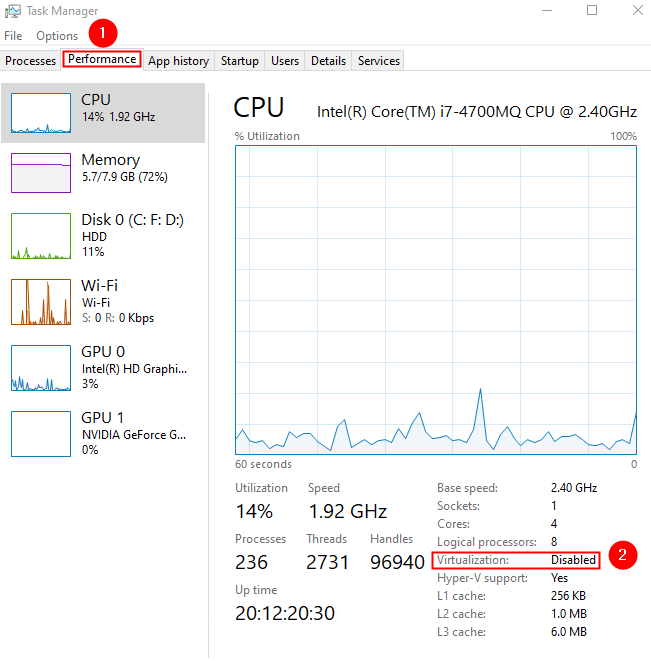
Step 2: Go to the Performance tab
Step 3: Check the Status of Virtualization. Virtualization should be Enabled

Step 4: In case the Virtualization is disabled, Enter the BIOS or UEFI Settings page.
Refer to the link, How to Open UEFI BIOS settings in Windows 10
Step 5: Once the BIOS page is opened, using the arrow keys navigate to the System Configuration tab and hit Enter
Step 6: Use the downward arrow key to reach Virtualization Technology and Enable it.
Step 7: Save the changes by pressing the F10 key
Step 8: Close the BIOS page and restart the system.
This should help. In case you are still seeing the issue, try the next fix.
Fix 2: Turn On Certain Windows Features
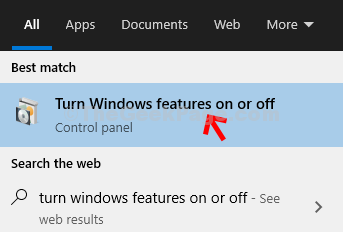
Step 1: In the search bar of the taskbar type Turn Windows features
Step 2: From the menu choose the option Turn Windows features on or off

Step 3: In the appearing window, scroll down and locate Virtual Machine Platform and Windows Hypervisor Platform
Step 4: Tick to turn on these features and press on the OK button

Step 5: Restart your System.
Hope this fix helps, If not, try the next fix.
Fix 3: Make sure that the hypervisor is enabled to start up automatically
Step 1: Search CMD in windows 10 taskbar search.
Step 2: Once the search result appears, right-click on the command prompt icon.
Step 3: From the context menu choose Run as administrator.

Step 4: In the command prompt window, enter the below command and hit Enter
BCDEDIT /Set {current} hypervisorlaunchtype auto
Step 5: Restart the computer
Step 6: Open Command Prompt as Admin
Step 7: Type the below command and hit Enter
bcdedit
Step 8: Under the Windows Boot Loader section, the hypervisorlaunchtype should be Auto
With this, the issue should be resolved.
That’s All. We hope this has been informative.
Kindly comment and let us know which of the above fix helped. Also, let us know if you run into any issues. We will be glad to assist.
Thank you for Reading.