Windows has small visual indications for showing up ‘something is wrong’ in users’ minds. If you are seeing a small yellow triangle icon sitting just next to your C drive, don’t worry. This is happening simply because the Bitlocker Encryption is not yet activated for the particular drive on your system. If your device has just finished installing a pending update, or you have manually updated your device, this issue may appear.
Workarounds –
1. Wait for a while. Pending Bitlocker Encryption may take a while to be finished.
2. Restart the system. After rebooting the device, open File Explorer and test.
Fix 1 – Turn ON the BitLocker Encryption
You can manually enable the BitLocker Encryption on your local system drive.
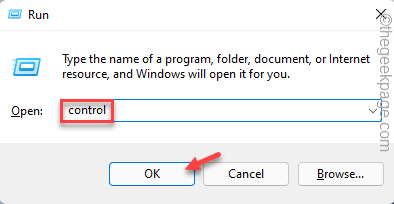
1. Press the Windows key+R keys together. This will open up the Run terminal.
2. Once you have opened the Run terminal, type “control” and hit Enter.
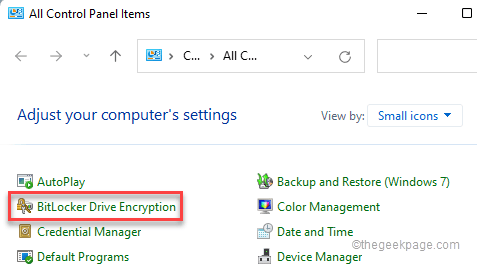
3. Once the Control Panel opens up, tap on the “View by:” option and tap “Small icons“.
4. Just tap on the “BitLocker Drive Encryption” option.
5. Here, you will notice the BitLocker Encryption is not turned ON for the particular drive (C: drive) that was showing the yellow rectangular sign.
6. So, tap the “Turn BitLocker On” option to turn it ON.
7. You will see two choices. Either you can use a USB flash drive or you can use just a password.
8. Select the “Enter a password” option.
9. Just input your password in the first box.
10. Later, re-type your password.
11. Then, tap “Next” to proceed.
12. In the next step, you can choose where you can store the backup of your recovery key. There are multiple options and you can select any of the options as you prefer.
13. Tap the “Save to your Microsoft account” option. This will let you save the password in your Microsoft account.
14. Just tap “Next” to proceed.
15. Simply, choose the “Encrypt used disk space only (faster and best for new PCs and drives)” if you have used only a fraction of your drive space.
16. Otherwise, if you have almost used up hard disk space, select the “Encrypt entire drive (slower but best for PCs and drives already in use)“.
17. Tap “Next” to proceed to the next step.
18. Simply, select the “New encryption mode (best for fixed drives on this device)“.
19. Finally, tap “Next” to proceed further.
20. Check the “Run BitLocker system check” option and tap “Continue“.
This will automatically close the BitLocker Drive Encryption screen.
21. You will note an additional prompt to restart the system, just tap “Restart now” to instantaneously reboot the system.
This will completely enable the BitLocker encryption. Write the Bitlocker password while your system is booting up.
NOTE –
You may notice an additional error message on the screen while trying to enable the BitLocker protection.
This device can't use a Trusted Platform Module.
In that case, follow these steps to enable a particular policy on your system.
1. Simply press the ⊞ Win+R keys together.
2. Then, type “gpedit.msc” and click on “OK“.
This will open up the Local Group Policy Editor.
3. When it does appear, go through this way –
Computer Configuration > Administrative Templates > Windows Components > BitLocker Drive Encryption > Operating System Drives
4. There will lot of policies on the right-hand pane.
5. Just, look for the “Require additional authentication at startup” policy settings.
6. Simply double-tap the policy to change the settings.
7. Tap on the “Enabled” option to enable this policy setting.
8. Later, make sure to check the “Allow BitLocker without a compatible TPM (requires a password or a startup key on a USB flash drive)” option.
9. Finally, once you are done, tap “Apply” and “OK” to save these changes.
Close the Local Group Policy Editor screen. Again, try to enable BitLocker protection on your system.
You won’t face any further issues.
Fix 2 – Use the Registry Editor
There is a small registry tweak that can prevent any device encryption on your system.
1. Click on the search icon (🔍) and write “regedit” in the search box beside the Windows icon.
2. Just, tap on the “Registry Editor” to access it.
NOTE –
When the Registry Editor opens up, tap on “File” and click on the “Export” option to back up the registry.
Now, save this backup in a very secure place.

After modifying the registry, if anything goes wrong, you can just use this backup to restore it.
3. After taking the backup, go this way –
HKEY_LOCAL_MACHINE\SYSTEM\CurrentControlSet\Control\BitLocker
4. After reaching the location, look for the “PreventDeviceEncryption” value.
5. If you can’t locate any value of the same name, go to the right-hand side, just right-click on the space and tap on “New>” and tap on “DWORD (32-bit) Value“.
6. Later, name the value “PreventDeviceEncryption“.
7. Then, just double-tap it to adjust it.
8. Next set the value to “1“.
9. Later, tap “OK“.
Once you have saved this value, close the Registry Editor and reboot the system.
Fix 3 – Manually disable the BitLocker Encryption
Additionally, you can permanently disable the BitLocker Encryption system for the C drive.
1. You have to open the Command Prompt with administrative rights.
2. Type “cmd” in the search box. Then, right-click “Command Prompt” and tap “Run as administrator“.
3. Just type and modify the command and hit Enter to disable the BitLocker Encryption system for the drive.
manage-bde C: -off
[
This will disable the BitLocker Encryption system for the C drive.
If you want to disable the same for any other drive, you can easily do it just by replacing the drive letter in the code.
Example – Suppose you want to disable the encryption of the D drive, the command will be –
manage-bde D: -off
]
The decryption process can actually take a while. You can close the Command Prompt screen.
You can check the status of the decryption from the Control Panel.
Control Panel > BitLocker Drive Encryption
This should solve the issue.
NOTE – It is not recommended to leave the system drive (C: drive) unencrypted. Try to enable the Bitlocker settings for the C drive at least to make it more secure.

