Users are allowed to install and run Linux Distribution on their Windows PC using the WSL (Windows Subsystem for Linux) feature. But, when installing the Linux subsystem via WSL, users have reported seeing the error “WslRegisterDistribution Failed with Error: 0x8007023e”. Generally, this problem is associated with the Windows Subsystem for Linux (WSL) itself being manipulated or the VM settings that are being used in Windows. Read this article and follow the fixes to overcome this error on your PC.
Fix 1 – Disable and Enable the Linux Subsystem
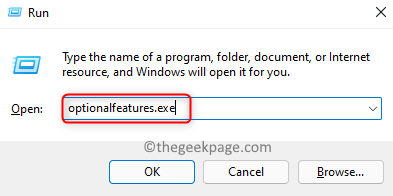
1. Press Windows and R keys on your keyboard to open Run.
2. Type optionalfeatures.exe to launch Windows Features.
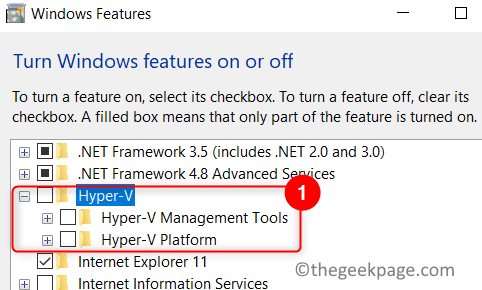
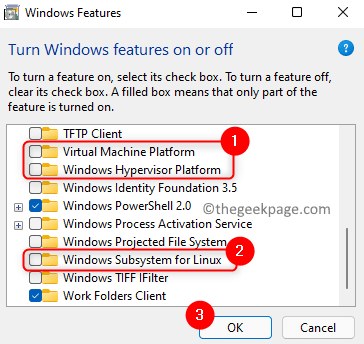
3. In the Turn Windows Feature On and Off window, you need to disable all virtual machine-related options.
- Locate Hyper-V and uncheck the box next to it.
- Uncheck the option Windows Subsystem for Linux.
- Also, disable the option Virtual Machine Platform by unchecking the box associated with it.
- If you have Windows Hypervisor Platform then disable it also.
4. Click on OK. At this time, Windows Features looks for the required files and makes the changes.
5. On the confirmation prompt, click on Restart now to reboot your PC.
6. After your system reboots, go back to Windows Features as in Steps 1 and 2 and enable all the above options by checking the box associated with them.
7. Restart your PC again after re-enabling.
8. Check if you are able to launch the Linux Distribution without the error.
Fix 2 – Enable Linux Subsystem Via PowerShell
1. Press the Windows key and type powershell in the search box.
2. Right-click on PowerShell on the search result and click on Run as administrator.
3. If the User Access Control prompts, click on Yes.
4. Type the command below and hit Enter.
Enable-WindowsOptionalFeature -Online -FeatureName Microsoft-Windows-Subsystem-Linux
5. After the command execution, it prompts for a restart. Press Y to restart your PC to complete the operation.
6. Check if the error is resolved after the startup.
Fix 3 – Update Linux Subsystem Via Command Prompt
1. Press the Windows key and type cmd in the search box.
2. Right-click on Command Prompt and select Run as administrator.
3. Update the Linux Distribution using the command below.
C:\> bash

$ sudo apt-get update

$ sudo apt-get dist-upgrade

$ <CTRL-D>

C:\> exit
4. Now open the Linux terminal and check if the error is solved.
Fix 4 – Reinstall Windows Subsystem for Linux (WSL)
If both the above fixes did not clear the error for you with Linux Distribution, then you need to uninstall and reinstall the WSL as there may be problems with the WSL itself.
A. Uninstall Linux Distribution and Windows Subsystem for Linux
1. Just hold the Windows and R keys simultaneously to open the Run dialog.
2. Type ms-settings:appsfeatures to open Apps & Features in Windows Settings.
3. Locate your Linux Installation (for example, Ubuntu) in the list of applications.
4. Click on the three vertical dots next to it and select Uninstall.
5. Complete the uninstallation following the on-screen instructions.
6. Now locate Windows Subsystem for Linux in the list of apps.
7. Click on the three vertical dots associated with it and click on Uninstall.
8. After the uninstallation, remove all the associated files and components of WSL using Windows Features. Follow the steps in Fix 1 to disable WSL and Windows Hypervisor Platform.
9. Reboot your system and then install WSL.
B. Install Windows Subsystem for Linux
Windows 10 version 2004 and above or Windows 11
1. Hit the Windows and R key and type powershell in the Run dialog that opens.
2. Press Ctrl + Shift + Enter to open PowerShell as administrator.
3. Enter the command below.
wsl --install
4. It downloads the latest version of Linux and also turns on the needed optional components for the Linux subsystem to run.
5. Restart your computer after the command executes.
6. Perform a fresh installation of the Linux software that you had uninstalled previously. Launch your Linux terminal and check whether the error is resolved.
Manual Installation (instead of the above install command) or Older Builds of Windows
1. Open Run (Windows + R).
2. Type powershell and press Ctrl + Shift + Enter to open Command Prompt as administrator.
3. Enter the command below
dism.exe /online /enable-feature /featurename:Microsoft-Windows-Subsystem-Linux /all /norestart
4. Reboot your PC after the above command completes executing.
5. After startup, use the Windows Store to download and install the Linux distribution that you had uninstalled.
6. Launch the Linux application and check if the problem is fixed.
That’s it!
We hope you must have been able to overcome the WslRegisterDistribution Failed with Error 0x8007023e on your PC using the fixes in this article. Comment and let us know the fix that helped you.


