Work folder provides a file server to share the office files for multiple user accounts. But some users are reporting about an issue they are facing. On their machines, they are seeing the ‘Error 0x8007017C, The Cloud Operation is invalid‘ error message. This problem usually occurs when the on-demand file system is disabled on your system. Just follow these easy fixes to solve the problem quickly.
Fix 1 – Disable On-demand file access feature
You can enact this in two ways.
Way 1 – Using the Control Panel
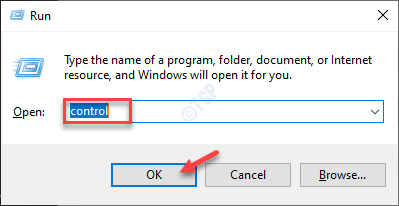
1. First of all press the Windows key+R keys together.
2. Then, just write “control” in the terminal and hit Enter.

3. Once the Control Panel screen prevails, click on the drop-down beside ‘View by:‘.
4. Then, click on you have to select the “Small icons” option.
![]()
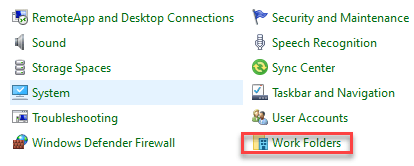
5. After that, click on the “Work Folders” to access it.

6. Here, uncheck the “Enable on-demand file access” option.
This will disable the on-demand file access feature. This may solve the problem.
Way 2 – Using the Group Policy Editor
1. You have to open the Local Group Policy settings. Press the Windows key with the ‘R‘ key together.
2. Then, type “gpedit.msc” and hit Enter.

3. At the next step, go here-
User Configuration > Administrative Templates > Windows Components > Work Folders
4. On the right-hand side, double-click on the “Specify Work Folders settings” to modify it.

5. Here, click on the radio button beside the option “Enabled“.
6. Next look for the “On-demand file access preference” settings. Click on the radio button and click on “Disable” from the drop-down.

7. Finally, click on “Apply” and “OK” to save the settings.

Close the Local Group Policy Editor settings. This will disable the on-demand file access feature on your computer.
Fix 2 – Uninstall the Windows Update
You may have seen this error message after the system has received a Windows Update.
Step 1 – Uninstall older Windows Update
1. First of all, right-click on the Windows icon and click on the “Run“.
2. Then, write “appwiz.cpl” and click on “OK“.

3. Once the Program and Features window opens up, click on “View installed updates“.

4. After that, simply scroll down to find out which is the most recent update from the list.
5. Once you have located it, right-click on it and click on “Uninstall“.

This will uninstall the update from your computer. Restart your computer.
[
Optional measures – Install the update with MCT
If you want to install the latest update, you can do it with a Media Creation Tool.
1. At first, go to the Microsoft Software Download page.
2. Then, click on the “Download tool now“.
3. Click on “Save” to save the package.

4. Once the downloading process completes, go to the file location.
5. Then, double click on “MediaCreationTool2004“.

6. Click on “Accept” to accept the terms and conditions.
7. Click on the radio button beside, “Upgrade this PC now“.
8. Then, click on “Next” to start the up-gradation process.

This will download the latest version of Windows for your computer and install it.
Fix 3 – Install the patches
Recently Microsoft has acknowledged the issue and delivered some patches to fix the issue.
1. At first you have to know which version of Windows 10 you are using.
2. To do so, press the Windows key+I keys together.
3. Then, click on “Update & Security“.

4. After that, click on the “Windows Update“.
5. Then what you need to do is to click on the “OS build info” option.

6. Check for the ‘Windows specifications‘.
7. Note down the Windows “Version“.

Once you have checked which version of Windows you are using, close the Settings screen.
8. Now, according to your Windows version, click on these links.
Windows 10, version 1809: February 16, 2021-KB4601383 (OS Build 17763.1790) Preview
Windows 10, version 1909: February 16, 2021-KB4601380 (OS Build 18363.1411) Preview
Windows 10, version 2004 or 20H2: February 24, 2021-KB4601382 (OS Builds 19041.844 and 19042.844) Preview
9. Then, scroll down through the page and click on “Microsoft Update Catalog“.
You will be directed to the Microsoft Update Catalog website.

10. Here you will notice a list of updatable patches.
11. Based on the type of system (x64-bit or x32 bit), click on “Download” to download the package appropriate for your system.

Once you downloaded the standalone installer, close the browser.
12. Go to the download location.
13. Then, double click on the setup file.

Follow the on-screen instructions to install the update on your computer. Your computer will restart and complete the installation process.
Open the Work Folders and check. This should solve the problem for sure.