Sysprep is a very important Windows installation tool that allows users to omit PC specification data from the Windows installer so that it can be used for installing it on other PCs. But some Windows users are complaining about an issue where they are seeing ‘Sysprep was not able to validate your Windows installation‘ error prompt while installing Windows on their machines.
Fix 1 – ReInstall the default Windows Apps
You have to install the default Windows Apps to fix this problem.
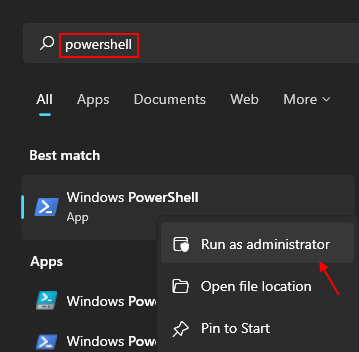
1. Search Powershell in Windows search box.
2 -Right click on Powershell icon.
3 -Click on Run as administrator.

4. Once the PowerShell opens up, type this command and hit Enter.
Get-AppxPackage -AllUsers| Foreach {Add-AppxPackage -DisableDevelopmentMode -Register "$($_.InstallLocation)\AppXManifest.xml"}

Once you have executed this code, close the PowerShell window. Restart the computer once and check it out.
Fix 2 – Remove the Upgrade key
Follow these steps to remove the “Upgrade” key from the registry key.
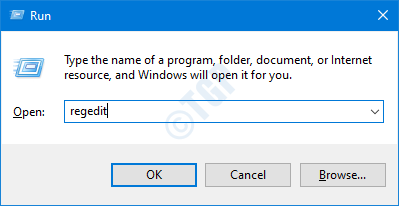
1. First of all, right-click on the Windows key and the R keys together.
2. Then, type “regedit” and click on “OK“.

Important– Registry Editor is a very delicate location on your system. Before you proceed further, we suggest creating a registry backup of the system.
If you haven’t backed up the registry, after opening the Registry Editor, click on “File“. Then click on “Export” to make a new backup on your computer.

3. Once you have taken the backup, go to this location-
Computer\HKEY_LOCAL_MACHINE\SYSTEM\Setup\
4. On the right-hand side, look for the “Upgrade” key.
5. Then, right-click on the “Upgrade” key and click on “Delete” to remove it.

6. Finally, click on “Yes” to remove the key from the system.

7 – Now, go to this location in registry
HKEY_LOCAL_MACHINE\SYSTEM\Setup\Status\SysprepStatus
8 – Now, in the right side do a double click on CleanUpState and then change the value data to 7.

Note: -If at the right side CleanUpState is not present, Just doa right click and Choose New > Dword (32 bit) value and name it as CleanUpState.
Now, change its value data to 7.
Now, run SYSPREP again
Once you have removed the key, close the registry editor screen.
Fix 3 – Turn Bitlocker Off
If you see this error message, go for this solution.
Turn BitLocker off to run Sysprep. (0x80310039)
Bitlocker provides security over the system drive (generally, the C: drive). Sometimes this can cause a problem.
1. Click on the search box and start to write “cmd“.
2. Further, right-click on the “Command Prompt” and click on “Run as administrators“.

3. To check the status of the Bit locker, run this command and hit Enter.
manage-bde -status

Check out the results and notice in which volume bit locker is active. Generally, the bit locker remains active on the Local Disk C: or the “C:” drive.
4. To disable the BitLocker service in the particular drive, paste this command, edit it, and hit Enter.
Disable-Bitlocker –MountPoint 'C'
[NOTE – Replace the Cwith the drive letter where the Bitlocker is active.

This will disable the Bitlocker on the particular drive and fix the issue that you are facing.
Now, close the terminal and run the Sysprep once again.
Fix 4 – Uninstall and install app packages
Upon opening the setupact.log file, you may see this –
Error: SYSPRP Package XYZ_1.2.3.500_x64__8we4y23f8b4ws was installed for a user, but not provisioned for all users. This package will not function properly in the Sysprep image.
[NOTE – As you can see, the problem is occurring due to – XYZ_1.2.3.500_x64__8we4y23f8b4ws.
In this case, the name of the app is “XYZ” and the package is “XYZ_1.2.3.500_x64__8we4y23f8b4ws“.]
As you can see the XYZ_1.2.3.500_x64__8we4y23f8b4ws package is corrupted and causing this issue.
1. First of all, press the Windows key+X keys together.
2. Then, click on the “Windows PowerShell(Admin)” to launch it.

3. In the PowerShell screen, type this command and hit Enter to remove the package at first and install it later on.
Get-AppxPackage –Name *Name of the app* | Remove-AppxPackage

Remove-AppxProvisionedPackage -Online -PackageName package name
[
Replace the “Name of the app” with the name of the app from the error message.
Similarly, replace the package name with the package name you have noted in the error message.
Example – In our case, the command will be –
Get-AppxPackage –Name *XYZ* | Remove-AppxPackage

Remove-AppxProvisionedPackage -Online -PackageName XYZ_1.2.3.500_x64__8we4y23f8b4ws
]

Once you have executed these codes, close the PowerShell window.
Restart your computer and further try to run the Sysprep.
Fix 5 – Run SFC scans
1. Click on the search box and start to write “cmd“.
2. Further, right-click on the “Command Prompt” and click on “Run as administrators“.

3. Paste this code in the terminal. Thereafter, hit Enter to run the scan.
sfc /scannow

SFC scan will commence.
4. To launch a DISM scan, write this command in the CMD terminal and then hit Enter.
DISM.exe /Online /Cleanup-image /Restorehealth

Once you have run both the SFC and DISM scans on your machine, close the CMD screen and restart your computer.