While installing Windows 10 is often said to be a simple procedure, it does come with its share of errors and exceptions that make it challenging. Error Code: 0xE0000100 with the error message, “Windows installation encountered an unexpected error” is one such error that can often arise either during Windows 10 installation or due to a Windows Update failure.
There could also be a problem with the disk partition, a damaged installation media, if your system is low on RAM or if it’s damaged, and more. Fortunately, this can be fixed and you can complete the installation or the update smoothly. Let’s see how.
Method 1: Using Diskpart Tool
You must try cleaning the partitions using the Windows 10 built-in diskpart tool. Let’s see how.
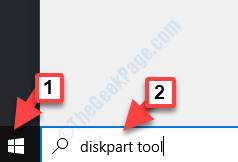
Step 1: Go to Start and type diskpart tool in the search box.

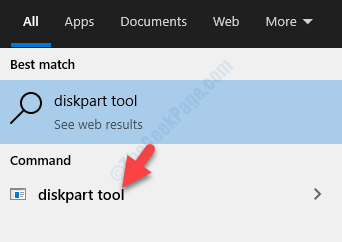
Step 2: Left-click on the result and it will open a Command Prompt window.

Step 3: In the Command Prompt that opens, type the below commands one by one and hit Enter after each command:
diskpart

list disk

select disk 0

clean
Now, restart your PC and try finishing the installation. It should complete installing smoothly, but if it does not, try the 2nd method.
Method 2: By Running Chkdsk Utility
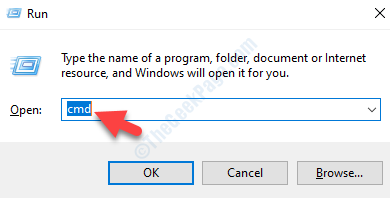
Step 1: Press Win + X keys together on your key board to open the Run command.
Step 2: Now, type cmd in the search box and then, press Ctrl + Shift + Enter keys together on your keyboard to open Command Prompt in elevated mode (Admin).

Step 3: As the Command Prompt (Admin) window opens, type the below command and hit Enter:
chkdsk c: /f

Let the process complete and then restart your PC. The error should be gone now, but if it still persists, follow the 3rd method.
Method 3: By Checking RAM
Shut down the system completely and replace the RAM with a new one to check if the error is gone and the installation or the update goes through. You can interchange the RAM slots and then restart your PC. This should be done when the RAM hardware or connector has suffered any damage.
Additionally, you can use a free software like the Memtest86+to run a memory diagnostic test on your RAM.
This should fix the issue and you can complete the Windows 10 installation, but if you are still facing the issue, follow the 4th method.
Method 4: By Tweaking the LoadAppInit_DLLs Registry Key
Step 1: Press Win + X keys together on your key board to open the Run command.
Step 2: In the Run command search box, write regedit and press OK to open the Registry Editor window.

Step 3: In the Registry Editor window, navigate to the below path:
HKEY_LOCAL_MACHINE\SOFTWARE\Microsoft\Windows NT\CurrentVersion\Windows
Now, on the right side of the pane, look for LoadAppInit_DLLs key.

Step 4: Double-click on LoadAppInit_DLLs to open the Edit DWORD (32-bit) Value dialogue box. Now, go to the Value Data field and set the value to 0.
Press OK to save the changes and exit.

Exit the Registry Editor window and then restart your PC to check if the error is gone.
But if you still encounter the error, follow the 5th method.
Method 5: By Running the Hardware Troubleshooter
The previous version of the Windows 10 were accompanied with a built-in hardware troubleshooter. However, starting from the 1809 build of Windows 10, the Hardware and Device troubleshooter was removed. But, the good thing is, you can still run the troubleshooter using the Command Prompt, let’s see how.
Step 1: Go to Start and type Command Prompt in the search box.

Step 2: Left-click on the result to open the Command Prompt window.

Step 3: Copy and paste the below command in the Command Prompt and press Enter:
msdt.exe -id DeviceDiagnostic

Step 4: It will open the Hardware and Devices window. Click on Next and wait till it detects the error and fixes it automatically.

Now, restart your PC and the error should be gone. You can now continue with your Windows 10 installation or update as normal.