If you were using a trial version of Windows and recently decided to go for the paid version, there is a slight chance that you may see this error message – “Error 25004. The product key you entered cannot be used on this machine. This is most likely due to a previous Office 2016 trials being installed“. There is nothing to worry about. We have detailed some easy solutions addressing this issue in this article. Simply follow those and the issue will be solved quickly.
Fix 1 – Uninstall Existing Office on your PC
The main reason of this error is an existing Office application residing on your PC. So, , Just uninstall existing Office app from your computer and then try again.
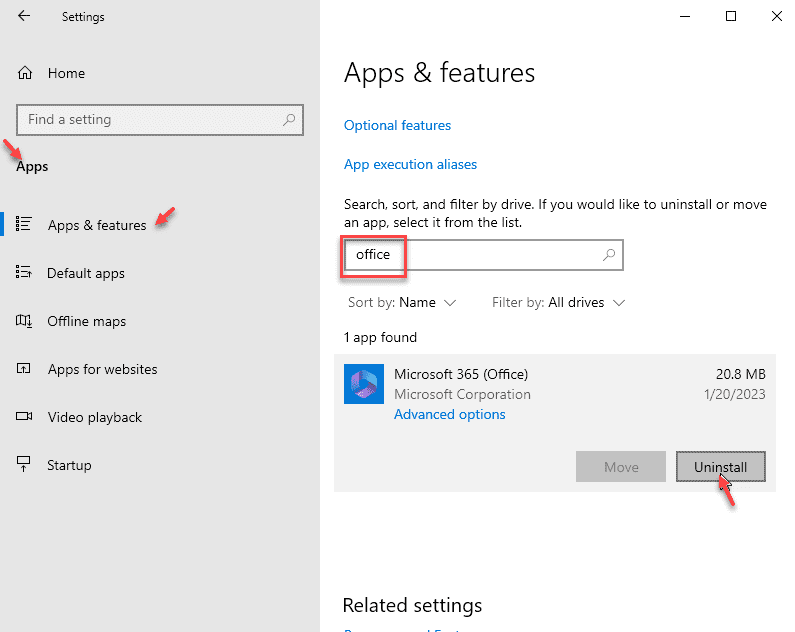
1 – Open Settings By pressing Windows and I key together.
2 -Click on Apps and then click on Apps & Features from left menu.
3 – Search Office from the search box and if any office application shows up , click on it.
Now, Click Uninstall

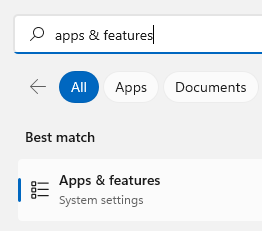
For Windows 11 Users
1 – Search Apps & Features and click on it

2 – Search Office and then Uninstall it
Fix 2 – Modify Registry settings
Sometimes existing ‘Office‘ key conflicts with the Office installation on your computer.
1. Click on the Windows icon. Type “regedit“.
2. To access the Registry Editor, hit “Enter“.

NOTE–
Changing a single key in your Registry Editor without knowing anything, may result in a fatal error. So, take a backup in advance.
Just click on “File” and then click on “Export“. Store it somewhere safe on your drive.

3. When the Registry Editor appears, expand the key headers in this way-
Computer\HKEY_CURRENT_USER\SOFTWARE\Microsoft\Office
4. Simply, right-click on the “Office” and then click on “Delete“.

5. If there is a confirmation prompt, click on ‘Yes‘.

6. After that, go to this place-
Computer\HKEY_CURRENT_USER\Software\Microsoft\Office
7. Just the same as before, right-click on the “Office” key and click on “Delete“.

8. Then, navigate to this way-
Computer\HKEY_LOCAL_MACHINE\SOFTWARE\MICROSOFT\WINDOWS NT\Current Version\AppCompatFlags
9. Right-click on the “AppCompatFlags“.
10. After that, click on “Delete“.

After that, close the Registry Editor window.
Restart your computer and try to install the full version of the Office again.
Fix 3 – Rename/ Delete the existing Office folders
Renaming the existing Office folder will resolve this issue.
1. At first, you need to access the File Explorer by pressing Windows key+E.
2. Then, go this way-
C:\Program Files
3. Scroll down through the list of folders till you find out ‘MS Office‘.
4. Right-click on the “MS Office 15“* folder and click on “Rename“.

5. Rename the folder as “MS Office 15 Backup“.

Similarly, try to find other folders related to Office inside the Program Files folder. Just add the ‘Backup‘ at the end of the names of those folders.
Example-
OfficeUpdate folder to OfficeUpdate Backup
OfficeUpdate 14 to OfficeUpdate 14 Backup
6. Navigate to this location-
C:\Program Files\Common Files\microsoft shared
7. In the Microsoft shared folder, delete the ‘Office15‘ folder and the ‘OfficeSoftwareProtection Platform‘ folder.

8. Now, navigate to this location~
C:\Users\"%User Account Name%"\Appdata\LOCAL\Microsoft
[Replace the ‘User Account Name‘ with your own username]
9. Right-click on the “Office” folder and click on “Delete“.

10. Then, go to this place-
C:\Users\"%User Account Name%"\Appdata\LocalLow\Microsoft
11. Delete the “Office” folder here as well.

12. After that, open this place on your File Explorer–
C:\Users\"%User Account Name%"\Appdata\Roaming\Microsoft
13. Right-click on the ‘Office‘ folder and ‘Delete‘ it.

14. Go to this location on your drive-
C:\Windows\System32\spp\store.0\
15. As the last step, right-click on “tokens.dat” and click on “Rename“.
16. Rename the file as “tokens.dat.old“.

Once you are sure that you have deleted all the folders related to MS Office, close the File Explorer.
Shutdown your system. Wait for a while and start it up. Install the MS Office again and try to access it.
*NOTE–
Depending upon the MS Office version, the name of the Office folder may be different. Like- MS Office 13, MS Office 14.
Fix 4 – Empty Temp folder
The Temp folder contains extracted temporary files of your computer.
1. At first, press the Windows key along with the ‘R‘ key.
2. When the Run terminal pops up, type “%temp%“. As soon as you click on “OK“, the Temp folder will appear.

3. In the Temp folder, press ‘Ctrl+A‘. All the folders and files inside the Temp folder will be selected.
4. After that, press the ‘Delete‘ key to empty the Temp folder.

Once you have cleared the Temp folder, try to install MS Office again.
Fix 5 – Repair the existing version
Repairing the existing version of MS Office may solve the issue.
1. At first, search “Programs and Features“.
2. Now, click on “Programs and Features” in the elevated search result.

3. When the Programs and Features window appears, find the “MS Office” package.
4. What you need to do now is to right-click on the package and click on “Change“.

5. Select “Quick Repair“.
6. Then, click on “Repair“.

Once it is repaired, reboot your computer. After restarting your device, try to re-install the Office.
Fix 6 – Clean uninstall the Office package
If nothing is working out for you, the uninstallation of the current package is the only way resolution left.
1. Visit this link on your computer.
2. Simply, click on the “Download” on the right-hand side.

After downloading the file, close the browser.
3. Go to the Downloads folder on your computer.
4. After that, double click on the “SetupProd_OffScrub.exe” file to launch it.

5. Then, click on “Install“.

6. After that, you need to click on “Run” to run the installer.

7. Then, click on “I agree“.

8. When you see the question ‘Is this the affective machine?‘, click on the radio button beside “Yes“.
9. Then, click on “Next“.

10. Then, check the right version of the MS Office.
11. After that, click on “Next“.

Then wait for the uninstallation to be over.
Close the Microsoft Support and Recovery Assitant tool. Restart your system and install the MS Office again.
Fix 7 – Install Office using CMD
NOTE–
If you have a Multiple Activation Key (MAK), only then this workaround is going to help you.
1. At first, press Windows key+R.
2. In the Run window, type “appwiz.cpl“. Click on “OK“.

3. Scroll down through the list of apps and click on “Microsoft Office Professional Plus“.
4. Click on “Uninstall“.

5. Finally, click on the “Uninstall“.

6. Follow the instructions of Fix-5 to clean up MS Office residues from your computer.
7. If needed, reboot your computer.
8. Now, what you need to do is to move the Office iso file (the DVD drive) to your HDD drive.
9. Note down the location.
9. Click on the search box and type “cmd“.
10. After that, right-click on “Command Prompt” and click on “Run as administrator“.

11. When the cmd window appears, navigate to the folder where you have placed the ISO files.
cd location of the ISO file
(Example- Place the location of the ISO file in ht.
cd 2013
)

12. Now, modify and execute this code by hitting Enter, after pasting this command.
setup.exe /admin
( Example– The command will look like-
c:13>setup.exe /admin

13. As soon as you executed this command, the Office Customization Tool will open up.
14. Follow the instructions.
15. Select the ‘Enter the product key‘ tab and input your MAK key. (It will add the dashes automatically)
16. Save the file in the ‘Updates’ folder within the Office installation drive. (Example – C:\2013\updates\2013.msp)
17. At the last step, close the Office Customization Tool.
18. Once you have done all these, run the setup.exe on your computer normally.

This time the installation process won’t throw up the error again.
Additional Tips–
1. You can consider using a new product key for your MS Office.
2. Use the latest version of Office installers.