Some Windows 10 users are complaining about an issue they are facing whenever they are trying to open Windows Defender on their computer. Every time they are trying to open the Windows Defender on their respective systems, Windows Defender is not opening and instead, an error message is popping up stating “This app is turned off by Group Policy“. Follow these two fixes and the problem will be solved just in no time.
Fix-1 Edit Group Policy-
Disabling “Turn off Windows Defender Antivirus” from Local Group Policy Editor should solve this issue.
1. Press Windows key+R to launch Run window on your computer.
2. Type this command in that Run window and then hit Enter.
gpedit.msc

Local Group Policy Editor window will be opened.
3. When the Local Group Policy Editor opens up, expand the left side in this fashion-
Computer Configuration > Administrative Templates > Windows Components > Windows Defender Antivirus
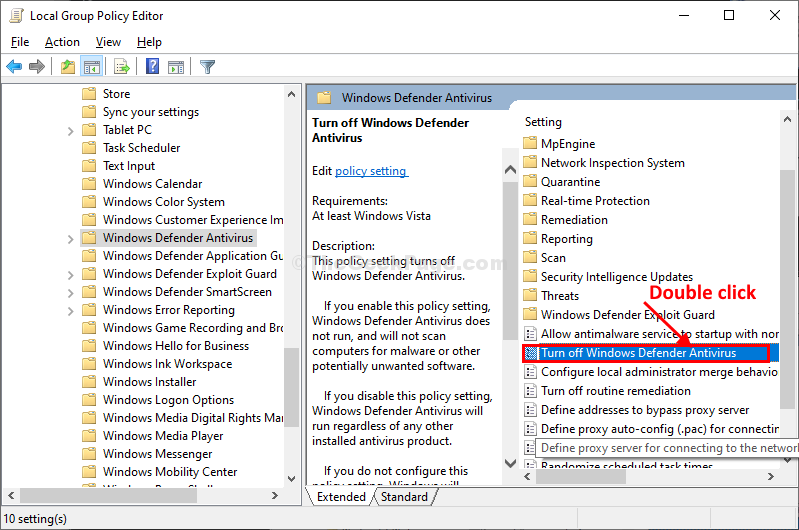
4. On the right-hand side of the Local Group Policy Editor window, scroll down.
5. Then, double click on “Turn off Windows Defender Antivirus“.

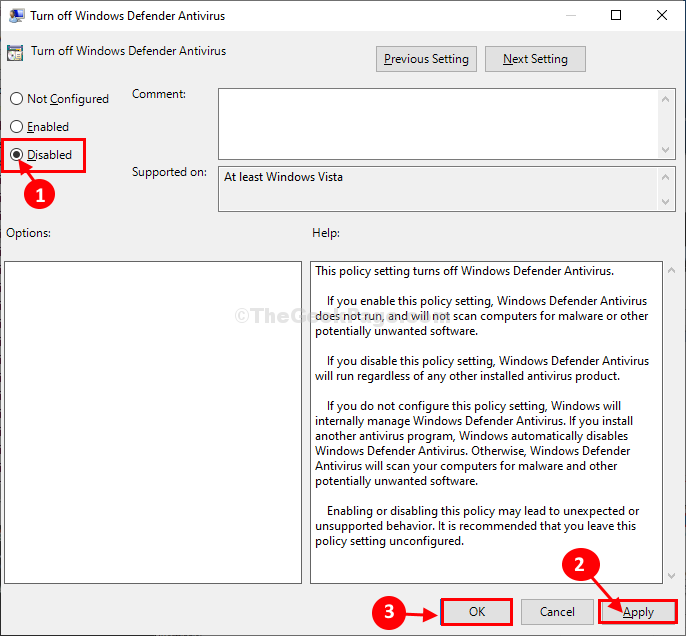
6. In Turn off Windows Defender Antivirus window, click on “Disabled” to disable the policy settings.
7. Once you have done all these, click on “Apply” and “OK” to save the changes on your computer.

Close Local Group Policy Editor window.
Restart your computer to let the changes take effect.
After rebooting your computer try to open Windows Defender again on your computer. Go for the next fix if the problem persists.
Fix-2 Modify Registry Editor-
Deleting ‘DisableAntiSpyware’ key from Registry Editor may work out for you.
NOTE–
Before going ahead to the main fix, we strongly suggest you create a backup of the registry on your computer. After opening Registry Editor, click on “File” > “Export” to create the backup.
If anything goes wrong you can retrieve your registry by simply importing the backup.
1. Press Windows key+R to launch Run window on your computer.
2. When the Run window pops up, type “regedit” there, and then click on “OK” to open the Registry Editor window.

3. In Registry Editor window, on the left-hand side, navigate to this location-
Computer\HKEY_LOCAL_MACHINE\SOFTWARE\Policies\Microsoft\Windows Defender
4. On the right-hand side of the Registry Editor window, you will notice the “DisableAntiSpyware” key.
5. Right-click on the “DisableAntiSpyware” key and then click on “Delete” to delete the key from your computer.

6. Click on “Yes” to confirm the deletion process.

Once you have deleted the key, close the Registry Editor window.
Reboot your system to save the changes.
After rebooting your computer, try to open Windows Defender on your computer. It should open without any further problems.
Your problem should be solved.