Windows Defender is a very good alternative when it comes to protecting your pc from various malware, viruses. So, when it is not turning ‘ON’ on your computer, your computer will be prone to potential threats in the online world. Don’t worry. Follow these simple fixes on your computer and the problem will be solved quickly.
Fix-1 Modify Registry Editor window-
You can face this error if there is a string containing the wrong value in your registry.
1. Click on the Search box and then type “regedit“.
2. Now, click on “Registry Editor“.

NOTE–
You should build a backup by simply clicking on the “File” in the menu bar of the registry editor and then clicking on the “Export“.
3. Once you have created the backup, go to this header-
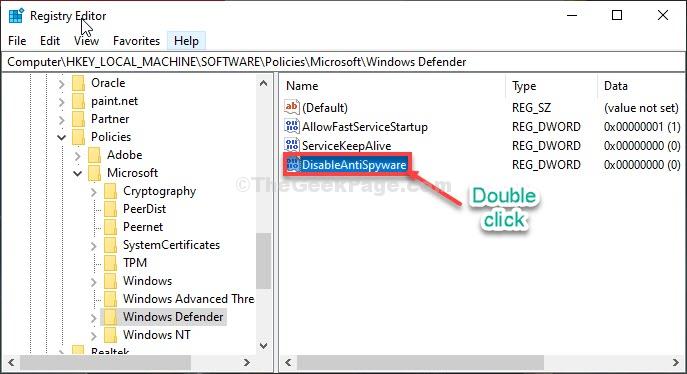
Computer\HKEY_LOCAL_MACHINE\SOFTWARE\Policies\Microsoft\Windows Defender
4. Now, on the right-hand side, check if you can find the “DisableAntiSpyware” string value.
5. Then, double click on “DisableAntiSpyware” to modify it.

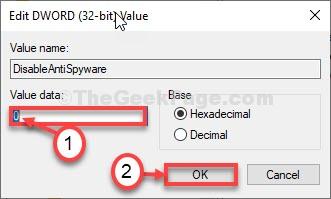
6. After that, set the Value data: to “0“.
7. Click on “OK” to save the changes on your computer.

Close Registry Editor window.
Reboot your computer. After rebooting your computer you will be able to turn Windows Defender on your computer.
Fix 2 – Uninstall third-party antivirus
Many users have fixed the problem simply by uninstalling the third-party antivirus from their computers.
1. Press the Windows key+R keys together.
2. Then, type “appwiz.cpl“. Click on “OK“.

3. Next you will see a list of applications. Look for your third-party antivirus (such as – McAfee, Avast those which comes preinstalled).
4. Right-click on the antivirus and then click on “Uninstall“.

Follow the on-screen instructions to uninstall the antivirus from your computer.
Restart your computer and try to use Windows Security again. It will work just fine.
Fix 3 – Check the Date and Time settings
1. Press Windows key+S and begin to type “Change date & time“.
2. Then, simply click on the “Change date & time“.

3. On the right-hand side, “Set time automatically” to “Off“.
4. In a similar fashion, simply toggle the “Set time zone automatically” to “Off“.

5. Next, under ‘Set the date and time manually‘ click on “Change“.

6. Here you have to set the “Date” and “Time” according to your local time and date.
7. To save this change in settings, click on “Change“.

8. Click on the ‘Time Zone‘.
9. You will see a list of different time zones. Select the correct timezone for your computer.

Restart the system and further check the Windows Security again.
Fix 4 – Edit Group Policy settings
1. At first, press Windows key+R.
2. Then, type “gpedit.msc“. Click on “OK“.

3. When the Local Group Policy Editor opens up, navigate to this particular location-
Computer Configuration > Administrative Templates > Windows Components > Microsoft Defender Antivirus
4. After this, double click on the “Turn Off Microsoft Defender Antivirus” policy to modify it.

4. Set the settings to “Disabled“.
5. Finally, click on “Apply” and then click on “OK“.

Close the Policy Editor on your computer.
Try to check if this has worked or not.
Fix 5 – Check the registry values
Sometimes the registry values on your computer can prohibit your access to Windows Defender.
Warning – Registry Editor is a very sensitive location on your computer. Before moving further altering the registry on your system, we ask to make a backup of the registry on your computer.
Just follow this simple step-
After opening the Registry Editor, click on “File“. Then click on “Export” to make a new backup on your computer.

1. Type “regedit” in the search box.
2. Then, click on the “Registry Editor” to access it.

3. Then, navigate to this location –
Computer\HKEY_LOCAL_MACHINE\SOFTWARE\Policies\Microsoft\Windows Defender\Policy Manager
4. Once you are in the specified location, double click on the “AllowUserUIAccess“*.

5. Simply, set the value of the key as “1“.
6. Click on “OK” to save this modification.

Restart your computer to save the change on your computer.
*NOTE–
If you see there is no “AllowUserUIAccess” key on your computer, follow these two steps to create the key.
a. Right-click on the left side, and then click on “New>” and click on “DWORD (32-bit) Value“.

b. Name the key as “AllowUserUIAccess“.
Then follow the rest of the steps mentioned above to change the value and restart the system.
Your problem should be fixed.
Fix – 6 Set normal startup for your system-
Setting a normal startup on the computer has solved the problem for many users.
1. You can access the press Windows key+R keys together.
2. To open the System Configuration window type “msconfig” in Run window and then click on “OK“.

3. In the System Configuration window, go to the “General” section.
4. Then, select “Normal Startup” as the booting option on your computer.

5. Then, click on “Apply” and “OK“.

Restart your computer.
After restarting Windows Defender will be working normally.
Fix- 7 Check for Windows Update-
Windows deliver crucial updates and definition with the Windows Update process.
1. At first, what you can do is to open Settings.
2. In the Settings window, click on “Updates & Security“.

3. On the right-hand side, click on “Check for updates“.

All you need to do is wait for the update process to be over.

Restart your device to complete the update process.
After rebooting your computer, try to enable Windows Defender on your computer.
Your problem will be solved.
Fix- 8 Start Windows Defender service-
Starting Windows Defender service on your computer may solve this issue.
1. Type “service” in the search box.
2. Simply click on Enter to access the Services.

3. Then, double click on the “Windows Defender Advanced Threat Protection Service” service.

4. Now, you need to set the service to “Automatic“.
5. Now, click on “Start” to start the service on your computer.

6. To save the settings on your computer, click on “Apply” and then “OK“.

Close Services window.
Open Windows Security settings and try to turn ‘ON‘ Windows Defender.