Wireless printers connect to your system via WiFi, making it a lot easier to access than having a wire around. All you need to do is to enter your WiFi password and your device gets connected to the network. However, you must make sure that the printer’s configuration, matches with the network. You can then get a print out for anything, anywhere.
But, at times, you may encounter the “Windows could not search your network for printers” error in your Windows 10 PC while setting up your WiFi printer or once it’s done. This can be frustrating, especially when you are in the mid of a printing job of some important documents and Windows can’t find the printer in the connected network. You simply cannot print a document.
However, there are ways through which you fix this issue. But, before you proceed with the fixes, make sure of a few basic things as explained below.
Verify a Few Basic Things
Before you proceed with the methods to fix the issue, very a few basic things like if the printer is turned on and the green light is on at its back (connection is live), if the network wire is unplugged, the WiFi connection is ON, etc. Many times the printer may freeze and it may just need to be restarted. When in an office environment, the computer must be connected to the internal network of the office for the Printers to be active, and so on.
Once you have checked all that and the problem is still not solved, move on to the below fixes.
Method 1: By Turning On Network Discovery
If the network is unable to find any other computer or devices, along with the printer, chances are, that the network discovery settings of your PC has changed. In that case, follow the below steps to enable network discovery again:
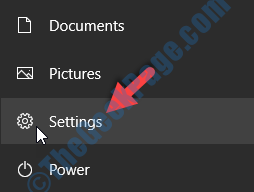
Step 1: Navigate to the Start button on your desktop, click on it and select Settings from the menu.

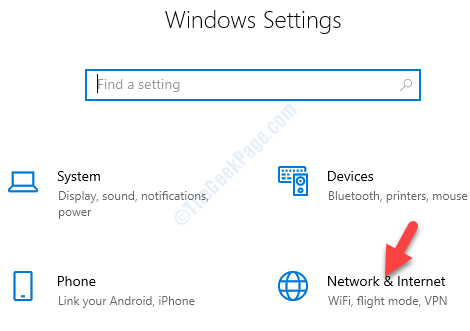
Step 2: In the Settings window, go to Network & Internet.

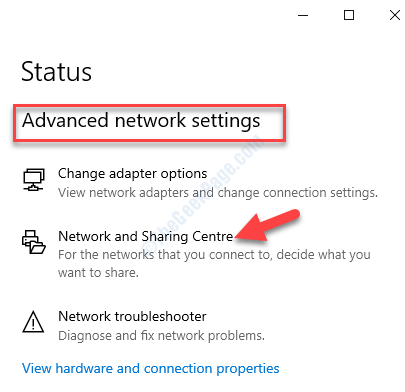
Step 3: In the Network & Internet settings window, it takes you directly to the Status section. Go to the right side of the window, scroll down and under Advanced network settings, select Network and Sharing Center.

Step 4: Next, in the Network and Sharing Centre, go to the left side of the pane, and click on Change advanced sharing settings.

Step 5: In the Advanced sharing settings window, go to the Guest or Public section. Now, under Network Discovery enable Turn on network discovery and under File and printer sharing, enable Turn on file and printer sharing.
Hit the Save changes button below to save the changes and exit.

*Note – If you are on a Private network, enable the Turn on network discovery for that section instead.
This should help you get rid of the error and you can now see the Printer, but if the problem persists, try the 2nd method.
Method 2: By Running Troubleshooter for Printer
You can troubleshoot the Printer either through the Settings app or through the Run command. Let’s see how.
Solution 1: Via the Settings App
Step 1: Right-click on the Start button and select Settings from the menu.

Step 2: In the Settings window, click on Devices.

Step 3: In the Devices pane, click on Printers & Scanners on the left side.
Now, on the right-side, go to Related settings section and click on Run the troubleshooter.

Once the troubleshooting process is complete, wait for it t add the printer. However, if you are used to this Printers issue, you may try the alternative.
Solution 2: Using Run Command
Step 1: Press the Windows + R keys on your keyboard together to open the Run command.
Step 2: Type the below command in the Run box and press OK:
msdt.exe /id PrinterDiagnostic

This is the fastest way to open the same Printer Diagnostic Prompt.
This should resolve your Printer issue, but if it doesn’t, then follow the 3rd method.
Method 3: Verify If the Printer and Computer Are on Same Network
For the Printer to be detected by the Network, the Printer should be on the same network as the computer. This is especially the situation, when you have created different WiFi or Names. Therefore, it’s important to double-check if the WiFi printer is connected to the computer on the same network. This is also applicable for the printers that are connected over Ethernet connections.
If that is the case, connecting the Printer to the correct network can fix the issue, however, if you are still facing the error, try the 4th method.
Method 4: By Sharing Printer Through Computer
This method is applicable to those who are using non-network based printers connected to a computer. For such printers, you would need to turn on the sharing option, so that others can use it. So, if you have a Printer that does not connect via WiFi or Ethernet, you can share the printer only when you turn on the sharing option. Let’s see how to enable Printer sharing.
Step 1: Press the Win + I keys together on your keyboard to open the Settings window.
Step 2: In the Settings window, go to Devices.

Step 3: In the Devices window, select Printers & Scanners on the left.
Now, go to the right side of the pane, select the Printer and press the Manage button below it.

Step 4: In the next window, under Manage your device, select Printer properties.

Step 5: In the Printer Properties window, go to the Sharing tab. Check the box next to Share this printer and then create a Share name.
Press the Apply and then the OK button to save the changes and exit.

Your printer will now be available to connect with all the computers in the same network. But, if you still encounter the error, follow the 5th method.
Method 5: Verify the Firewall Settings
Step 1: Click on the Shield icon on the bottom left your Taskbar to open the Windows Security settings.

Step 2: In the Windows Security settings page, click on Firewall & network protection.

Step 3: Next, in the Firewall & network protection window, select Advanced settings.

Step 4: As the Windows Defender Firewall with Advanced Security window opens, select Inbound Rules on the left side.
Now, on the right side of the window, find the File and Printer sharing group and check the Status (if anything is blocked).

Step 5: Same way, check for Outbound Rules. Click on Outbound Rules on the left and on the right side, check if there is anything blocked for the File and Printer sharing group.

While one of these methods can fix your Printer issue in Windows 10, you can also reset the Windows Firewall settings to default. However, it’s still recommended to make sure if the Printer or the Network is ON and not turned off.