The compression and extraction process is a part of file sharing over multiple platforms. But sometimes while extracting the compressed file, you may encounter an error message stating ‘Windows can’t complete the extraction process’. If you are don’t worry. There are a variety of possible reasons for this issue. It may be the destination folder or the zipped file itself can be a damaged one.
Preliminary workarounds
1. Restart your PC. After rebooting try the extraction process again.
2. There is a chance the file is corrupted itself. Download another copy of it and try again.
Fix 1 – Extract the file in a protected area
Extracting the data in a subfolder of your C: directory (like- Downloads, Documents, etc) should fix the issue.
1. Go to the location where the zip file is on your computer.
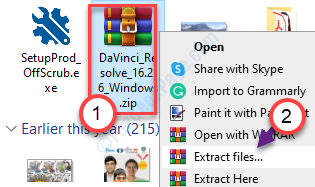
2. Right-click on the zip file and then click on “Copy“.

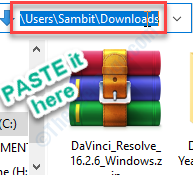
3. Now, navigate to this location on your device-
C:\Users\%username%\Downloads
4. Press ‘Ctrl+V‘ to paste the folder here.

4. Now, right-click on the zipped file and then click on “Extract here…“.

5. Choose the location where you want to extract the file.
6. Click on “OK“.

Check if this works.
Fix 2 – Rename the file
Sometimes a longer file may cause the problem. Try giving a shorter name.
1. Access the zip file.
2. Right-click on the zip file and then click on “Rename“.

3. Name the file as “abc.zip“.

4. Try to extract the file again on your computer.
This should fix your issue.
Fix 3 – Perform a clean boot
Perform a clean booting your computer
1. Simply, right-click on the “Windows icon“. Then, click on the “Run“.
2. Write “msconfig” and click on “OK“.

3. In the System Configuration window, go to the “General” section.
4. Just click on the radio button beside the “Selective startup” option.
5. Next you need to check the box beside the “Load system services.

6. Click on the “Services” tab.
7. Do not forget to check the “Hide all Microsoft services” box.
8. Finally, to disable the third-party drivers on your computer, you have to click on “Disable all“.

12. Simply click on “Apply” and “OK”.

Restart your PC to boot it with only necessary drivers.
After rebooting your computer, try to extract the file again.
Fix 4 – Run SFC and DISM scan
1. Press the Windows key+S. Next, write “Command Prompt“.
2. Soon, right-click on the “Command Prompt” in the search result. After that, click on the “Run as administrator“.

3. When you reach the Command Prompt, run a System File Checker (SFC) scan just by typing this command and followed by a press on the Enter key.
sfc /scannow

This process may take 2-5 minutes.
4. In case of sfc scan doesn’t find any error, run the DISM scan.
DISM /Online /Cleanup-Image /RestoreHealth

After that, close the CMD window.
Restart your system and give the extraction process another try.
This should solve this issue.
Additional Tip –
1. Use the File compressing software on your computer fails, use other compressing tools. We have curated a list of compressing tools in this guide.