Are you seeing the ‘Atibtmon.exe’ run time error whenever you unplug your laptop from the power source? This peculiar error rarely occurs with laptops and associated with Microsoft Visual Libraries. If you are also facing this rare issue, there is nothing to worry about any further. You can easily fix this issue just by enacting these easy fixes on your computer. Try out these workarounds and check if these solve the particular issue on your computer.
Workarounds–
a. Restart your system, if you are seeing this error message for the first time.
b. Update your Windows 10 to the latest version.
Fix 1 – Modify Power Settings
This problem occurs due to misconfigured advanced power settings on your system running on ATI mobility chipsets.
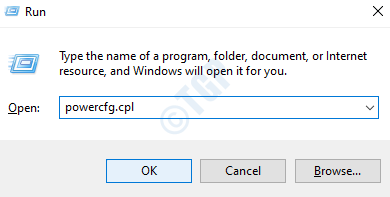
1. At first, you need to right-click on the Windows icon and click on the “Run“.
2. After that, paste this code and just click on “OK“.
powercfg.cpl

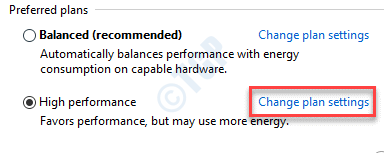
3. After that, click on the “Change plan settings“.

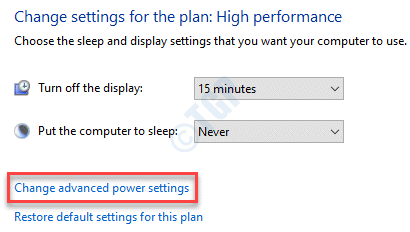
4. Again you have to click on “Change advanced power settings“.

5. Look out for the “ATI Powerplay settings“. Expand it.
Note: – Some user may not have ATI Powerplay option, in that case directly go to step 9.
6. You will notice ‘Plugged in:’ settings and the ‘On battery:’ settings.
7. You just have to set the ‘On battery:’ settings to “Maximum Performance“.

8. Just click on “OK” to save this change.
9. Also, Click on PCI Express.
10. Click on Link State Power management.
11. Choose maximum power saving from dropdown in settings.

This should fix the problem you are facing with your system. Restart the computer and unplug it again.
Fix 2 – Disable Vary-Bright
It seems that the variable brightness setting is causing the issue on your computer.
1. Open the AMD Pro Controller Center.
(If you don’t have it on your system, you can easily download it from here. )
2. Once it opens up, go to this location –
Power > PowerPlay
3. Then, just uncheck the “Enable Vary-Bright” option.
This will save the settings not to vary the display brightness on your system.
Fix 3 – Rename the Atibtmon.exe
You can rename the Atibtmon.exe on your computer or delete it from your system.
1. Press the Windows key along with the ‘E‘ key.
2. In the File Explorer window, go to this location –
C:\Windows\System32
3. Look for the “Atibtmon.exe” in the folder.
4. Right-click on the application and click on “Rename” to rename it.

5. Simply put a ‘–‘ before the name of the application.
6. Click on “Yes” to confirm any prompt that appears on your screen.
After renaming the file you just need to reboot your computer to complete the process.
NOTE–
1. If renaming the application doesn’t work out you can do this –
a. Open the File Explorer and go to the location of ‘Atibtmon.exe‘ on your system files.
b. Right-click on the “Atibtmon.exe” and click on “Delete” to delete it from your computer.

This has fixed the issue for many users.
2. Some users have also claimed that the issue has solved by moving the original ‘Atibtmon.exe’ file from the system files and restarting your system after that.
Fix 4 – Run SFC scans
1. Click on the search box and start to write “cmd“.
2. Further, right-click on the “Command Prompt” and click on “Run as administrators“.

3. Paste this code in the terminal. Thereafter, hit Enter to run the scan.
sfc /scannow

SFC scan will commence.
4. To launch a DISM scan, write this command in the CMD terminal and then hit Enter.
DISM.exe /Online /Cleanup-image /Restorehealth

These processes may take a while to complete. Test it out.
Fix 5 – Check with Automatic Repair
Startup repair can scan and fix this issue on your system.
1. Just press the Windows key+I keys together.
2. Then, click on the “Update and Security“.

3. On the left-hand side, click on “Recovery“,
4. Now, in the “Advanced Startup” section, you need to click on “Restart Now“.

5. Just like before, click on the “Advanced options“.

6. Henceforth, click on the “Troubleshoot” to troubleshoot the booting issue.

7. Again, click on the “Advanced options” to see the advanced options on your computer.

8. To start the startup repair, click on “Startup Repair”.

Once you have started the startup repair process, it will scan and fix the Atibtmon.exe issue upon unplugging your system from the connection.